From Save the Cake! Bright Owl Books, Kane Press: 2019
Learning to read can be painstaking. Memorize the letters, string them together, recall the sounds, then run everything together until it makes sense. Early reader books are essential for this learning, but they can also seem a bit babyish with their simple stories and illustrations. At least, that’s what my son expressed to me as he struggled to read. And I had to agree with him.
Then I discovered Molly Coxe.
Molly has produced a terrific set of “Step Into Reading” books with Random House (Big Egg, Cat Trap and Hot Dog, are a few titles). But the series that really puts a smile on my face – and makes my creative mind go whoosh! – are with Bright Owl Books and Kane Press. With titles like Rat Attack, Blues for Unicorn, Go Home Goat, and Save the Cake, Molly presents clever, engaging stories with developed characters and perfect timing. Equally magnificent are her illustrations, which are needle felt characters photographed on live sets. Outdoor sets, to boot! With real snow, dirt, flowers, and water! Your eyes feast on the page, drinking up the colors, textures, and balance.
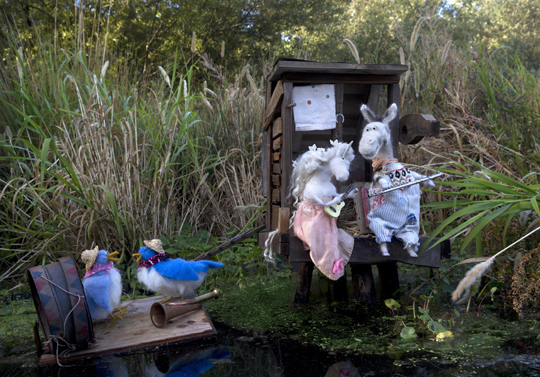
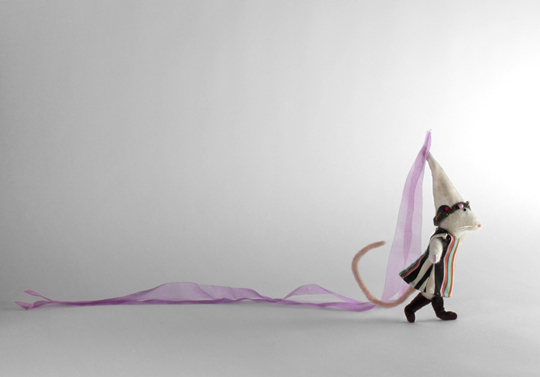
From Blues for Unicorn, Bright Owl Books, Kane Press: 2019
With her thoughtful stories and exquisite images, Molly’s books are the perfect building block towards growing a happy, appreciative and competent young reader.
Please tell us a little about yourself!
I grew up in Georgia during a simpler time. Lots of free, unsupervised hours on my hands, lots of trees to climb, streams to explore, simple materials to make things out of, post WW2, parents who were not intrusive or worried, said “Have fun! See you at dinner!”
How did you first start writing early reader books?
I was teaching preschool in New York City, after a year and a half in art school, following college. I loved making up simple impromptu stories for four year olds. They loved writing (dictating) simple, impromptu stories. (Shout out to Vivien Gussin Paley, who has written extensively on the magic of this storytelling process in a classroom.) When I worked on my first early readers, I had two kids in the demographic, a built in, very honest, test audience. That helped. Also, my brain thinks well in short sentences.
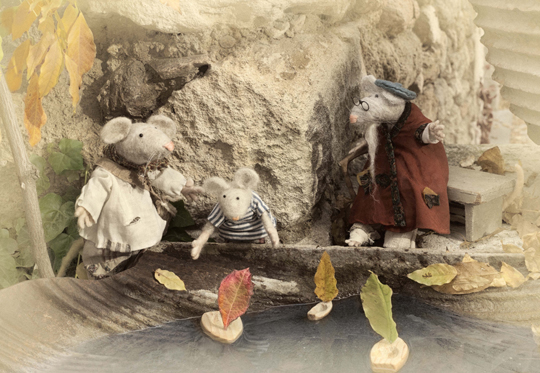
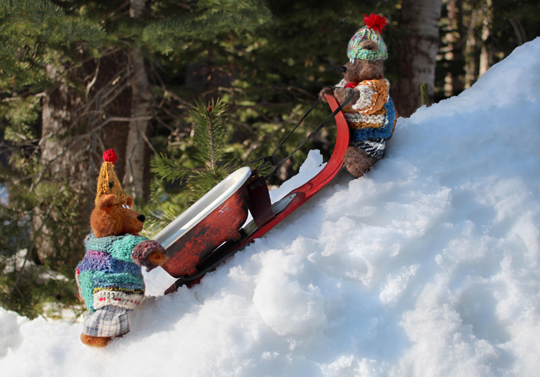
From Rat Attack, Bright Owl Books, Kane Press: 2018
Early readers are obviously limited in their length and complexity. What’s your philosophy when creating your stories?
Try to tell a fresh, surprising story with very few words. Easy words! Let the images do a lot of the work. Funny is good.
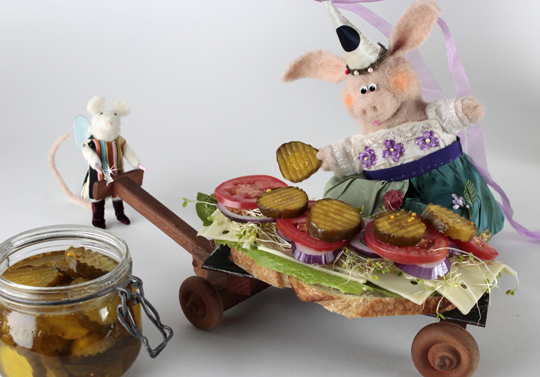
From Princess Pig, Bright Owl Books, Kane Press: 2018
You illustrate your books, as well as sculpt needle felt characters. Is the creative process the same? Or does it feel very different?
Yes, the media are different but the goal is the same: tell a story in words and pictures. Both are great fun. Some stories, like the Beginner Book for Random House, seem to call for a flat, graphic approach. At the moment, I’m enjoying building three dimensional worlds, like scenes from miniature epics.
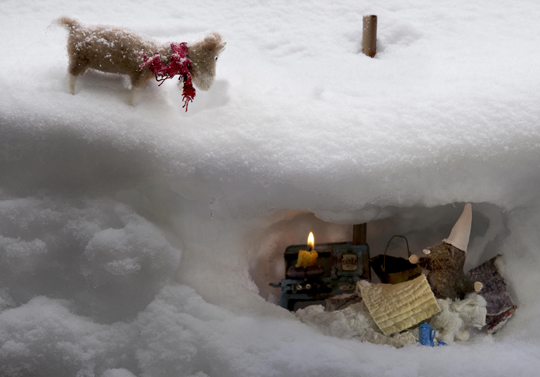
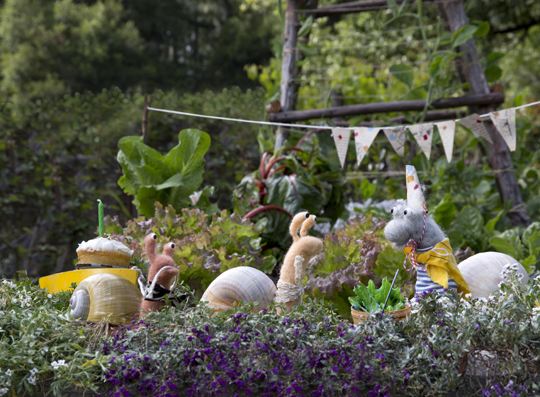
From Go Home, Goat, Bright Owl Books, Kane Press: 2019
What comes first, the story, or your photographic illustrations?
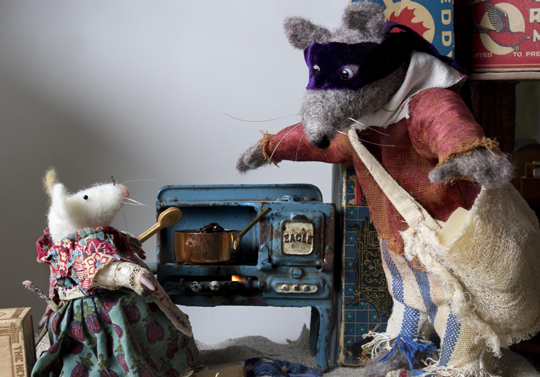
Depends. With early readers, the words come first. I have to make sure I can tell a lively story before I spend the time with illustrations. For my current picture book project, which has more text, the idea began with a rustic, antique dollhouse kitchen that my mom found in a rural village in France. What could happen there, I wondered? Whose kitchen is it? Your imagination, and your heart, take over.
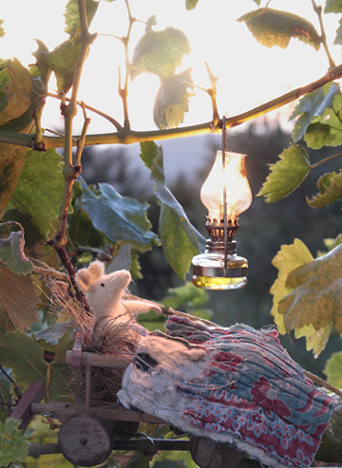
A work in progress, courtesy of Molly Coxe
Please tell us a little about your needle felt creations!
This is a process of discovery, beginning with a wire armature. It’s very exciting! As you apply wool to the armature, the character (always an animal, in my case) starts to speak to you, and you follow your intuition until he/she has a personality and starts to come alive. I know: that sounds weird, but it’s true. The character then influences the story, which is already at least partly written. You realize this character might do things differently. You aren’t totally in charge any more.
From Princess Pig, Bright Owl Books, Kane Press: 2018
Describe the process of building a scene and photographing it.
So much fun. Imagine being a seven year old outside in the woods with a pile of sticks, leaves, rocks, dirt. It’s just like that, but with a wider range of materials, and slightly more sophisticated tools. (Only slightly: I restrict myself to low tech solutions that I can pull off alone, for many reasons. One is that it’s hard for me to stay in a flow when I am interacting with others.) Photography is all about light–once you have a decent composition, and the characters are expressing the action and the emotion. Mostly this means getting up very early, and being very patient, hanging out in a pond with minnows nibbling your legs until the morning sun comes over the hill and just kisses the characters and the foliage, and the mule shack in a way that creates magic.
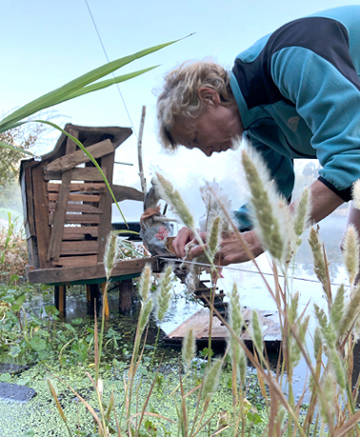
Molly Coxe at work, courtesy of the artist
What’s the strangest, or most difficult thing you’ve worked with when composing a scene?
A blizzard at 6,000 feet, working on Cubs in a Tub. You have about ten minutes before your fingers freeze solid, and you can’t operate the camera any more, your characters hat gets swept off a cliff by a gust of frigid wind (I climbed down and got it, by the way. Very unwise, but exhilarating). When you are trying to create dramatic images, real life drama helps. You have to snag the moment, not worry about every little thing being “perfect”.
From Cubs in a Tub, Bright Owl Books, Kane Press: 2018
How did you create the rain effects in Wet Hen? Those images are amazing, and in some cases, characters are floating on water!
A hose propped up on ladders. That was such a good time. Midsummer. Hot! But you had to get the image in the first couple of trys. Otherwise, the characters were too soaked, had to dry out for rest of day, try again next, when the light was nice again. The floating scenes were very dicey. Lots of fishing line holding things up from above. I asked my daughter, with whom I have a fair degree of mind meld, to help create the giant wave with a paddle, while I took the photo. We got it on first try.
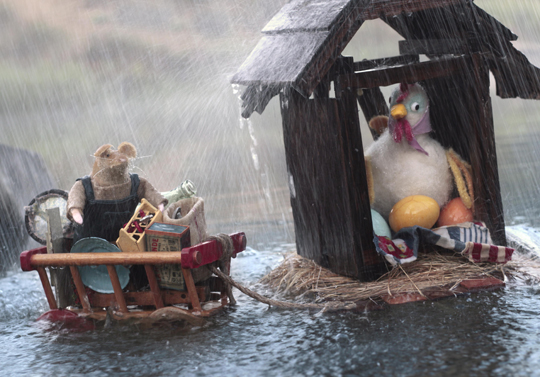
From Wet Hen, Bright Owl Books, Kane Press: 2018
I absolutely love the Story Starters at the end of each book. Do you, or the publisher, come up with the prompts?
I come up with them, with the help of wonderful editors. Great editors make all of the text so much better. Shout out to my editors!!!
From Wet Hen, Bright Owl Books, Kane Press: 2018
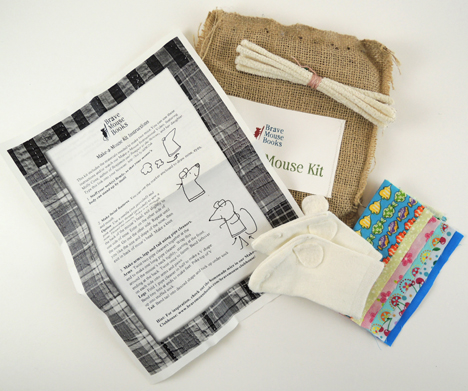
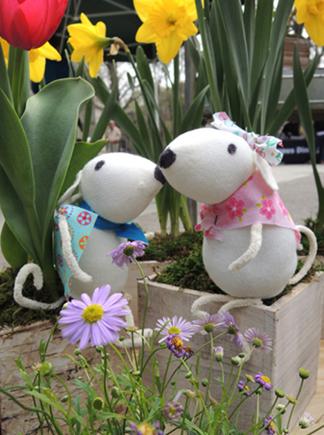
Molly also does creative work with kids, and was kind enough to send me one of her fabulous “Make-A-Mouse” kits. It arrived in an adorable stitched burlap bag and included all the materials to make 2 sock mice (and did you notice the little socks came with pre-stitched felt ears?). Not pictured below was the polyester fill stuffing. Molly thought of everything!
 I won’t be able to match Molly’ magnificent sets, but I was inspired to snap a photo of my two completed mice at a local farmers market:
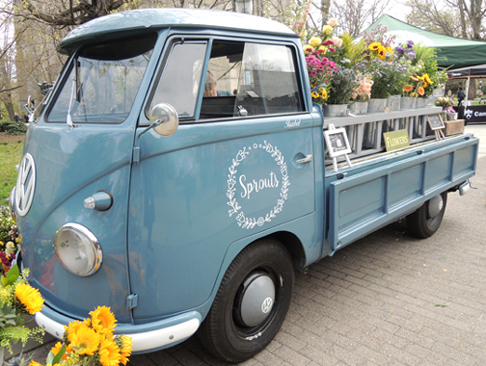
 Many thanks to the folks at Sprouts, who were kind enough to let me photograph their wares. And check out Isabel the farm truck. Doesn’t she look like a piece of one of Molly’s sets? I’m half-expecting a needle felt pig to appear in the driver’s seat and give a wave!
Many thanks to Molly for the kit, and for just being so darn awesome. Both as a caring writer and an artist to look up to. May your days be full of inspiration and perfect lighting!
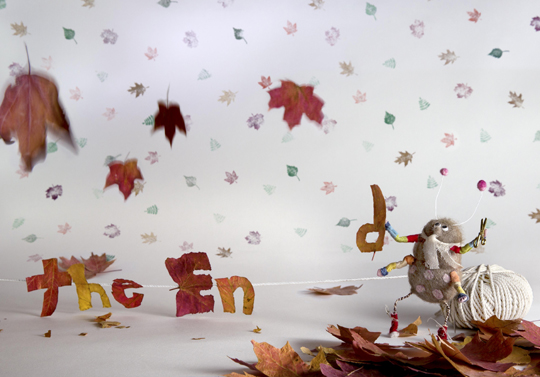
From Greedy Beetle, Bright Owl Books, Kane Press: 2019
All images used with permission of Bright Owl Books, Kane Press, and Molly Coxe.

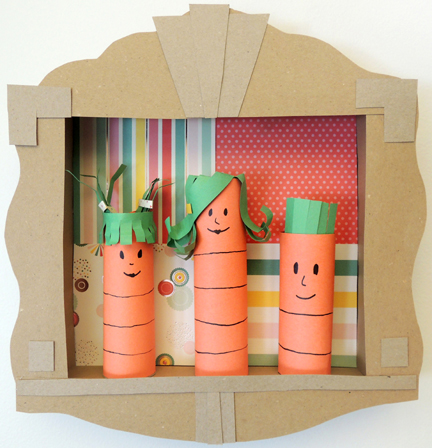 This handsomely framed three-dimensional portrait is a must for any home. And if you want to portray your sweet little family as carrots, well why not?
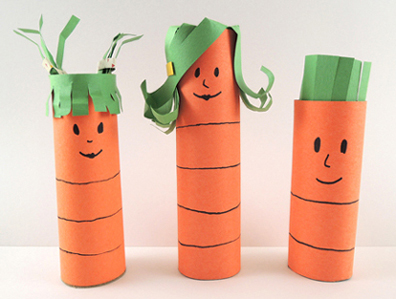 The frame is a box cut down to 2″ deep. We decorated the back of our frame with patterned paper (but you can also have kids draw the background on with markers). Next, we offered different brown poster board shapes to glue around the edges of the box:
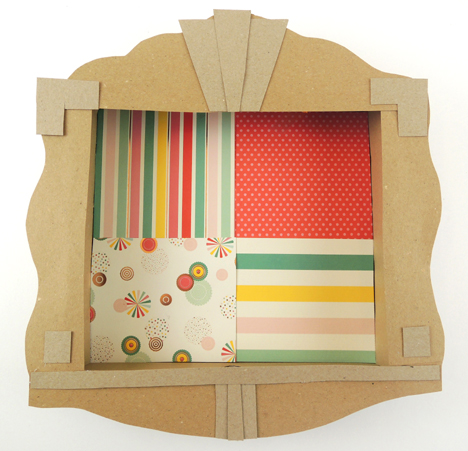 To hang the frame, twist a pipe cleaner into a loop, then attach it to the top of the box with tape. Want to make it extra secure? Cut a slit in the top of the box, thread the pipe cleaner ends through the slit, then tape them to the interior top of the frame. Here’s a shot of our frame from the back, hanging loop in place:
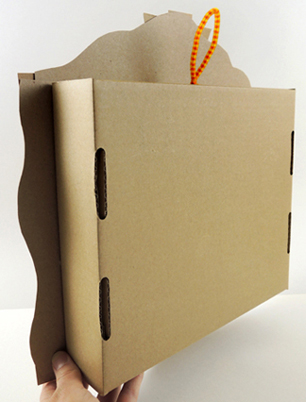 Hang your frame in your favorite room of the house, place your little family inside it, and feel the love!
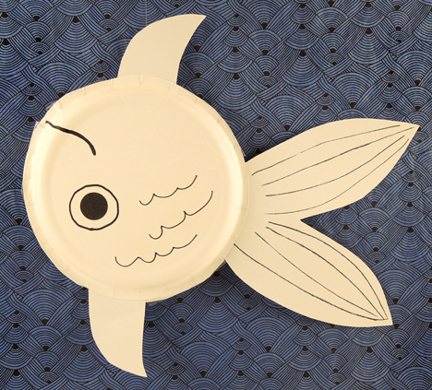 After spotting the fabulous upside down goldfish ghost
 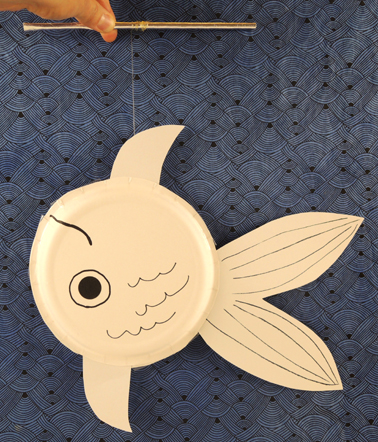 To make the marionette, trim the outside perimeters off 2 paper plates. Use marker to draw eyes, a mouth, and scales on the plates.Next, tape a white construction paper tail and fins to the inside of 1 plate.