 Let this Sous Chef Souris help you make delicious pies! Your miniature kitchen has everything you need for creative baking – mixing bowls, wooden spoons, cutting board, rolling pin, pie pans, fresh felt ingredients, and, of course, matching chef hats!
We read Tiny Pie, written by Mark Bailey and Michael Oatman. Illustrated by Edward Hemingway (Running Press Kids, 2013). It’s past her bedtime, but little Ellie the elephant is hungry. She’s too short to reach the kitchen counters or open the fridge, but she can peep through that interesting mouse hole in the wall. There, she discovers a mouse cooking show in progress inside, complete with cameras and studio audience. It’s tiny pies, big flavor, for Ellie and her new mouse friends!
You’ll need:
- 2 small boxes (more on box specifics below)
- 1 cooking show sign template, printed on 8.5″ x 11″ white card stock
- 4-5 clear plastic sample cups
- A piece of tagboard or brown poster board
- Small pieces of brown and red felt
- 4-5 blue mini pom-poms
- 1 drinking straw
- 1 snippet of bubble tea straw (approximately 2″)
- 2 miniature aluminum pie tins
- 2 paper muffin cups
- 1 toilet paper tube
- Grey and white construction paper
- 1 pink mini pom-pom
- White poster board
- 1 white facial tissue
- 1 piece of white tissue paper
- Scissors and tape for construction
- Markers for decorating
- Hot glue
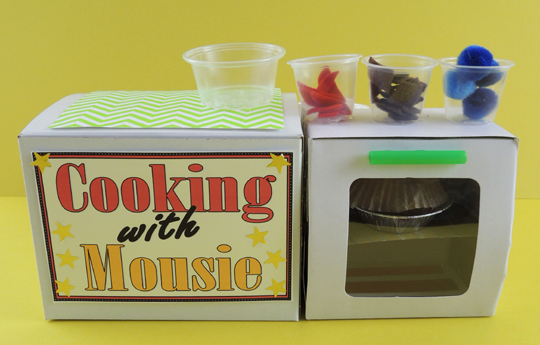
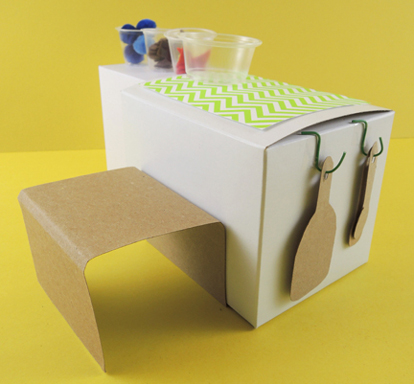
The cooking counter consists of 2 parts. Part 1 is a 6″ craft box work counter (that’s where the sign template goes – don’t forget to add your name to the sign!). Part 2 is the oven. We used a 4.5″ “White Cupcake Box” from Oriental Trading Company ($5 a dozen) as our oven. Why? That cute little window in the top! It makes a perfect oven door. Add a 2″ bit of drinking straw as an oven handle, and you’re ready to bake!
Inside the oven, we fashioned a little shelf out of tagboard (poster board works too), and and added some red mirror board heating elements:
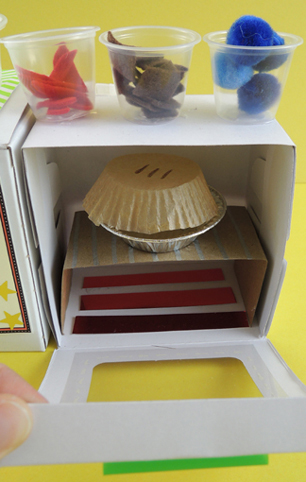 On top of the cooking counter is some patterned paper, as well as 4 clear plastic sample cups. 3 of the cups were stocked with pie fillings: red felt apple slices, brown felt chocolate, and mini pom-poms blueberries. The 4th cup is the mixing bowl.
To give the mouse chef a little boost, we had to add a tagboard “stool” to the back of the cooking counter. You can see it in the photo below, along with some twisteez wire hooks we added to the sides to hang your utensils (you can also use paper clips).
Here are more kitchen goodies:
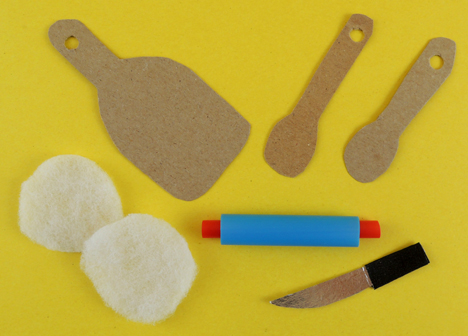 The cutting board and wooden spoons are tagboard. The knife is a little piece of silver mirror board with a black masking tape handle. Those two white circles are polyester batting “pie dough” for the mixing bowl, and the rolling pin is a 2.25″ snippet of bubble tea straw with a 3″ piece of drinking straw threaded into it.
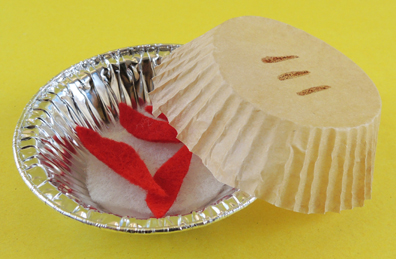
The pies are mini aluminum pie pans with a circle of fabric batting dough tucked in the bottom. Top if off with some felt or pom-pom ingredients. The crust is a trimmed-down muffin baking cup top.
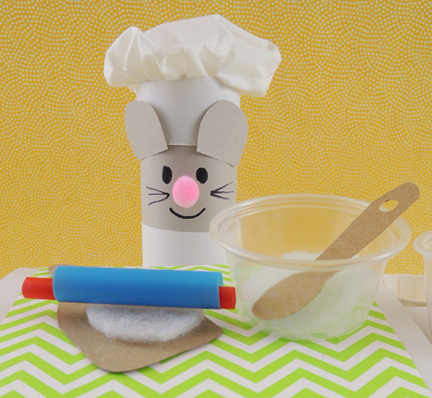
 The toilet paper tube mouse is sporting a chef hat made from construction paper and a bunched up facial tissue.
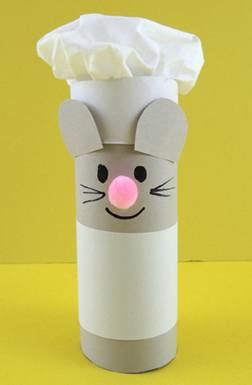 Your chef hat is made out of cardboard and white tissue paper. Instructions for making it can be found in this post. It only occurs to me now, looking at the photo. This chef hat TOTALLY needs a pair of grey construction paper mouse ears.
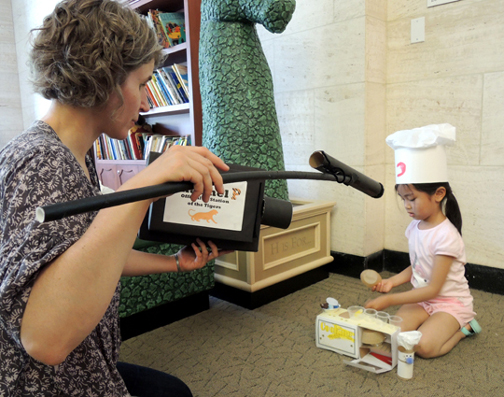
 When the kitchens were finished and the chefs were ready, we brought out our camera equipment (learn how to construct it here) and filmed a number of pie-themed cooking shows. Chocolate appeared to be the pie flavor of the day. And with good reason, amiright? Nom nom.
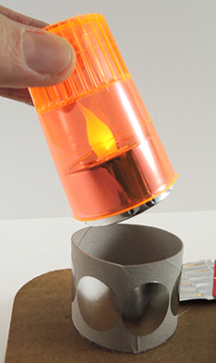
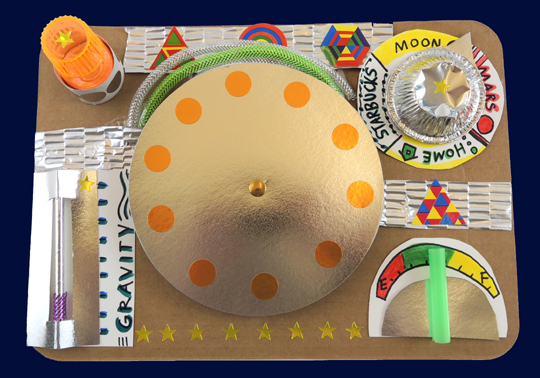 Three, two, one…blast off! We head to the moon using this rocket ship dashboard, which includes a custom steering wheel, fuel gauge, gravity level, destination dial, and flashing light. This was a special story time for the
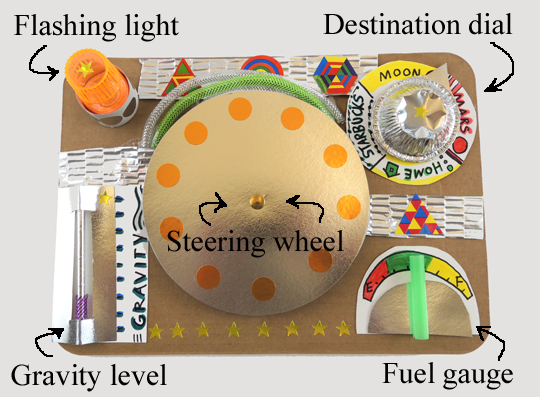
 The steering wheel is 2 silver circles hot glued together and then attached to the dashboard with a longer, 1.5″ brass fastener (or use a bit of
 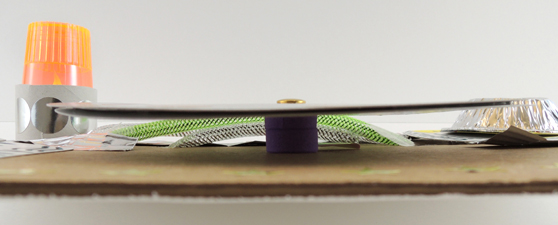 We also had markers, silver foil paper, mesh tubing, foil star stickers and geometric stickers on hand for decorating. The geometric stickers are “Funky Geometric Shapes Rolls of Stickers” from Oriental Trading Company (6 rolls of 900 stickers are $10).
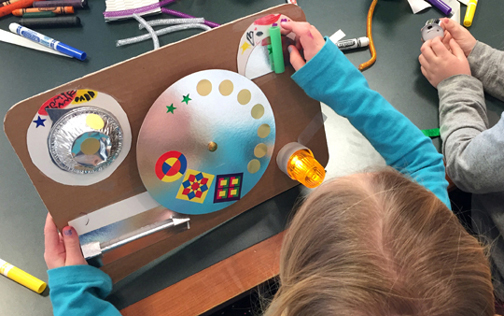
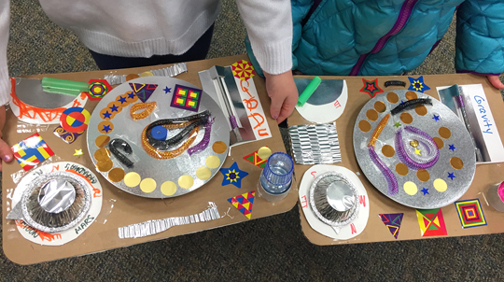
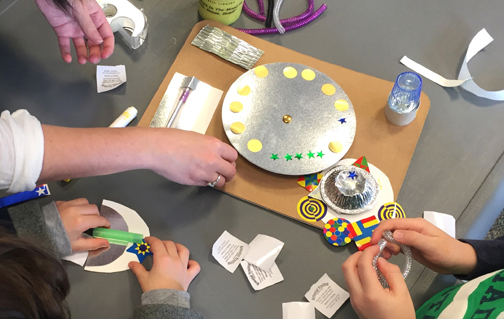 Once the decorating was done, we fired up ye
 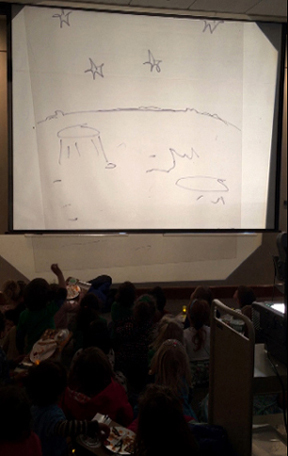 This story time was hosted by the public library in Bernardsville, New Jersey. Look at their charming children’s section, which was the gift of Estella and Jay Parsons:
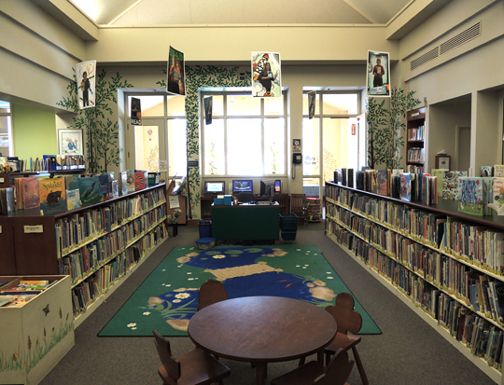 It’s full of beautiful hand-painted trees, botanical touches, and forest animals. Look at the deer standing next to the little wicker chair in the corner!
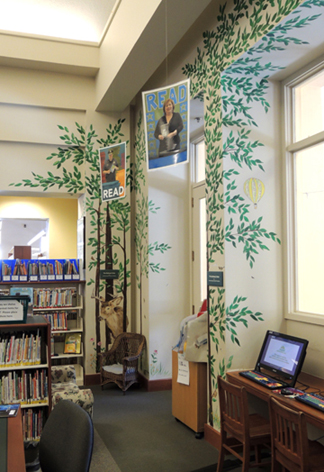 This little singing bird is Katie’s favorite:
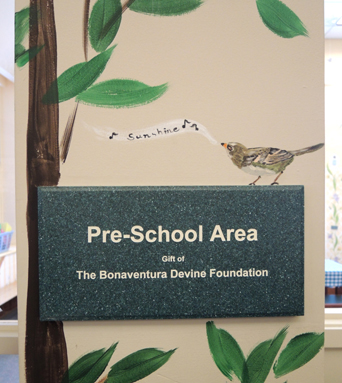 The preschool area (a gift of the Bonaventura Devine Foundation) continues the outdoor theme with picnic-style activity tables with cute gingham covers and buttery sunshine-colored walls.
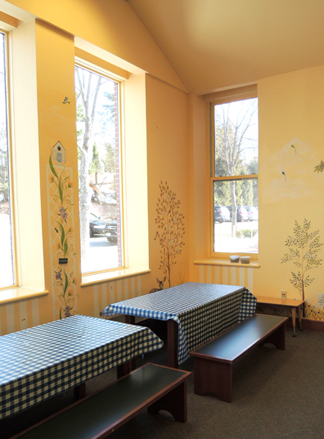 Here’s my favorite touch, however. The “Please Disturb” sign on the reference desk!
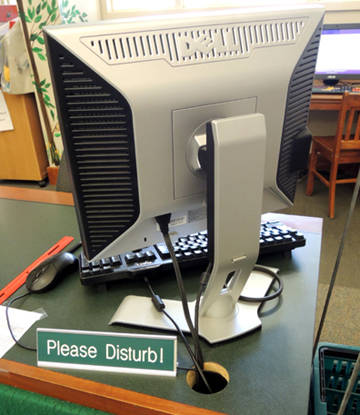
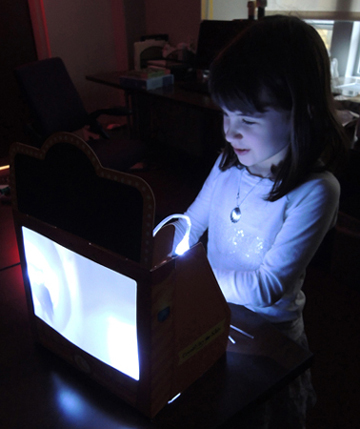
 Teachers, parents, and librarians, lend me your ears! Today, I present Shadow Puppets Theater by Creativity for Kids, the one stop shop for hours of imaginative narration and story building. Get thee hence and acquire one!
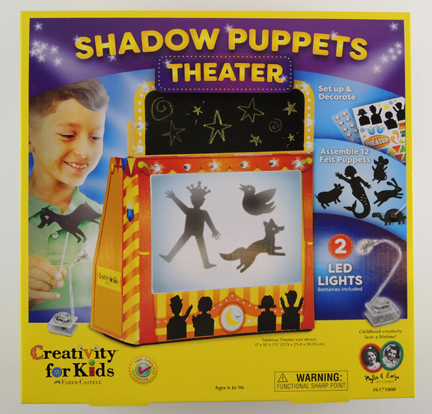 The kit retails for around $20, and is intended for ages “6 to 96.” It contains a theater, a detachable chalkboard marquee, 1 piece of yellow chalk, stickers, rhinestones, 10 felt animal puppets, 2 felt people puppets with accessories, 15 metal brads for the jointed puppets, 12 puppet holders, 8 puppet sticks, and 2 LED lights (batteries included!).
 One of the frustrating things about toy puppet theaters is how flimsy the stage is, and how the slightest nudge will send it tumbling. Not this one! It’s made out of very sturdy cardboard. A few basic folds, and the stage is ready to go, anchored in place with some very helpful velcro fasteners.
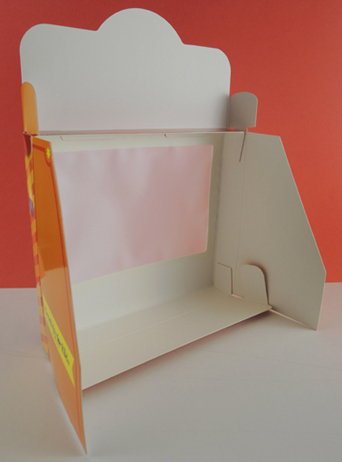 There’s also a detachable chalkboard marquee for the top, which is super cute. Also, unlike some of the cheaper cardboard chalkboards, the chalk wipes off cleanly and easily with a dry paper towel.
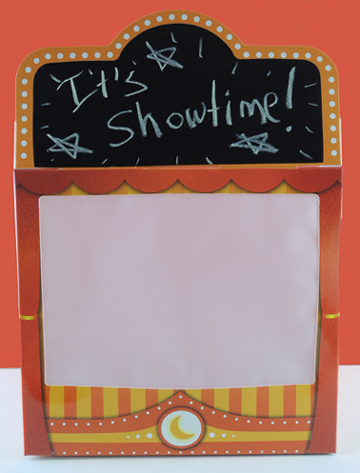 Also included are some terrific stickers and clear rhinestones (yes!) to decorate the front of the theater. They are easily removable, so you can change your theater’s look. The stage’s screen is thick, high quality, and securely mounted (because there’s nothing sadder then your screen buckling, tearing or falling off during a performance).
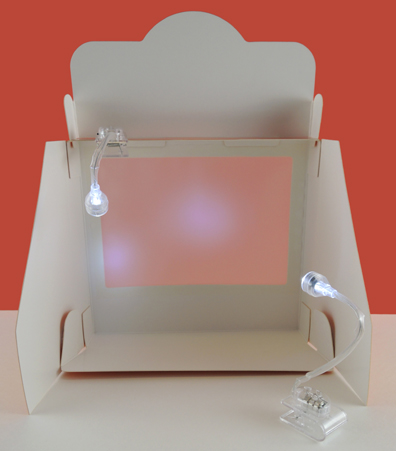 Their illumination power is fantastic. No matter what configuration we put the lights in, we got great shadows and and a well-lit screen.
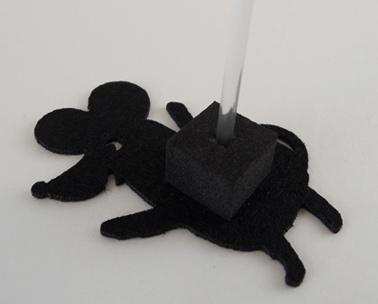
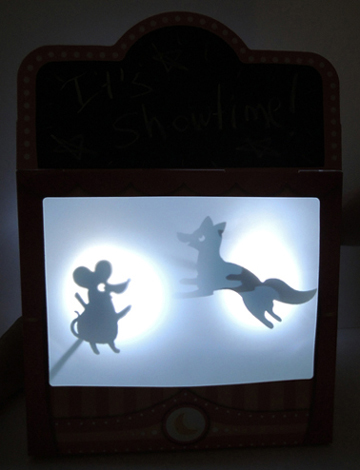 The puppets? They totally rock. Look at them! The mouse! The owl! The happy pig!
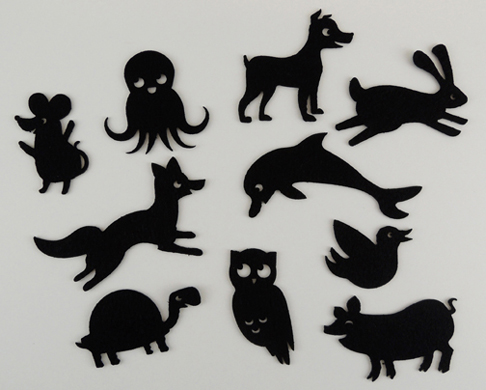
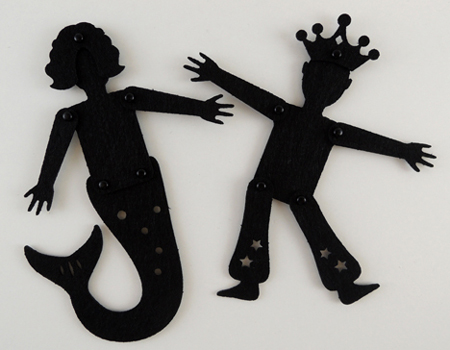 I only have one quibble with this puppet theater kit. There are 12 puppets in the kit, but only 8 sticks! The instructions say to swap out the sticks during the show, but that somewhat breaks the flow. I made a couple extra out of a