
 Get your piping hot hamburger, crispy crinkle fries, and ice cold soda served over the counter of this awesome 1950s diner! The cook is taking orders, and our fun matching game insures that your customers will get exactly what they like.
We read Hamburger Heaven by Wong Herbert Yee (Houghton Mifflin, 1999).
Every Friday after school, Pinky Pig works at Hamburger Heaven. She’s saving for a new clarinet. But slow business means that Pinky might soon be out of a job! Instead of despairing, she gets to work, asking different animals what they like to eat. She puts together a new menu and then papers the town with ads for Hamburger Heaven’s new offerings. That Friday, a huge line of customers is waiting to try burgers with pine needles, burgers with worms, burgers with beetles, burger with slugs, snails, stinkbugs, crickets…there’s something for everyone! Hamburger Heaven is back in business, and Pinky’s clarinet dream becomes a joyful reality.
You’ll need:
- 3 paper bags
- 3 small plastic cups (ours were 5oz)
- Brown, yellow, and orange tissue paper
- 2 drinking straws
- 3 pieces of white card stock (approximately 4.25″ x 5.75″)
- 3 jumbo craft sticks (mine were 8″ long)
- Brown, green, orange, red, and tan construction paper
- A 1950s diner (more on this later!)
- Scissors and tape for construction
- Markers for decorating
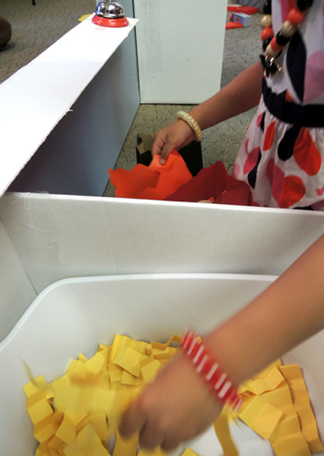
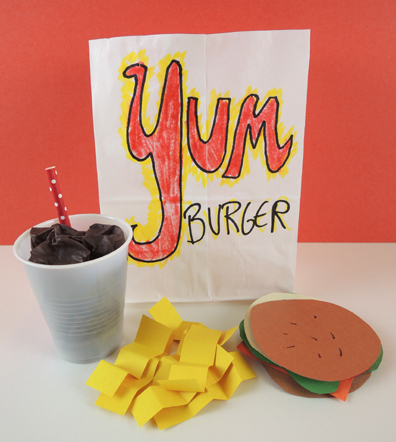 This project consists of 3 paper bags, 3 sodas, 3 sets of fries, 3 burgers, and 3 “customer cards.” First, cut the paper bags down to 7″, then decorate the fronts with your restaurant’s logo. To make the soda, squish three, 9″ x 13″ pieces of tissue paper into 3 small plastic cups. Add a half of a drinking straw to each cup (our straws were 4′ long). For the fries, accordion fold 1″ x 3″ pieces of yellow construction paper. We’ll get to the burgers in just a moment.
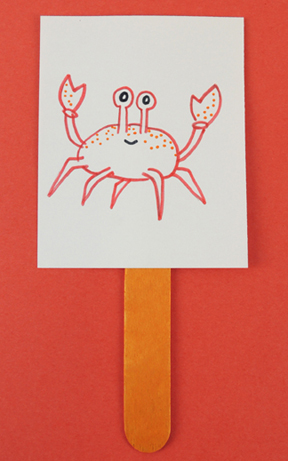
In addition to the play food, this project is also a game in which you match individualized burgers to pictures of your customers. To make the “customer cards,” draw 3 creatures on 3 pieces of white card stock. Then tape each “customer card” to a jumbo craft stick, like so…
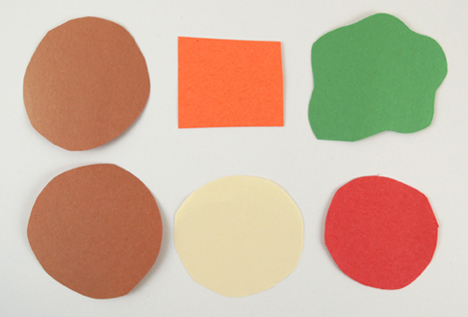
 Now for the matching burger! Each burger consists of 6 pieces of construction paper: 2 brown buns, 1 slice of cheese, 1 lettuce leaf, 1 tan burger patty, and 1 tomato slice. Since you’re making 3 burgers, you’ll need 3 sets of those 6 pieces.
 To customize the 3 burger patties, draw what each creature eats on a patty. For example, one of our creatures is a crab. Among other things, crabs eat fish parts and algae. So we drew them on the burger patty (here’s a creature diet information sheet we posted during story time to help kids).
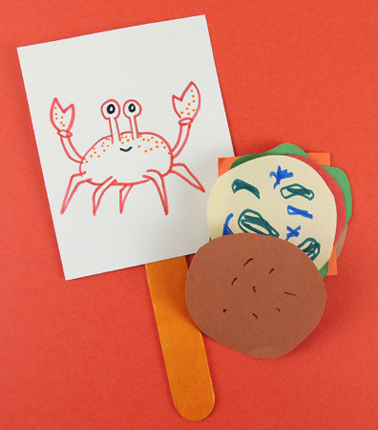 Use tape loops to stack and secure your burgers (just make sure you can lift the bun a little and see what you drew on the burger patty). We used a brown marker to add some “sesame seeds” on the top of the bun as well. Grab your food, and your customer cards, and head for the diner!
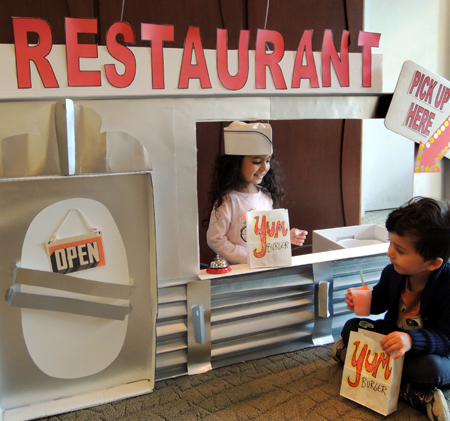
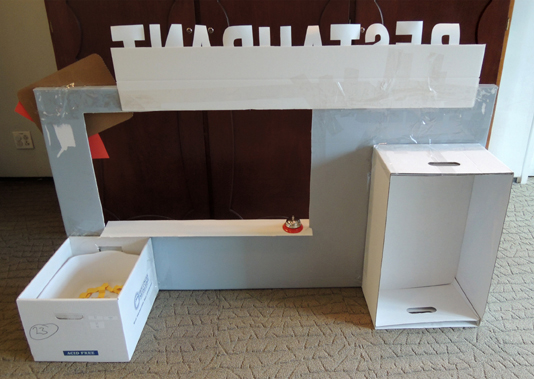
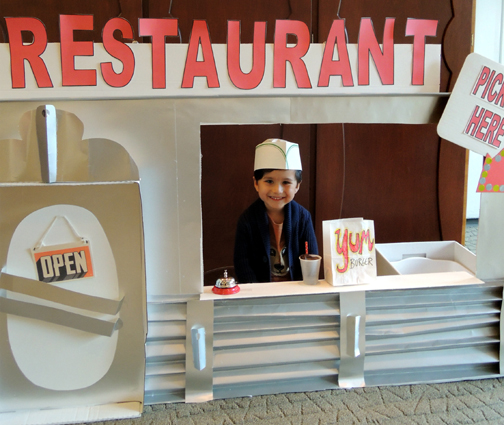
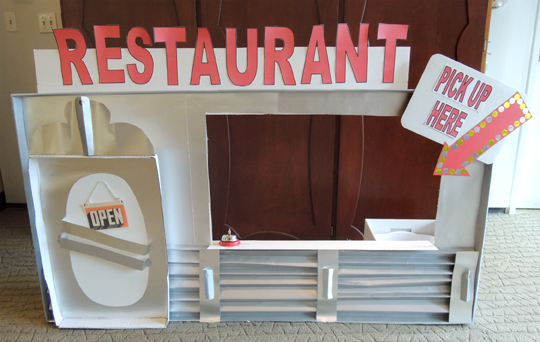 This diner is Marissa in all her awesomeness. The front is a recycled box lid (first used for this ice skating story time). The diner door is a recycled box lid. The whole thing is covered with silver metallic poster board. Just look at her fantastic metal corrugations on the front! The vintage “Open” sign on a string! The oval door with diagonal push bars! This has to be one of my favorite Marissa creations (after the pig marching band of course).
Here’s what the diner looks like from the back. In the box on the left you can see the crinkle fries loaded into the “fry basket.” We prepped the fries in advance, refilling the fry basket, as needed, during the matching game.
 If you don’t have time to make a diner, no worries. Use a tabletop, small desk, or even an overturned box! However, I do recommend including a counter bell (in the past, I’ve borrowed the bell from the library’s circulation desk). Since our bell was going to get repeatedly slammed by kids, I taped it to the counter. You might want to do the same.
Here’s how to play the matching game. Kids gave their grown-ups (or siblings) the 3 customer cards. Then they sat behind the diner counter, food at the ready. One by one, the customers “walked” up to the counter.
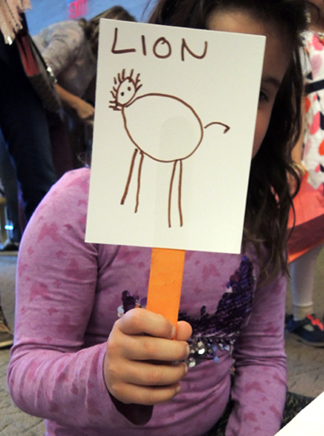 Kids matched the customer to the appropriate burger, took a drink order (we offered cola, lemonade, or orange pop), and grabbed a generous serving of crinkle fries.
 They bagged everything, briskly dinged the bell, and shouted “Order up!” Once that customer had left, it was on to the next customer until every creature had been matched to a burger. Did we have fun? Oh yeah! In fact, we left the diner up for 20 minutes after story time for repeat customers. There was lots of enthusiastic bell dinging and BIG smiles!
 Want to supersize that? Check out these giant burger relay races at our Cloudy with a Chance of Meatballs story time!
 Twirl, leap, coast and spin! The skating rink is open and you’re invited to strut your stuff, courtesy of a magnet attached to the bottom of a toilet paper tube skater. If things start to get a little chilly, glide through our cozy hot chocolate shack for a fill up!
 We read Little Red Gliding Hood, written by Tara Lazar, and illustrated by Troy Cummings (Random House, 2015). Little Red is a great skater, but her ice skates have definitely seen better days. When a skating competition is announced, along with a prize of brand new skates, Little Red is thrilled. Unfortunately, it’s a pairs skating competition, and she has no partner. Unfortunately, while searching for a partner, she encounters the Big Bad Wolf! After a face-paced and spirited chase across the ice, he finally catches her. But he’s not going to eat her…he just wanted to tell her that her laces were untied! Turns out the not-so-bad Wolf needs new skates too, and he’s a great skater to boot. The day of the competition, Little Red and the Wolf enter the completion. They put on such a great performance, the judges give them a perfect 10 and the grand prize!
 Next, use construction paper and markers to turn your tubes into a pair of ice skaters. In keeping with the book, one of our skaters was Little Red, and the other was the Big Bad Wolf. Katie put this adorable duo together, and added a bit of red ribbon for Red’s hood and the Wolf’s sash.
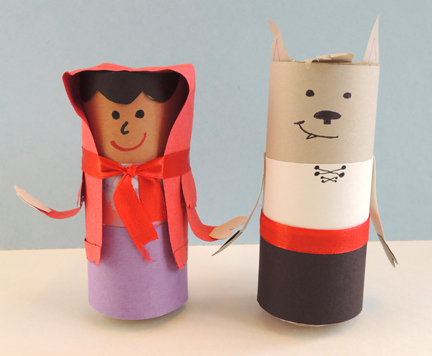 Hot glue a button magnet to the bottom of each tube.The bigger the magnet, the better the results on the rink! Our magnets were 0.75″ in diameter. We tried smaller ones, but they just couldn’t keep the connection.
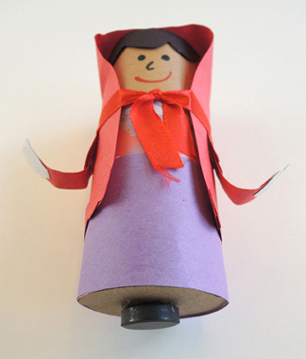 Next, hot glue button magnets to the bottoms of 2 corks (but test to make sure the skater magnets and the wand magnets attract before hot gluing them to the corks). We used champagne corks because they have a bulge at the bottom that was easier for little kids to grip. But wine corks work too.
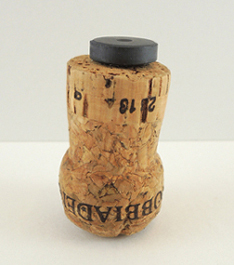 Now for the hot chocolate shack! Cut the bottom and 2 sides off a small tissue box. Your shack should have no floor, and the doorways should be tall enough for your skaters to glide through easily.
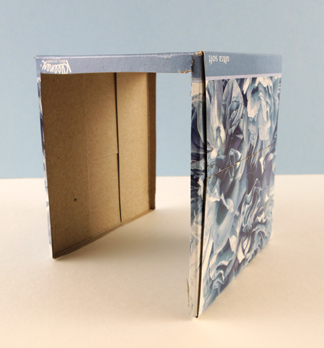 We used tagboard for the sides of the shack and the roof, but construction paper works too. Cut and color the sign and 2 windows from the shack template and attach them to the shack. We reinforced the sides of the box by gluing craft sticks on above and below the windows and on both sides of the doorways. The final touch – a chimney- is totally optional. Cut a
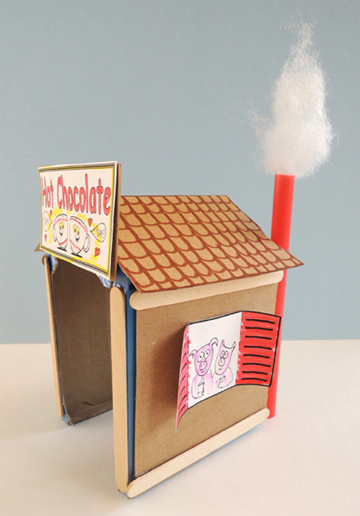
 Place your skater on the top of the box, then place your magnet wand underneath the box. The magnets will connect through the cardboard, and you can start skating!
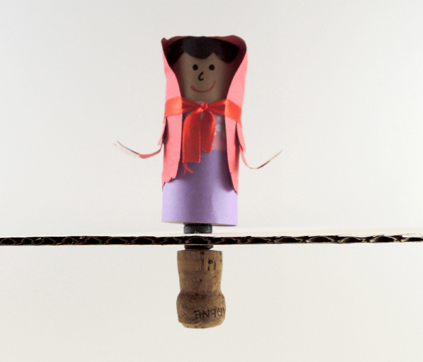 Plunk your hot chocolate shack down, crank up the Tchaikovsky, and skate!
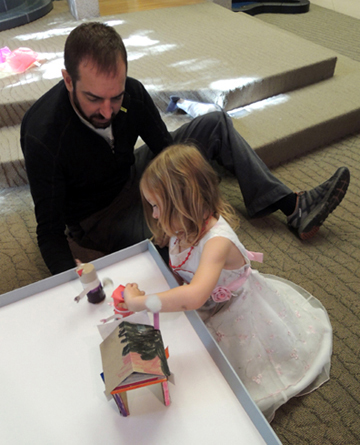
 When it’s time for your next library visit, perhaps you’d consider bringing a canary with you? I hear they’re friendly, quiet, and quite avid readers. Make a sweet little canary on a perch and a sparkly, decorative birdcage to go with it. And don’t forget that mini library book!
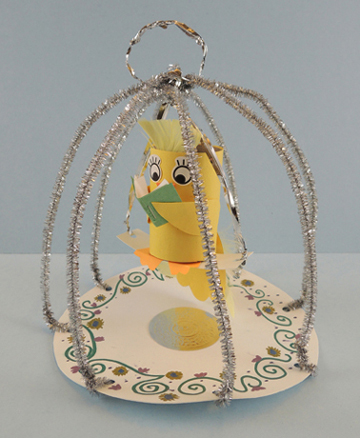 We’ll begin with the birdcage, and finish with the reading canary! Punch 8 symmetrical holes into a circle of poster board, then decorate the poster board with markers (we used Crayola metallic markers and they looked fantastic).
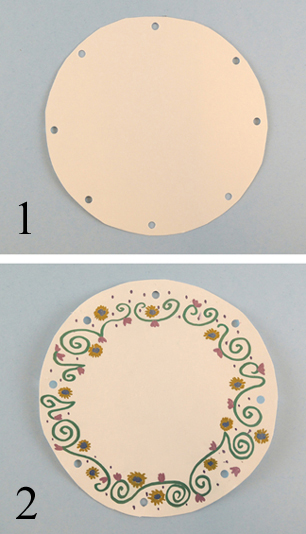 Wrap the ends of 8 sparkle stems through each hole.
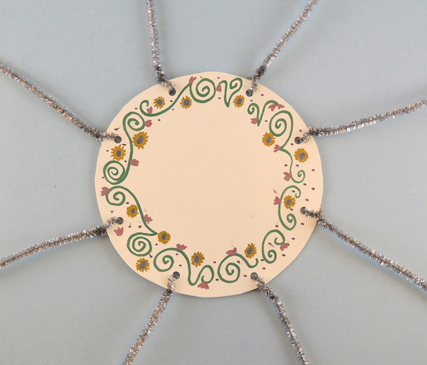 Gather the free ends of the sparkle stems together over top of the poster board circle. Adjust the stems, as needed, to create a birdcage, then twist the ends of the stems together. We also added a decorative silver
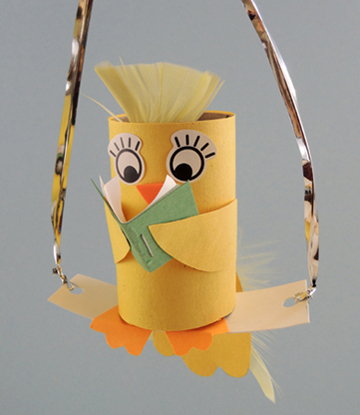
 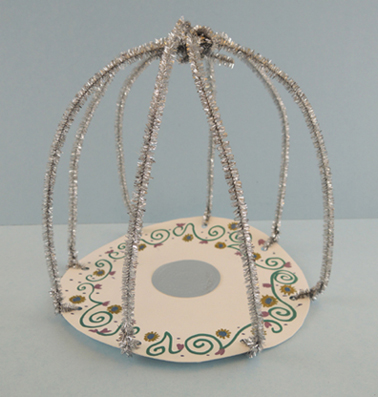 To make the canary, cut a toilet paper tube down to 2.75″ and wrap it with yellow construction paper. Add a small feather crest, and use markers to draw a beak and eyes (or use
 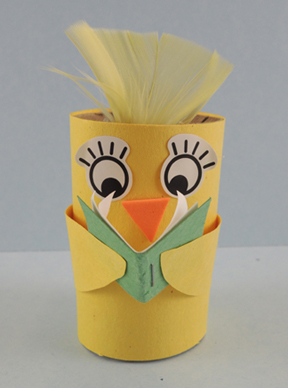 Cut a tail out of yellow construction paper (our tail was about 2.75″ long). Hot glue (or tape) it to the canary’s body, and add a small feather on top. We covered the top of the feather with a yellow
 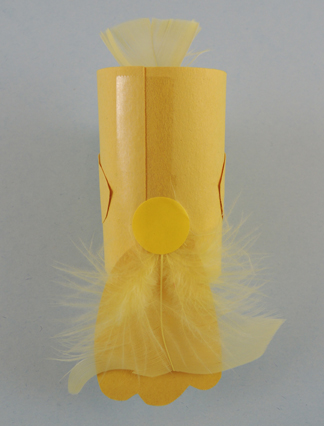 Now for the perch! Punch a hole in each end of a 1″ x 3.75″ piece of poster board. Cut a pair of orange canary feet from construction paper, then hot glue them in the center of the perch. Finally, hot glue a 0.75″ x 6″ strip of tagboard on top of the feet. Bend both ends of the tagboard strip upwards to create perch “prongs.” Your perch should now look like this:
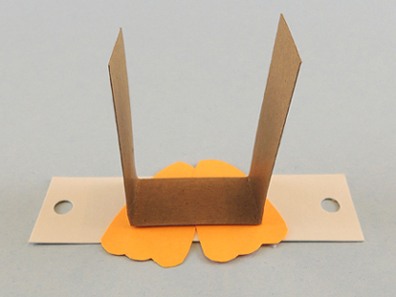 Slide the prongs into the bird tube, then secure them to the inside of the tube with tape.
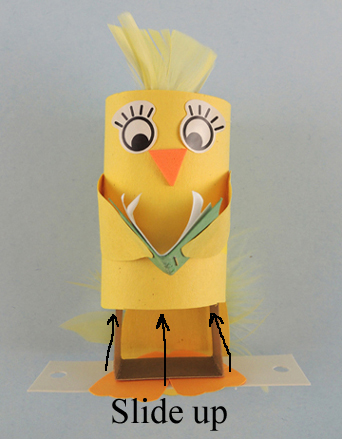 Next, wrap a silver craft tie in each hole of the perch. Bring the ties over the canary’s head and twist them together. Note! Because of the height of the birdcage, you’ll need to twist the craft ties fairly close to the top of the canary’s head. Finally, curl the little orange canary toes over the edge of the perch.
 Slide your perched canary inside the cage, adjust for height, and then wrap the free ends of the craft ties around the top of the cage to secure it in place. Circle and twist the extra craft tie to create a carrying handle for your birdcage.