Flowers for Ferdinand

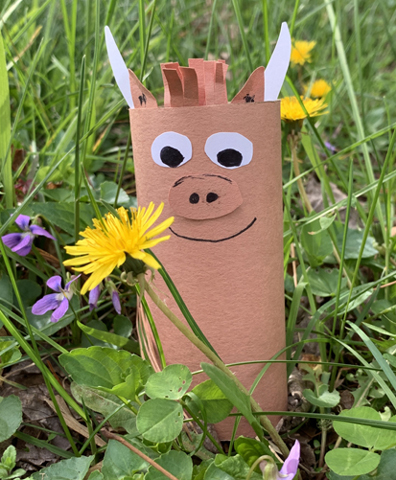
It’s warm, it’s raining, it’s spring, and that means FLOWERS! If there’s one character close to Katie’s heart, it’s the peaceful, flower-loving Ferdinand the Bull. Pair this simple project up with a nifty wildflower identification activity, and you have yourself a nature walk!

We recommend The Story of Ferdinand, written by Munro Leaf, and illustrated by Robert Lawson (Viking, 1936). Read aloud here by Brighly Storytime. This tale of a peaceful bull who would rather enjoy flowers then battle in a bull ring is a children’s classic. And if you’d like to read Alexis Antracoli’s excellent essay during banned Book Week 2019, click over to the curatorial blog!

You’ll need:

  • 1 toilet paper tube
  • Brown and white construction paper
  • Scissors and glue for construction
  • Markers for decorating

Use the materials above to craft a bull, then head outside with your camera! Keep an eye out for plants and flowers, then take a photo of Ferdinand enjoying them.

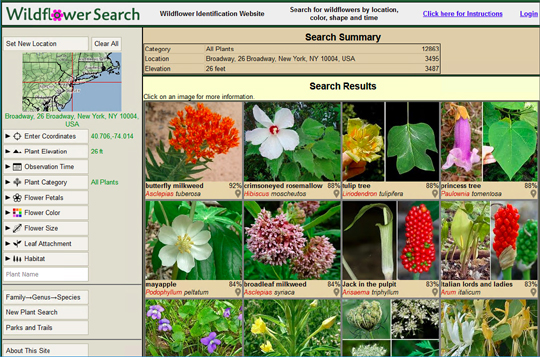
Now to identify your botanical finds! Katie discovered this awesome website for flower identification, Wildflower Search. You can set your locations with the assistance of Google Maps and the site will generate an illustrated list of the wildflowers in your area. It’s an awesome resource!

Using the site, Katie was able to identify a bunch of flowers, as evidenced in this lovely spring photo montage. I think the Bull Thistle is my favorite:

This slideshow requires JavaScript.

If you live in a more urban area, not to worry! Enter your location and see what happens…you might be surprised to find that there are more flowers then you expected. The screen shot of results I took for this post? That’s not New Jersey! I selected a location in New York City, Financial District, Manhatten. The site of famous Charging Bull statue to be exact.

Worth the Splurge: Plastic Wheels

plastic wheels by kelvin educationalYou’ve seen them in various projects that roll, toddle, and race. For anything ambulant, we highly recommend these fantastic plastic wheels, sold by Kelvin Educational. This post also includes instructions on how to make an official Pop Goes the Page wheel assembly for all your vehicular needs!

We discovered the 1-3/8″ diameter wheels while designing an event for Richard Scarry’s classic book, Cars and Trucks and Things That Go. The event was my son’s idea. He was 6 at the time, and told me the library needed to do “a program about crazy cars you can make.” Crazy cars we DID make, with some science thrown in to boot (details here).

cars and trucks montageTo make a wheel assembly, tape two, 4″ plastic straws to the bottom of a box. Then thread two, 6″ wooden rod “axles” through the straws. We used BBQ skewers cut down to the proper size with pruning shears (and don’t forget to cut off the pointy end of the skewer!). Here’s what a finished wheel assembly looks like:

axles and wheelsThe wheels can be purchased from Kelvin Educational. Black wheels are product #990168 ($10 for 100); and color wheels are #990169 ($11 for 100). Warning! Sometimes, the wheels slide off the ends of the skewers. To remedy that, we hot glue foam beads to the outsides of the wheels. But Kelvin Education DOES sell the same wheels, same price, with “end caps.” So we recommend going with those (black #990170; color #990171).

In terms of sturdiness and versatility, these wheels are definitely worth the splurge! Here are some story time projects we’ve created with them…


pigs on paradePig parade floats (marching band optional)


skunk on the street 3Hitting the streets with your pet skunk


red-wagon cropped

A super sweet tissue box red wagon


go with the floeAn ice floe for a geographically challenged polar bear and penguin family


monster-bike croppedA bicycle for a well-meaning monster


bon-appetit

A crêpe cart with all the trimmings, including a menu that allows you to order en français!


If these plastic wheels won’t work for you, alternatives include wooden wheels (a regularly stocked item at Michael’s Craft store), wooden spools, sized-down toilet paper or paper towel rolls attached to the bottom of the box, or poster board/card stock wheels glued to the sides of the box (like this awesome car, or this charming train).

Take Only Photos, Leave Only Footprints

take only photos leave only footprints

Hike along the majestic Grand Canyon, stopping along the way to enjoy the view, snap photos, and take a much-needed water break!

hiking the canyon

We read In the Canyon, written by Liz Garton Scanlon, and illustrated by Ashley Wolff (Beach Lane Books, 2015). Join a little girl and her family as they hike down the Grand Canyon. The clever rhymes, bold illustrations, and depictions of nature and wildlife make this the perfect read-aloud for story time!

You’ll need:

  • 1 toilet paper tube
  • Construction paper
  • 1 small box (ours was 2.5″ x 3″ x 4″)
  • Aluminum foil
  • 1 tape core
  • 1 canyon photos template, printed on 8.5″ x 11″ white card stock
  • 1 canyon game (more on this later!)
  • Scissors and tape for construction
  • Markers for decorating

First, the camera! Any small box will do, you’ll just need to cut a slit in the front of the box for your “photos” to slide into. Luckily, we had a whole bunch of recycled OcuSoft lid scrub boxes that made perfect old-school Polaroid cameras. We covered the box with tin foil, add a tape core lens, made a flash out of a large gemstone on a large plastic button, and used a little patterned tape to add some color!

camera boxesNext up, the hiker! We encouraged kids to use construction paper and patterned paper to make mini versions of themselves. Since you should never hike without a hat, we had the kids fashion one out of trimmed 3.5oz plastic cups with construction paper brims.

hikerNotice the little paper clip sticking out the back of the hat? If you’re going to play the canyon game, you’ll need to tape a small paperclip to the back of the hat. And speaking of the canyon game, here it is…

finished canyon gameThis is a huge flat box we wrestled out of the recycling pile. I hot glued crumpled brown packing paper to create a hiking trail back and forth across the box. I also hot glued little “rest stop” boxes along the pathway. This is a rest stop in the middle of the path:

hiking rest stopLater, I covered the rest stops with paper, and added photos from the template to signal that this was a “photo op.” Here’s the photo op at the very end of the trail.

final stop on canyon trailWe fashioned a fishing pole out of PVC pipe, and attached a paper clip to the end of the string. To play the canyon game, hook your tp tube person onto the fishing pole, and walk him/her up the canyon path, taking time to pause at the rest stops and snap a photo with your camera. We also had a “water break” station and gave kids a little sample cup of water.

hiking the canyonEvery time the camera “snapped” a picture, we would give the kids a matching photo from the template to slide into their cameras.

canyon photosWhen you’re done hiking, you can color in your photos! Oh, you’ll notice the template has one blank photo. That’s so you can draw whatever photo you’d like. We recommend a well-deserved canyon selfie!

canyon selfie