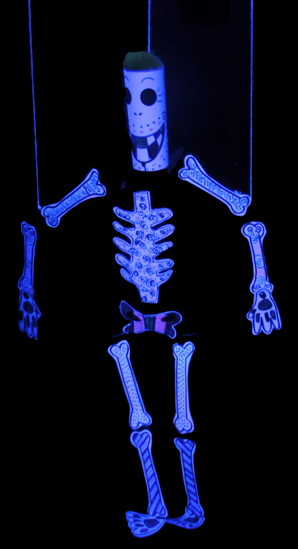
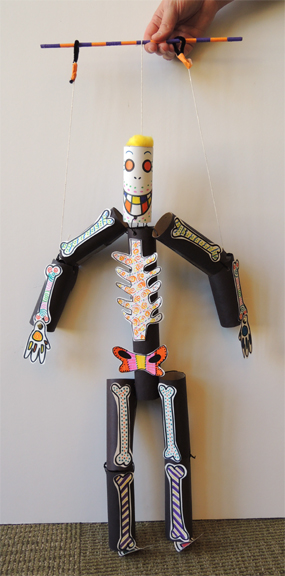
 What’s cooler then a skeleton marionette that glows? How about a skeleton marionette that glows, attaches to your feet, and dashes around with you?
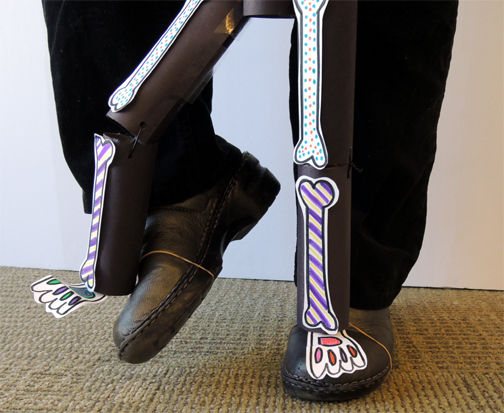
 Here’s my assistant, Katie, showing off some fancy skeleton footwork…
 We read Skeleton for Dinner, written by Margery Cuyler and illustrated by Will Terry (Albert Whitman & Company, 2013). Big Witch and Little Witch whip up a tasty brew and decide to invite skeleton to share it. “We must have Skeleton for dinner!” is what they say, but Skeleton, who is strolling nearby, thinks they mean that HE’S on the menu! Panic ensues, which soon envelopes Ghost and Ghoul (who are also on the invite list). Finally, Clever Crow figures out the problem, sets things straight, and the friends enjoy a tasty meal together.
You’ll need:
- 3 paper towel tubes
- 5 toilet paper tubes
- Black construction paper (or black paint)
- A rectangle of white card stock for the skull (approximately 4.25″ x 5.5″)
- 12, 4″ pieces of twisteez wire (pipe cleaners work too)
- 2 brass fasteners
- 1 wooden dowel
- A selection of color masking tape
- String for puppet’s head & arms
- 1 pipe cleaner
- 2 medium rubber bands
- 1 arms, legs, hands, feet template, printed on 8.5″ x 11″ white card stock
- 1 ribcage, pelvis template, printed on 8.5″ x 11″ white card stock
- 1 jumbo pom-pom (mine was 1.5″)
- Markers for decorating
- Scissors, tape for construction
- Hole punch
- Hot glue
- Black light (or custom glow-in-the-dark glue…more about that here)
If there’s ONE thing that would make this project faster to assemble, it would be to paint all the tubes black. We can’t do paint in our library (see the FAQs), so we wrapped all of our tubes in black construction paper. It took some time!
 For the assembly photos in this post, I decided to show you unwrapped rolls on a white background with red twisteez wire, red yarn, and red rubber bands so all the pieces would be more visible. On the actual skeleton the tubes were black, connected with black twisteez wire, and I used white string. So please excuse the blah assembly photos. I just wanted to make sure all the steps were clear!
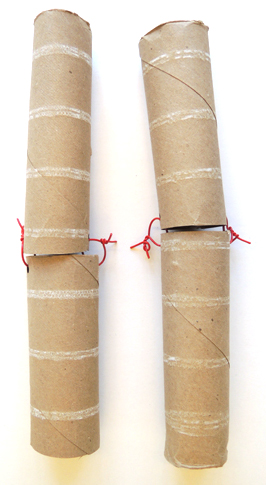
We’ll start from the legs up. Cut a paper towel tube in half. Punch holes on the top of one tube half, and the bottom of the other tube half. Thread twisteez wires though the top and bottom holes on each side of the tubes, joining them together. Making sure to leave some space and twist the ends of the wire together.
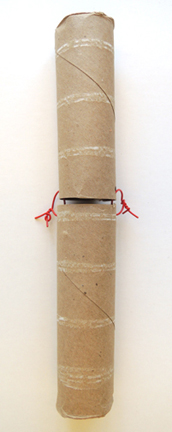 Repeat the above steps with the second paper towel tube. You now have two legs that bend at the “knee.”
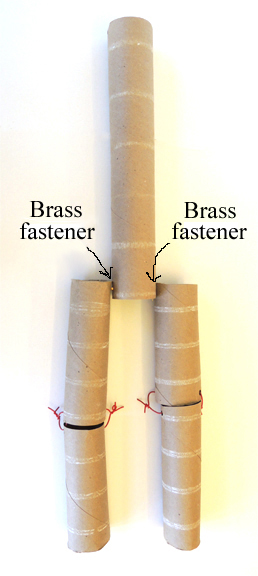
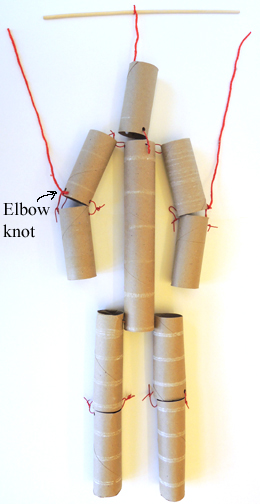
 The third paper towel tube is your skeleton’s torso. Attach the legs to the torso by punching holes on the bottom outside of the torso tube, and the top inside of each of the legs (it’s easier to see this step in the image below). Attach the legs to the torso using brass fasteners.
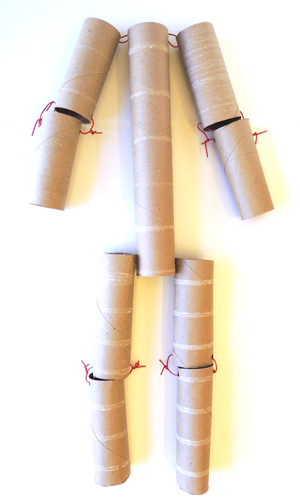
 Making an arm is just like making a leg, except you’ll be using toilet paper tubes instead of paper towel tubes. Punch holes in the top of one toilet paper tube and the bottom of the other toilet paper tube. Thread twisteez wires though the top and bottom holes on each side of the tubes, joining them together. Twist the ends of the wire together.
 Repeat the above steps with 2 more toilet paper tubes. You now have two arms that bend at the “elbow.” Attach the arms to the torso by punching holes on the top outside of the torso tube, and the top inside of the arms (again, it’s easier to see this step in the image below). Attach the arms to the torso using twisteez wire.
 To make the skull, draw a face on a rectangle of white card stock (alas, white construction paper doesn’t fluoresce under black light). Wrap the skull face around a toilet paper tube.
To attach the skull to the torso, punch holes in the front and back of the bottom of the skull (i.e. the base of the neck and the skeleton’s “chin”). Punch matching holes in the front and back of the torso tube. Attach with twisteez wire.
 The tube body is done, now for the strings! Quick note: I used red yarn for the instructions below, but for the actual skeleton, I used thin white string.
 First, wrap the wooden dowel with color masking tape. Now punch a hole in the back of the skull tube, near the top of the head. Thread a piece of string through the hole and knot. Attach the other end to the middle of the wooden dowel.
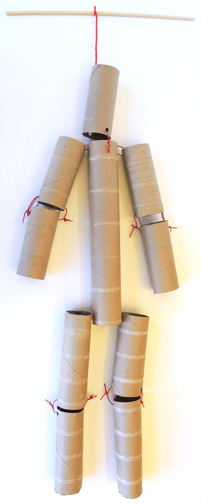 Next, punch a hole in the “elbow” of each arm tube (i.e. the outside bottom of the top arm tube). Knot a piece of string through the hole.
 But wait! Before you tie the arm strings to the wooden dowel, may we introduce one delightfully dynamic option? If you want to be able to move your skeleton’s arms, follow the following steps:
Cut a pipe cleaner in half. Bend the half pipe cleaner into a loop and twist the bottom together tightly. Tie an arm string to the loop, then reinforce with a piece of color masking tape.
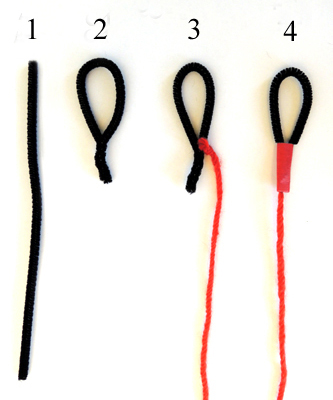 Repeat with the remaining half of the pipe cleaner. You now have 2 pipe cleaner loops that slide on and off the wooden dowel, allowing you to manipulate your skeleton’s arms!
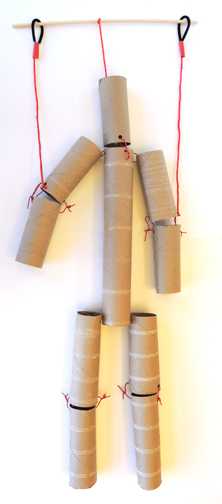 Finally, punch a hole in the “heel” of each leg and loop a rubber band through it.
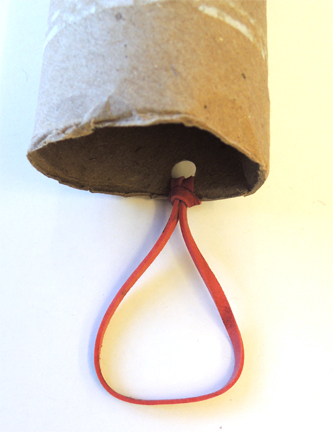 The rubber band stretches over your shoe so you can walk your skeleton around!
 With the body all rigged up, the last step is the bones! Color the bones in the template, then tape (or hot glue) them to the fronts of the tubes. Pop a jumbo pom-pom in the top of the skull tube to round off the look (I secured the pom-pom with a little hot glue)
 We rigged up a black light and mirror in a storage closet and invited kids to march in and watch their skeletons boogie. They absolutely loved it – especially when their skeleton’s feet matched their own dancing feet!

 It might be a smaller, simpler Halloween this year, but that doesn’t mean it has to be any less spirited (oooo bad pun alert!). We decided to do a round up of our Halloween posts for you to peruse, just in case you needed some projects, activities, costumes, or inspiration. But if you are just here to see Katie’s ingenious candy chute, scroll to the end of the post!





 Making an arm is just like making a leg, except you’ll be using toilet paper tubes instead of paper towel tubes. Punch holes in the top of one toilet paper tube and the bottom of the other toilet paper tube. Thread twisteez wires though the top and bottom holes on each side of the tubes, joining them together. Twist the ends of the wire together.


