
Bake a bounty of beautiful baguettes at this fantastic little bakery. Poofy baker’s hat optional, but it does add that professional touch, yes?
We read Nanette’s Baguette by Mo Willems (Hyperion, 2016). Little Nanette has a big job. She must journey to the bakery – all by herself – buy a baguette, and bring in home. Everything goes well, despite a few distractions (friends Suzette, Bret, and Mr. Barnett with his pet, Antoinette). But the baguette looks so tasty. It’s warm. It smells so good…Nanette takes a bite, then another, then another. Oh no! It’s gone! A tearful Nanette reports to her mother, but this problem is easily solved. They can go and buy another one, together. And eat it!
You’ll need:
- 1 large box
- A box cutter
- A selection of construction paper
- 1 bakery sign template, printed on 8.5″ x 11″ card stock
- 1 paper or plastic sample cup
- Modeling clay
- Scissors, glue and tape for construction
- Markers for decorating
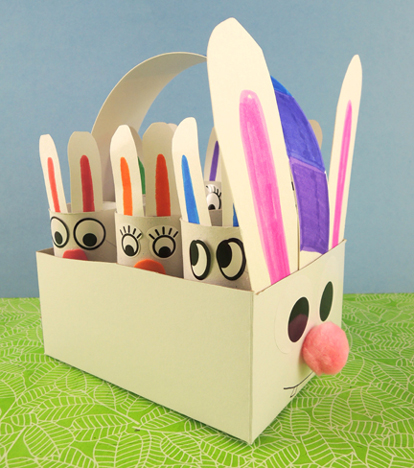
We used a 4.5” X 4.5” x 9” craft box for our bakery (but a large tissue box works too!). Trim and fold the box’s lid to form a peaked roof. Then use a box cutter to create a rectangular window for the bakery. If you’d like an awning, cut just three sides of the rectangular window, then bend the resulting flap upwards to create the awning.
Decorate the bakery with construction paper and markers. We offered color masking tape as well. Color and cut a bakery sign from the template, then attach to your roof. Finally, cut a rectangle out of the back of the bakery…
And use the resulting cardboard to make a countertop for your bakery. Hot glue it to a cut-down paper cup or plastic sample cup, then place the counter outside your bakery window. Use modeling clay (we used air dry Model Magic) to fashion some little baguettes.
The final touch is a baker’s hat, and you will find the supply list and instructions for it here!


Theoretically speaking, what WOULD happen if a llama created a black hole with his overzealous cake consumption? Would the world survive?
First, wrap 4 toilet paper tubes with constructions paper…2 with brown paper fringes, 2 with plain white. Next, cut the bottom off a small box (like a square tissue box). Then set the box on top of the legs (we hot glued the legs in place, too). The rest of the box gets decorated with brown construction paper fringes and white construction paper “pants.”
Now wrap the neck with brown construction paper fringes, pinch the bottom of the neck, and slide it into the front of the box (if you’re using a tissue box, you’ll need to cut a slit in the box). Use spare cardboard to make llama ears and a tail, add some eyes, and you’re done!
We decided to take the project one step further by introducing a black hole activity (and yup, crafting a black hole was a first in my long history of story times!). First, we had kids make pies and cakes using a paper cup, tin foil, and a paper baking cup.
The pie tin is the top of the paper cup (i.e. the open mouth part of the cup) wrapped in tin foil. The pie is the bottom of a paper baking cup.
I sat inside, and kids had to enter the black hole, look at the 2 cakes and 2 pies “floating” inside it, and select the one they had created!