 Welcome to the number mines of Digitopolis, the famous kingdom from The Phantom Tollbooth! This fall, we hosted a table at Princeton University’s annual Community & Staff Day event. Big crowds meant that we needed something simple, but we wanted to be creative too. Since we had successfully offered the number mines at a massive math event last spring (you can read about it here and here), we decided to bring them back for more numerical fun.
Alas, the original number mine (which was artfully constructed by the Arts Council of Princeton) wasn’t salvaged after the math event. This meant that Katie and I had to build our number mine from scratch. The first part of this post describes how we ran the event table. The second part describes how we build the mine.
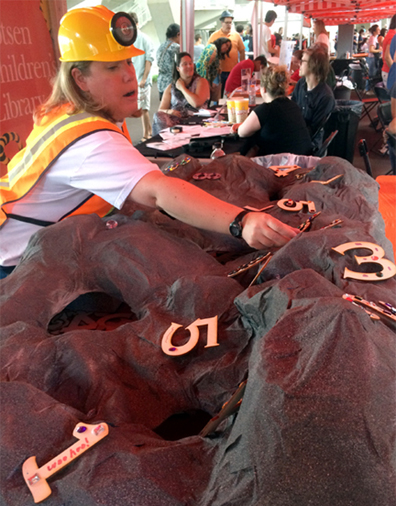
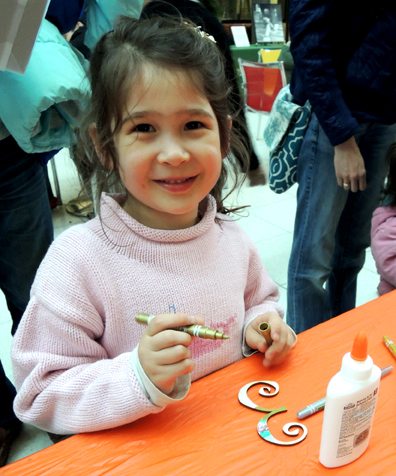
At the event, kids would reach into the number mine and pull out a plain wooden number. I bought the numbers online from Woodcrafter, where they range in size, thickness, price, and font. I got the 4″ numbers that were 1/8th of an inch thick. Each number cost 56¢.
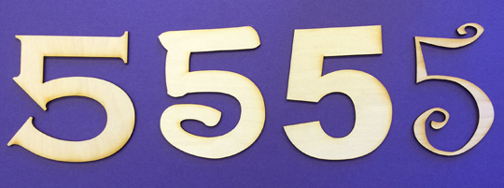 We found that 4″ was a great size for decorating, but if 56¢ per piece is outside your budget, you can go smaller. A 1″ number of the same thickness, for example, costs 23¢. Or, if you want to go even cheaper, skip the wood and print your numbers on white card stock. We loaded the numbers into the mine, and the kids “dug” them out with their hands.
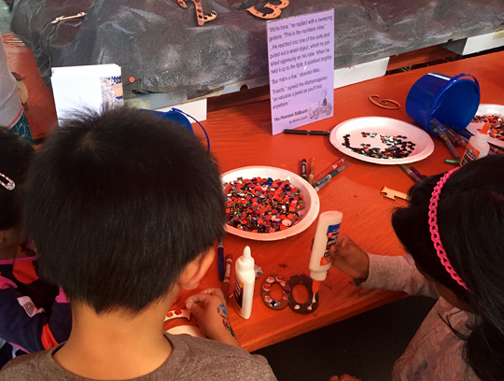
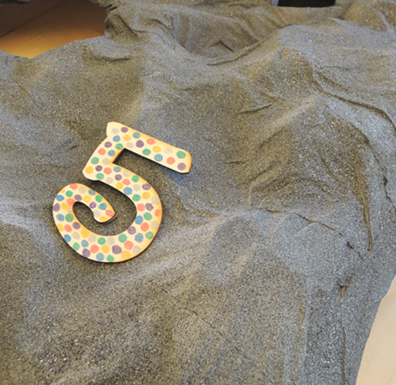
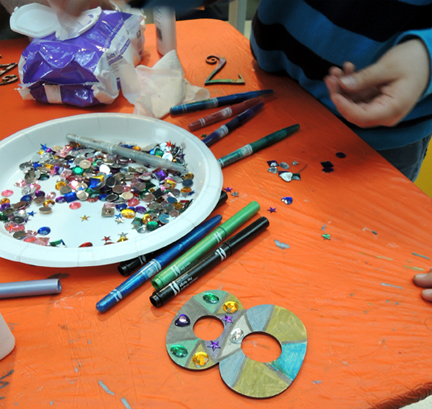
 Once kids found a number they liked (7 and 8 were very popular), they went over to the number decorating area, which was stocked with metallic makers, glitter markers, small gemstones, and glue. We had a relevant quote from the book on display too. Kids really got into decorating. One little girl spent 25 minutes working on her number!
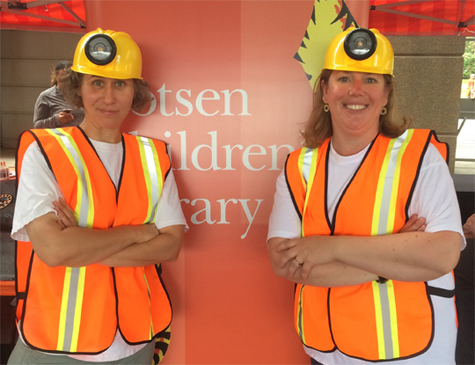
 Note! If you use squeeze glue (as opposed to hot glue) make sure to have paper towels or small paper plates handy so families can safely transport their numbers home. Hand wipes are also a good idea for sticky fingers and tabletops. Katie and I dressed for the occasion in miner’s helmets and safety vests.
 So, that’s our event table…now for constructing the mine! You certainly don’t have to get as elaborate as we did. You can create a mine by covering a box with grey paper. Cut a hole in the box’s lid, throw some numbers in there, and have kids reach into the box! Or you could skip the mine altogether and just do the number decorating part of the project. But if you do want to build a mine, here’s how we did it.
STEP 1
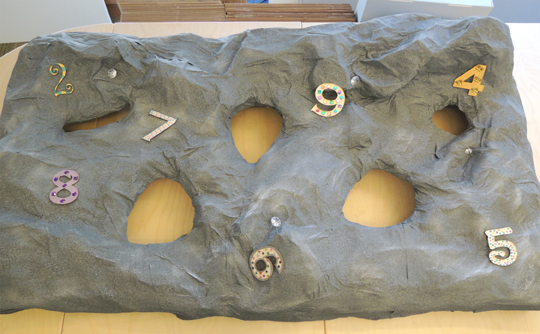
Find a big, flat box that isn’t too deep. You don’t want kids to have to reach too far down for the numbers – especially the little ones. We used a 34″ x 54″ inch box lid, and then attached 6 photo storage boxes to the bottom using hot glue and packing tape. This resulted in a mine that was 5″ deep. Here’s a shot of the underside.
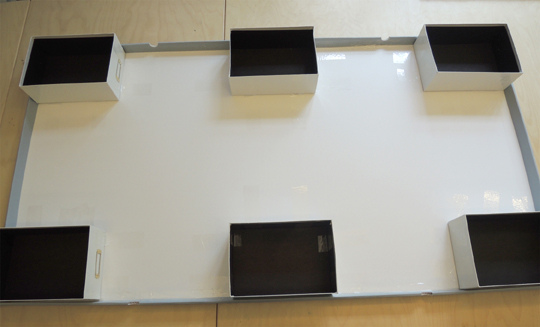 Since the box lid didn’t reach all the way to the bottom of the photo storage boxes, we closed the gap by attaching big strips of corrugated cardboard to 3 sides of the mine. We left it the mine open in the back so we could restock numbers during the event.
STEP 2
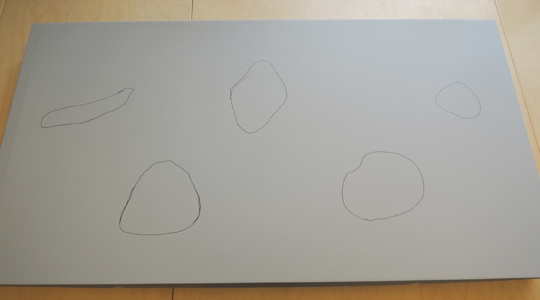
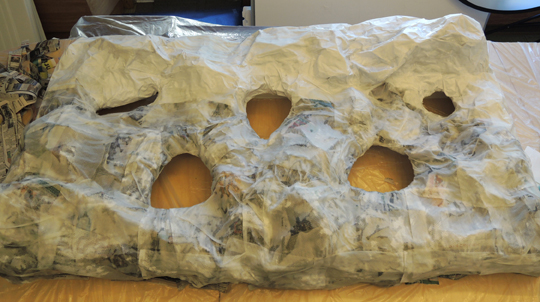
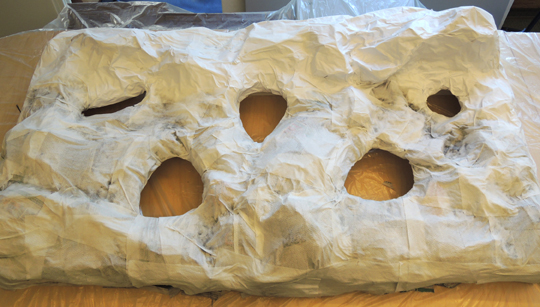
Cut holes in the top of the box. We found it helpful to draw the holes before we started cutting. That way, we could be sure we weren’t cutting into any of the support boxes and we knew that the numbers would fit through the holes.
STEP 3
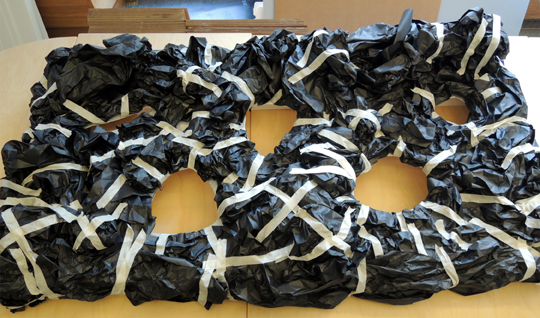
Create the rocky, craggy landscape of your mine. We bunched up big pieces of black bulletin board paper and attached them to the box with masking tape.
STEP 4
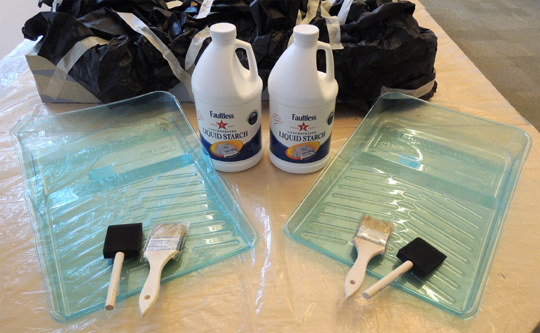
Now for the really, really messy part. Papier-mâché. We don’t have a sink in our work space, and the nearest bathroom is far, far away. So we wanted to create the smallest mess possible. In other words, we didn’t want to cook, mix, or blend any sort of papier-mâché paste (or dilute any glue). After a little research, we settled on liquid starch.
Below are our tools – 2 enormous jugs of liquid starch, 2 plastic roller trays, and 4 paint brushes (the bristle brushes worked better than the foam ones). Oh, and we also put a plastic tarp under the mine so we wouldn’t ruin the table.
 Since we had a lot of area to cover, we used big, 6″ x 16.5″ pieces of newspaper. Occasionally, we use a smaller strip for edges or crevices, but mostly we stuck with the big ones.
 The liquid starch held up well! It did coat our hands with sticky residue that required multiple rounds of soap and scrubbing to remove, but it wasn’t too bad. Honestly, the worst thing about the liquid starch was the fact that it was scented. “Mountain Fresh” scent to be exact. Hoo boy. You could smell the mountains the minute you took the cap off. After a couple minutes, the fragrance was looming in the room like a big, ominous fog. Katie put together a little graphic to convey the overpowering Mountain Freshness.
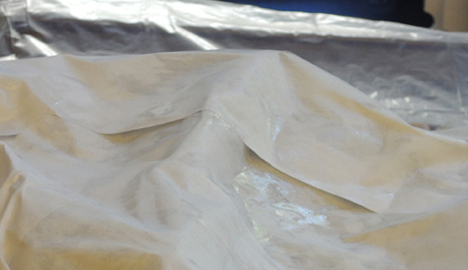
 We left the first layer to dry overnight. For the second layer, we got a little experimental. While researching liquid starch, we learned that some people absolutely rave about using white paper towels and computer printer paper for papier-mâché projects, especially if the projects are going to be painted later. So we decided to give it a try. We papier-mâchéd the bottom of the mine with paper towels, and the top portion with computer printer paper.
 Wow, did the paper towels suck up the liquid starch! The printer paper needed much less. But the printer paper was so stiff, it created unwanted gaps like this one:
 The solution was to drape a liquid starch-soaked paper towel over it. Below is that same gap with the paper towel over it. As you can see, the soft paper towel completely obscures the gap. I didn’t officially test this, but I believe newspaper would obscure gaps as well, perhaps even better than the paper towels.
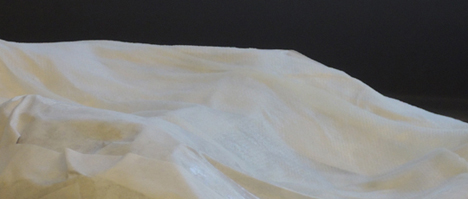 I was a little worried the paper towels were too transparent. But overnight, they magically dried to solid white.
 In the above photo, you can see there were still wet patches in crevices where the liquid starch had pooled. Katie hit those with a hair dryer, no problem. And we should add that, even now, things were still smelling quite Mountain Fresh.
STEP 5
Time to paint! We used this awesome textured-stone effects spray paint by Valspar. It’s fun, but pricey ($10 a can at Lowe’s). Our mine required 3 cans.
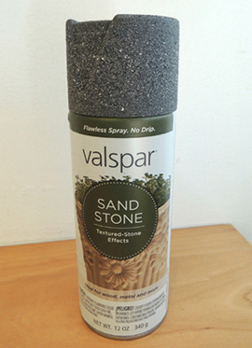 A cheaper option would be to use gray paint to cover the mine, then dab on darker gray with a piece of sponge. This will get you a textured surface, without the hefty spray paint price. Once the spray paint had dried (which, we might add, finally dissipated the Mountain Fresh fragrance), we decorated some numbers and attached them to the mines with hot glue. We hot glued some large plastic gems on as well – purchased from the wedding favor aisle at Michaels Craft Store.
 And this, dear readers, is when we discovered the fatal flaws in regards to paper towels:
- When dry and spray painted, paper towels become incredibly brittle. I poked a hole right thorough one section while merely tapping on it (we eventually covered the hole with the number 8).
- The texture of the paper towel absolutely comes through in the end. So if your paper towels have little hearts embossed on them, you’re going to see little hearts under the paint.
- The edges of the paper towels are clearly defined. Unlike the newspaper and the printer paper, you can definitely see the edges of the paper towel under the paint. So our rocky surface looked like, well, draped paper towels. You could even see the dotted perforations that separate the paper towels.
 The printer paper, on the other hand, was much sturdier and the edges were hidden under the paint. The lesson? DON’T use paper towels for papier-mâché projects. Use newspaper and printer paper instead. In fact, I highly recommend printer paper for the second layer of painted papier-mâché projects. Very sturdy, holds paint very well.
However, paper towels are what we used and their brittle weakness made me and Katie very, very nervous. We were positive that kids were going to put their hands right through the mine as they leaned in to select numbers.
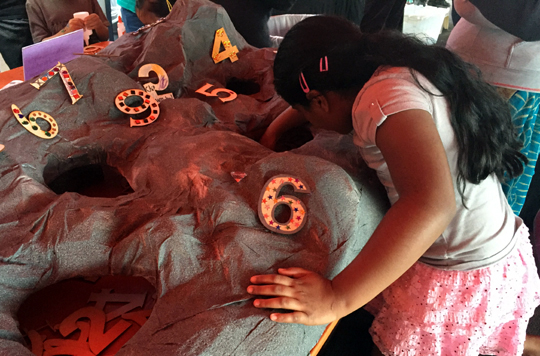 Anticipating trouble, we brought duct tape and a couple of step stools to the event. The stools elevated the kids right up to table level, allowing them to keep their weight mostly on the stools and not on their hands. So the paper towels held, but there were a couple time you could see them bending. Katie and I would brace ourselves for a tearing, crunching, breaking sound. Thankfully, it never happened. Whew!
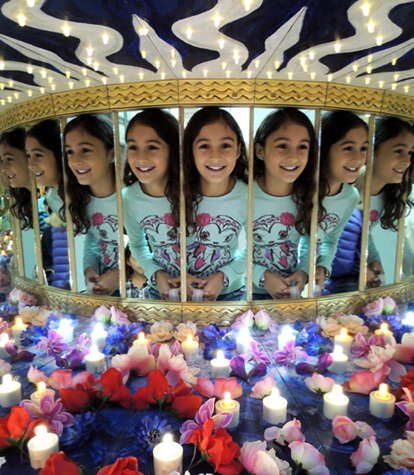 Who knew infinity could be so beautiful? I’ve returned with Part II of the Digitopolis event post (
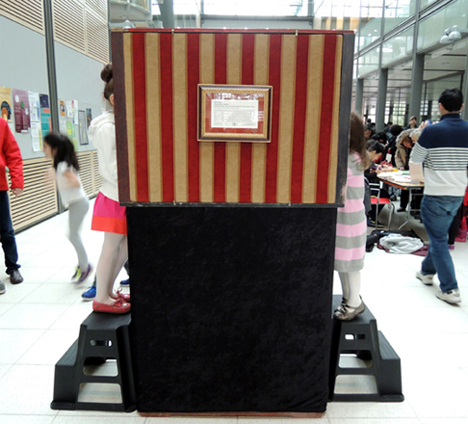 The boxes are designed to be infinite, interactive environments that play with your perception and inspire inquisitiveness and wonder. They were in constant use during the event, and there were lots of shrieks of amazement, enthusiastic explosions of “Cool!” and long, drawn out utterances of “Woooooow…”
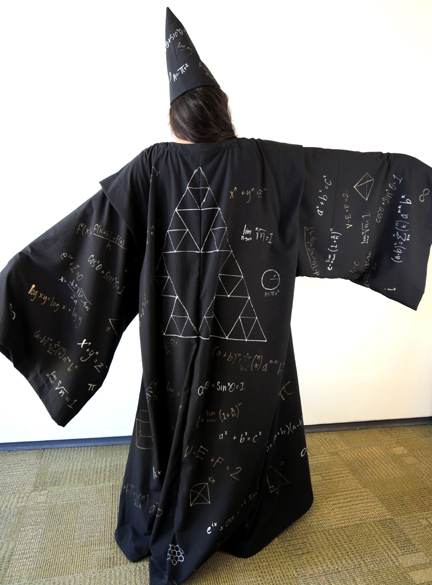
 Digitopolis was not without its celebrities, including the King of Numbers himself. I speak, of course, of the Mathamagician.
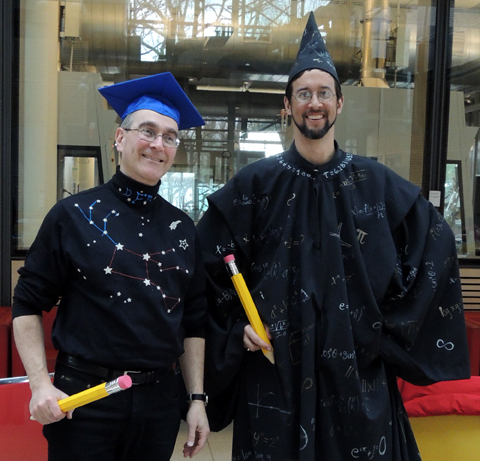 That’s real-life mathamagician Brent Ferguson on the right, grinning away under the pointy hat covered with equations. He’s math faculty at the Lawrenceville School, and in 2013, he was awarded the National Museum of Mathamatics’ Rosenthal Prize for innovation in math teaching. On the left is Dr. Dan Fishman, a high school math teacher, who, like Brent, has unbridled enthusiasm for all things math.
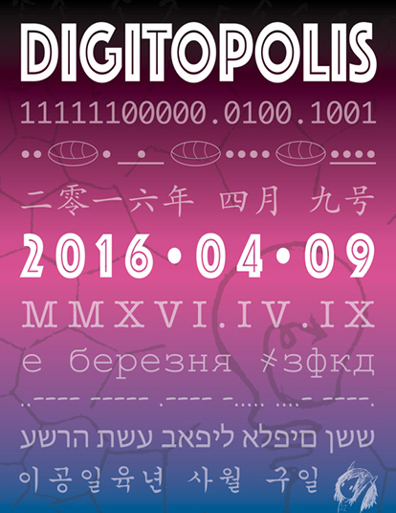
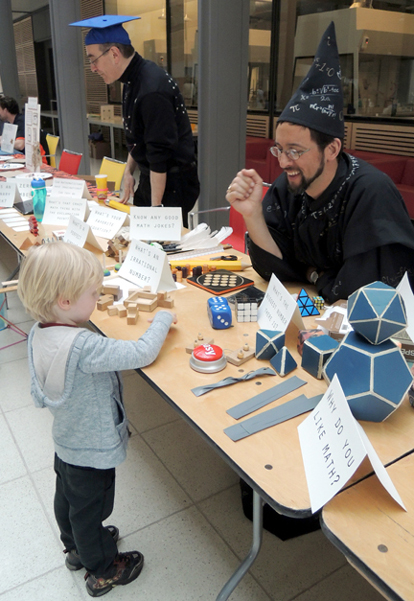 Also at the Mathamagican’s table were three Digitopolis “tourism” posters for families to take home (the posters were inspired by
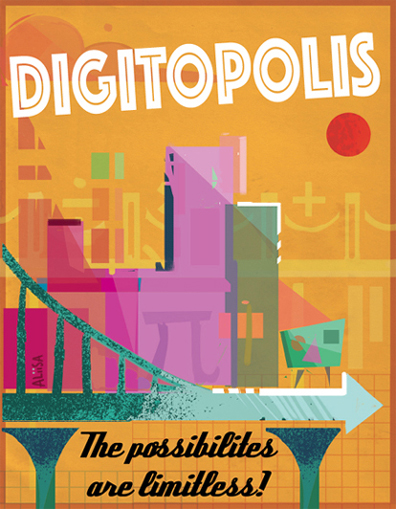

 A quick word about the Mathamagician’s costume. The robes and hat were made by freshman James Jared, who ingeniously modified
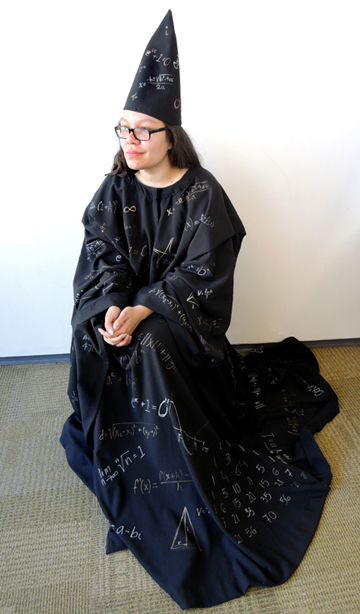
 The Mathamagician wasn’t the only celebrity in Digitopolis that day. Does this gentleman look familiar to you?
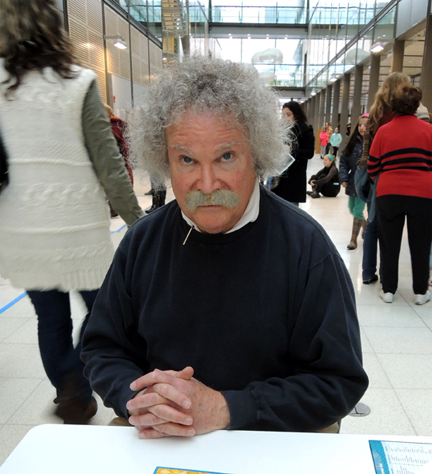 Yup, it’s Albert Einstein. Or rather, professional reenactor Bill Agress playing Albert Einstein. Mr. Einstein circulated the event floor, chatted with kids, answered questions about his life and work, tried an activity or two, and posed for pictures. And yes – he wasn’t wearing any socks.
 They also whipped up an
  Elsewhere in Digitopolis, another math wizard was hard at work. This is Emile Oshima, a junior at Princeton and master of the Japanese abacus. Next to him is senior Rei Mastsuura.
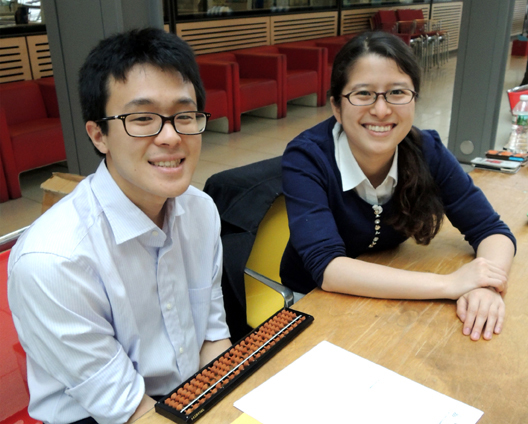 In addition to having Emile and Rei teaching kids how to use an abacus, Emile raced kids (and parents!) armed with electronic calculators to see who could reach the product of 3 x 3 multiplication problems faster. Emile always won. He was lightning fast!
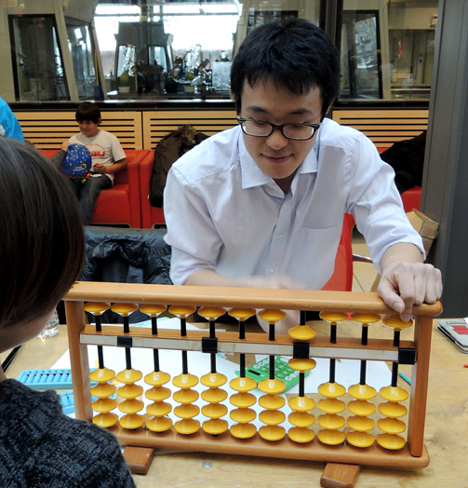 Meanwhile, at another event table, another calculator was keeping kids busy. But this calculator was rather…odd.
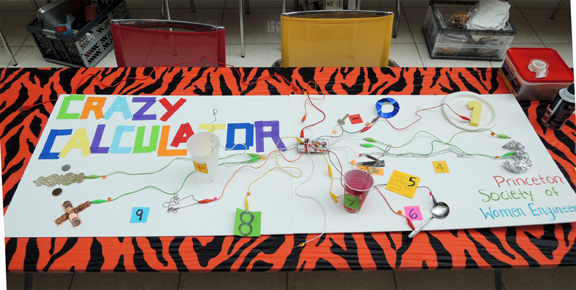 The “Crazy Calculator” was designed by the Princeton Society of Women Engineers using 2 Makey Makey sets. Have you seen Makey Makey? It’s pretty awesome. Each set consists of wired alligator clips, a small central board, and computer software.
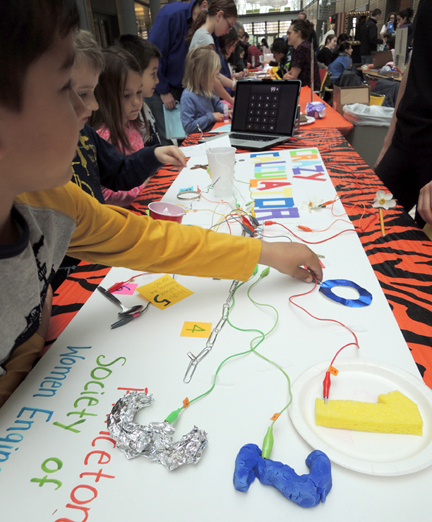 Interspersed with the other event tables were five “Pop Up History” activities that tied together math and history. These tables were designed to be simple, stand-alone, and un-staffed.
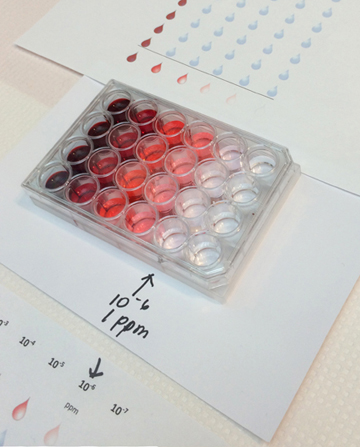
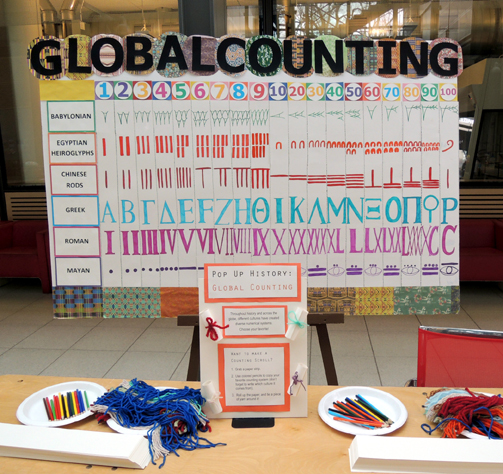 At “Global Counting,” kids could see diverse numerical systems on a big display board (the book Go Figure: A Totally Cool Book About Numbers (DK, 2005) was very helpful in this regard). Then, kids copied their favorite number system on a 3.5″ x 17″ strip of paper, and used yarn to turn it into a little scroll.
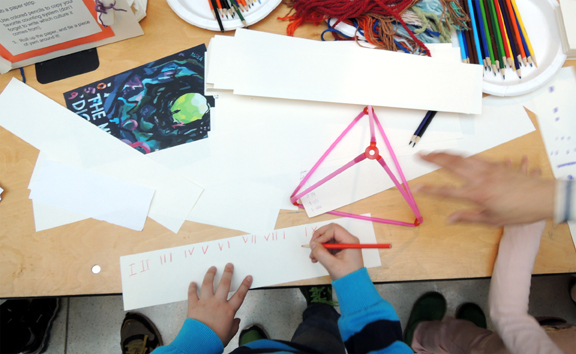 At another table were Möbius strips, a must-have for any hands-on math event. Discovered in 1858 by German mathematician August Ferdinand Möbius, the strip demonstrates how a piece of paper can have only one side! All it takes is a 2.5″ x 28″ piece of poster board, tape, and some
 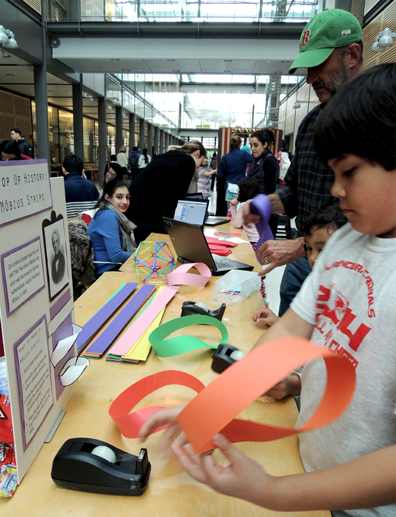 Another hands-on math must-have? Tangram puzzles. Originating in China, tangram puzzles were first introduced to Europe in the 19th century. There are plenty of inexpensive tabletop tangrams out there, but we decided to splurge on some giant foam floor size versions (thinner ones purchased from SimplyFun, chunkier ones from Fat Brain Toys). Later, these were donated to a local non-profit family shelter.
 The fourth Pop Up History table was called “Tally Hides.” Some American Indian tribes kept track of important things by making tally marks on animal hides and tree bark. Definitely a cool way to count!
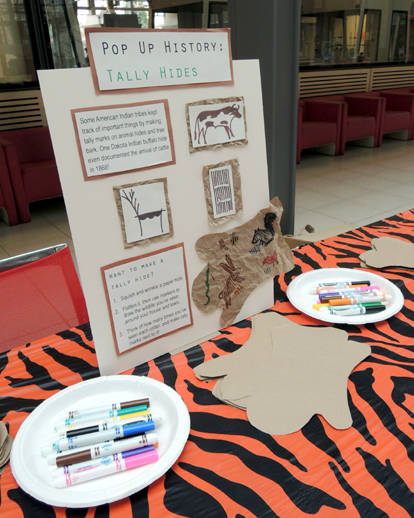 Before the event, we cut 9″ x 12″ pieces of brown paper into the shape of a hide. During the event, kids wrinkled the paper, flattened it out, and used markers to draw the wildlife they’ve seen around their homes and town. Then, they estimated how many times they’d seen each critter, and made a tally mark next to it. The project is originally from The Secret Life of Math (Williamson Books, 2005).
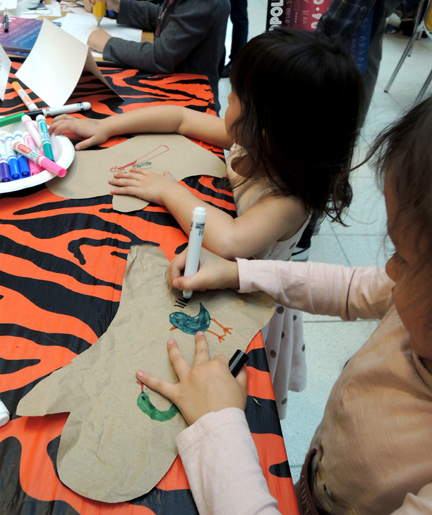 The final history table was called “Tile Tessellations.” Decorating surfaces with tiles spans many cultures, and many centuries. But did you know that the geometry in Early Islamic art was so intricate, it was unrivaled for over 500 years?
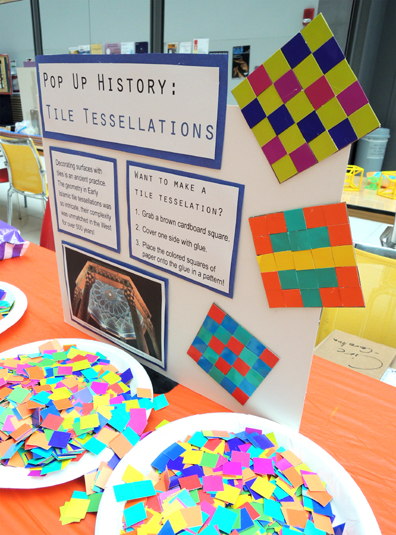 Kids put their tiling and tessellating skills to work by gluing 3/4″ paper tiles to a 6″ x 6″ square of
 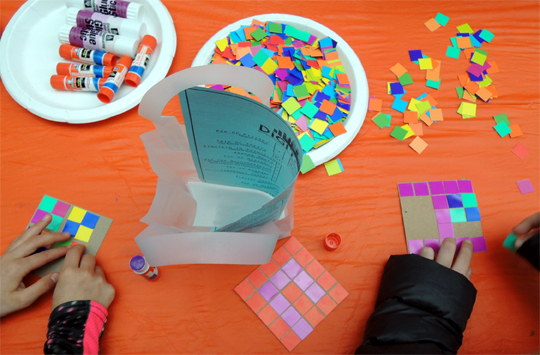 That’s it for history – how about some games?
 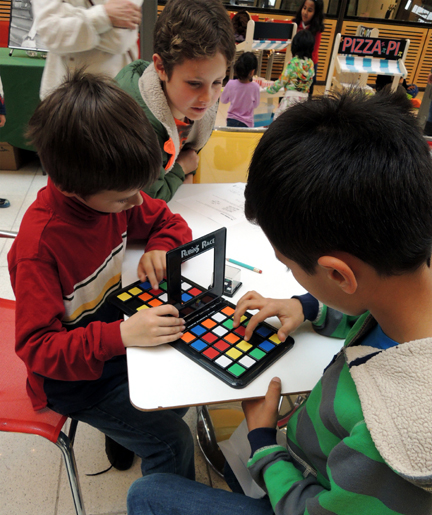 Or entire families could take a break and play Number Ninjas.
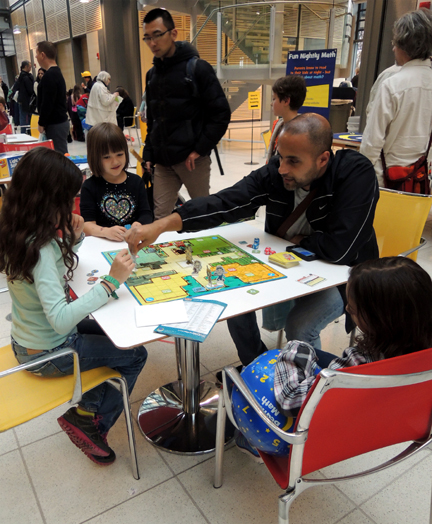 Heck, maybe you could even beat Einstein at Qbitz! After the event, the games were donated to a local non-profit family shelter.
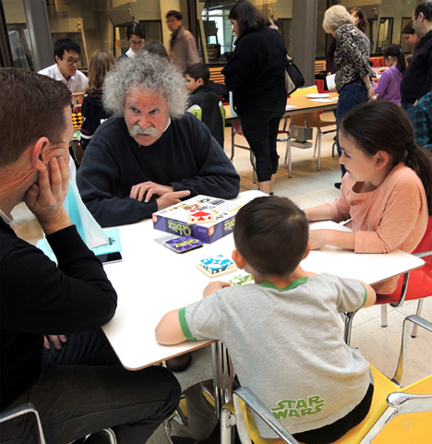 For the musically adventurous, there was “Musical Fractions,” an activity composed by senior Matt Smith and freshman Demi Zhang. Kids used percussion instruments (assorted floor drums, wood blocks, maracas, a wooden fish, claves, and sand blocks) to learn how to play, and recognize, wholes, halves, quarters, and eighths. They also learned about musical structure and patterns.
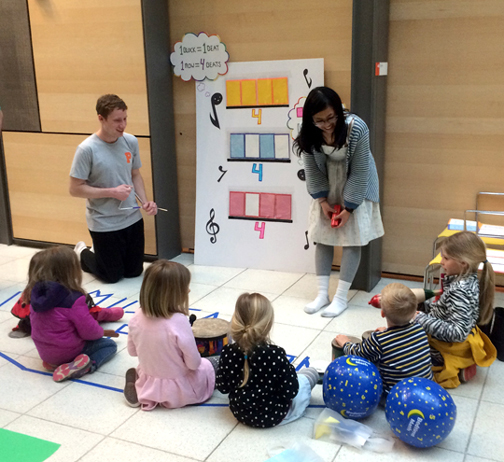 Each instructional session ranged between 10 to 15 minutes. I wasn’t able to catch an entire one, but I did manage to grab a few seconds of this one. Just listen to those fractions!
 At big events like this, my staff and I wear costumes so that people can find us quickly in the crowds (helloooo
  On the backs were our favorite numbers. Let’s hear it for 9, 2, and 11! Woot woot!
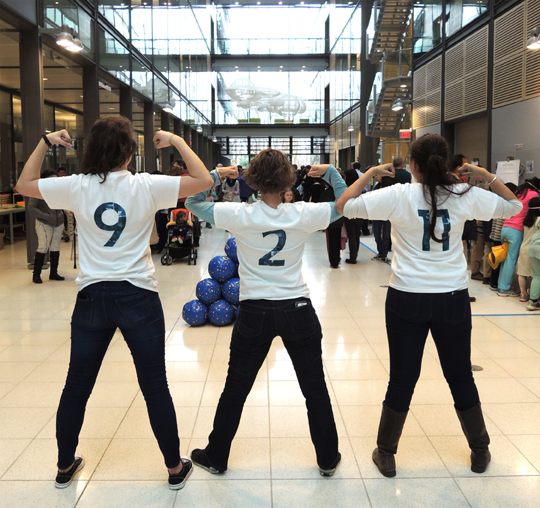 I’d like to send a million, trillion, zillion, googolplex thanks to everyone who made this event possible, and who generously gave their time to make math fun, approachable, unusual and fun. An extra shout out to the Princeton University students, and the student athletes who volunteered so energetically and enthusiastically! Thank you so much, everyone!
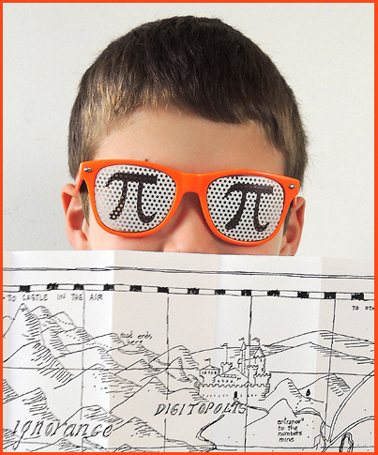 We’ve all wanted to jump into books. Who doesn’t, for example, want to go to Diagon Alley and hit the shops? Join Hazel for stories in the Honeycomb? Explore Babilonium with Candy Quackenbush? Or sail the skies with Matt Cruise on the Aurora? Part of my job at the
 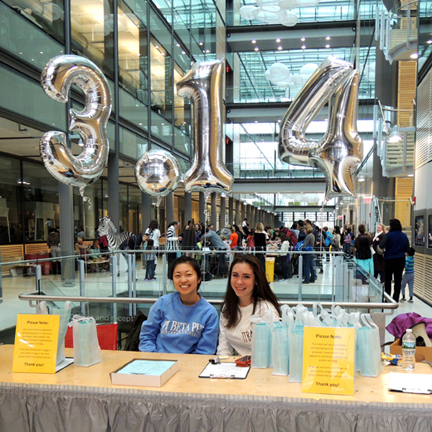 But before I get started on all the details, I’d like to introduce our event collaborator,
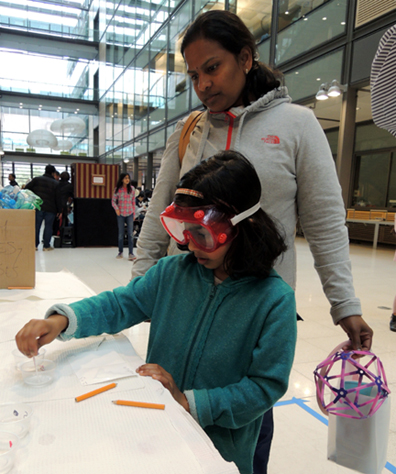
  Bedtime Math brought 3 fantastic activities to the event: Spy Training, Beach Ball Party, and Glow-in-the-Dark Geometry. Here’s Spy Training, which was all about codes and ciphers…
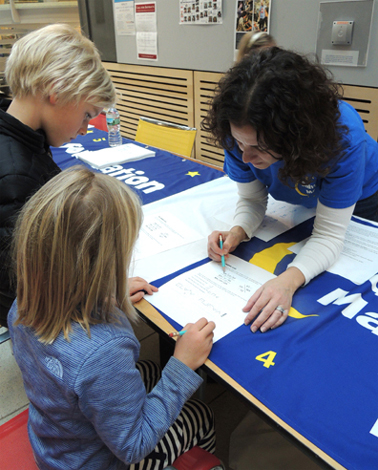 And here’s Beach Ball Party, which involved counting, stacking, and chasing beach balls determined to make a break for it.
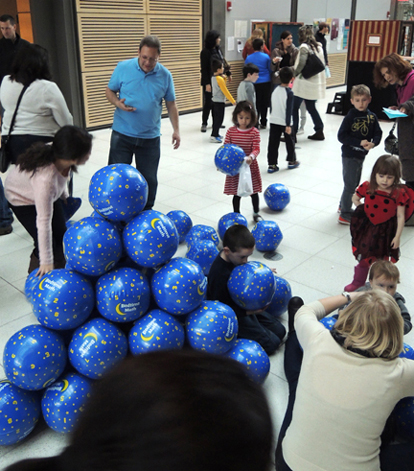 It also involved Ellen Williams (who you last spotted being pelted with marshmallows in
 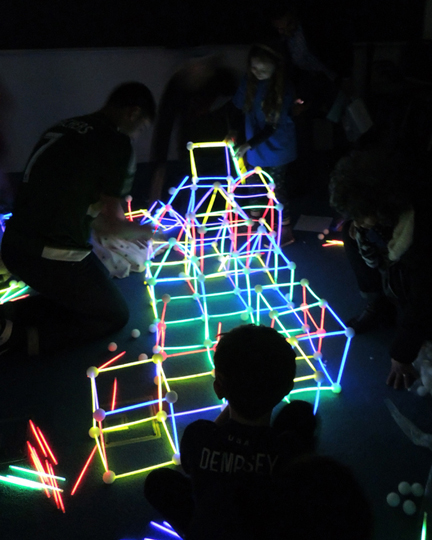 Some kids decided to use the original plastic connectors that came with the bracelets to make unique geometric creations. Here’s one of my favorites. A series of loops that, when spun, becomes a sphere!
 The mines were stocked with an assortment of wooden numbers. I used 4″ numbers I found online at Woodcrafter. If you’d like a cheaper option, I recommend printing paper numbers on card stock.
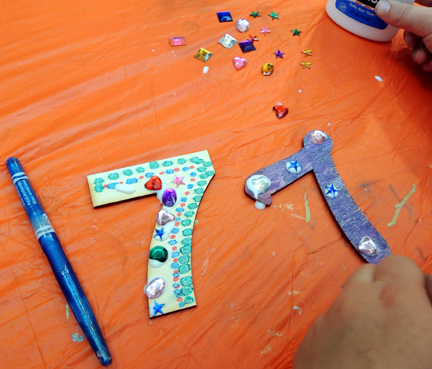
 The mines were staffed by high school volunteers from the Arts Council, who were suitably decked out in miner helmets.
 Elsewhere in Digitopolis was the “Fibonacci Forest,” hosted by the
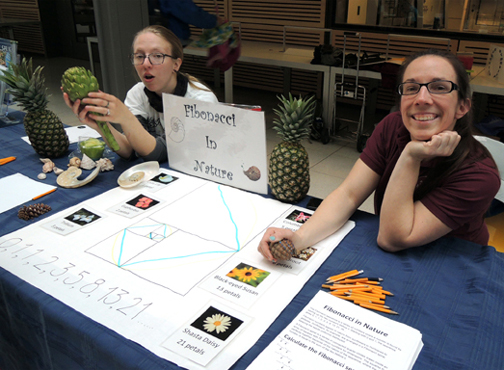
 The Watershed also did a cool fractal tree project. It involved a half-sheet of green paper, brown markers, and rulers (here are the
 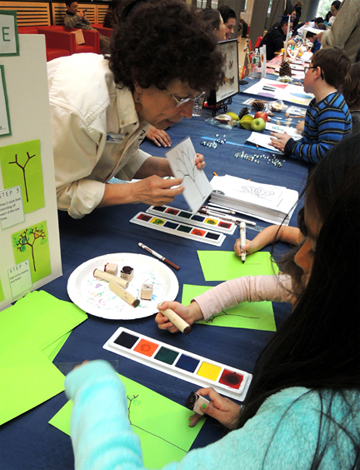 We decorated the finished fractal trees with bird and leaf stamps, but you can also just use markers or color pencils.
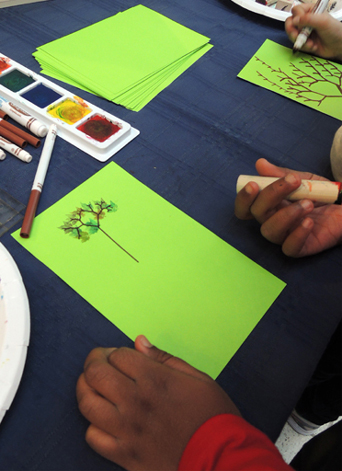 And speaking of wildlife, how about some zebra math? We were delighted to be joined by Princeton University Professor
 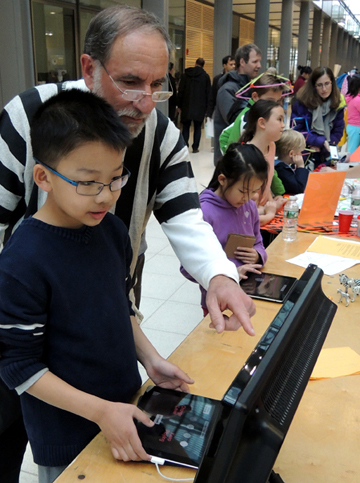 Some researchers believe that zebra stripes exist to confuse predators. So Dan and his constituents developed “Dazzle Confusion,” an iPad game in which kids “become the lion” and tried to tap black, white, or striped moving targets to determine which one is most difficult to hit.
 At the end of the game, the program tabulated the kids’ results and displayed them on a large screen. As the event progressed, the results continued to accrue. This lead to conversations about data collection, measurement, central tendencies, and averages.
 It’s worth noting that although there was much variation on kids’ “strikes” on the targets, there was a strong trend (p < .08) showing that the striped targets were hardest to hit! How’s that for some real world math?
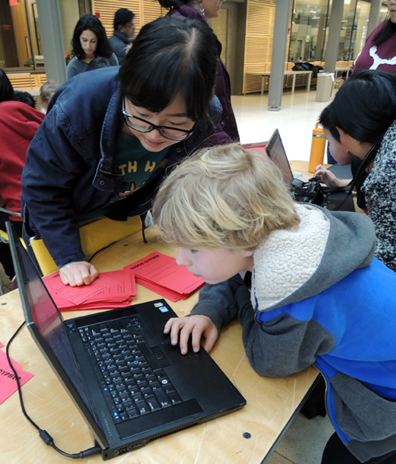 Here’s a screen shot of the game, which was created by sophmore Lucy Lin. If you’d like to test drive the game yourself, here’s the
 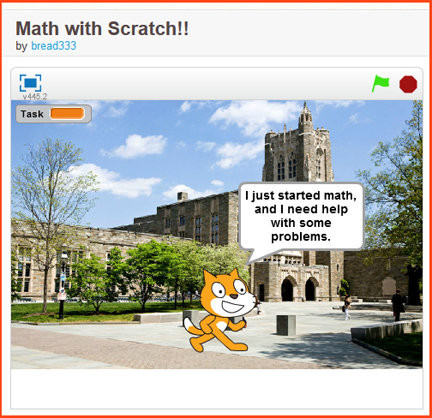 The game was cool, but even cooler was the fact that there was another laptop running tandem to the gaming laptops that showed all the algorithms behind the Scratch program. And volunteers were on hand to answer any and all questions about computing. They also had a couple of encryption puzzles for kids to crack.
 For those who prefer their math undiluted, the Princeton University Mathematics Club came out en force to host a “Playful Problems” table. Here, kids found a plethora of logic puzzles, word problems, visual puzzles, calculator tricks, the works!
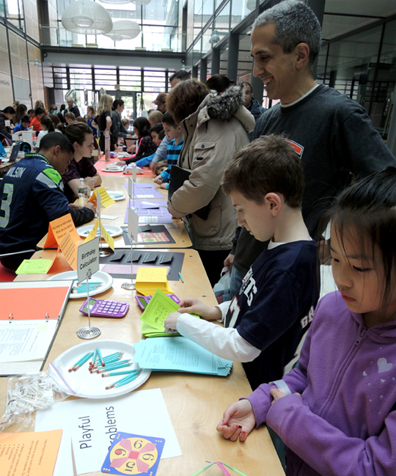
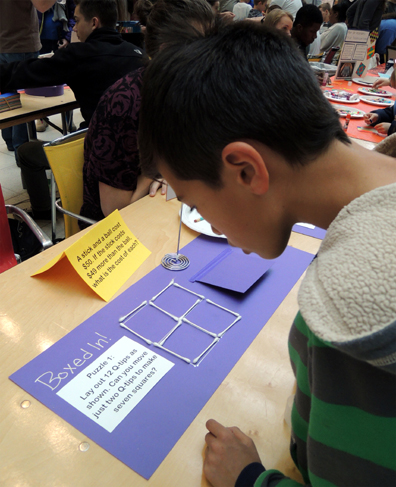 There were 12 different activities for children ages 4-10. The activities ranged from easy to moderately difficult. Here’s an example of our simplest puzzle, which was created by Casandra Monroe (whom you first met
 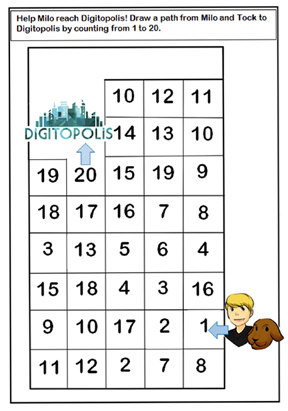 Below is a list of what we offered at the event table. In addition to using Google to find some of these puzzles, Math Wizardry for Kids (Barron’s, 1995) and How to be a Math Genius (DK Children, 2012) were terrific resources.
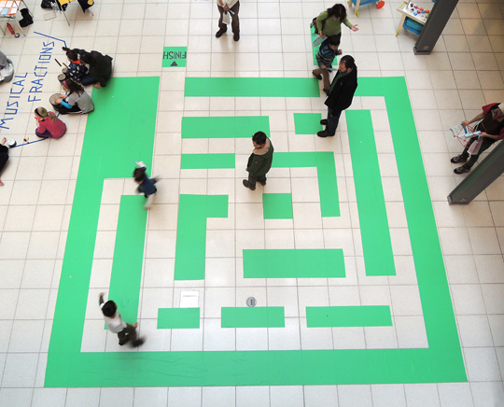 By the way, did you notice the cute play cart parked in the upper right corner of the above image? That’s one of our “Trio of Treats.”
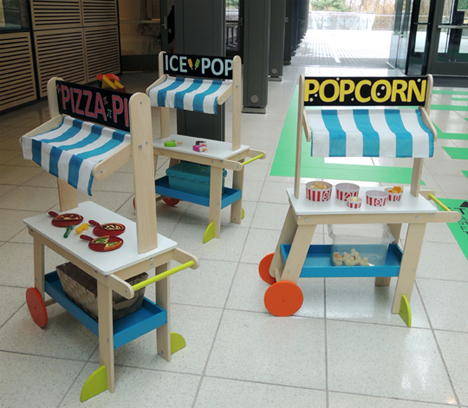 I always try to include something for the littlest patrons, so I bought 3 adorable food carts and stocked them with math play sets. The food carts are by KidKraft (Sweet & Sunny Lemonade Stand) and the play sets are by Learning Resources. We used Piece-A-Pizza Fractions, Number Pops, and Count ‘Em Up Popcorn.
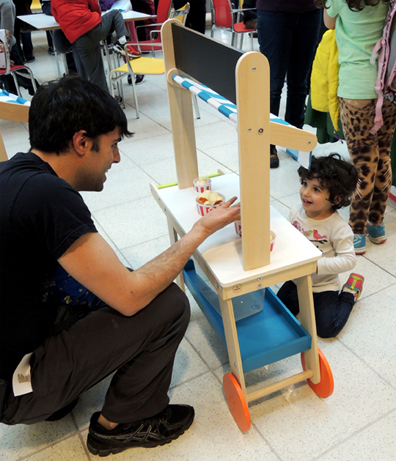 One of the most popular event tables, however, was “Visit the 4th Dimension.” It was hosted by
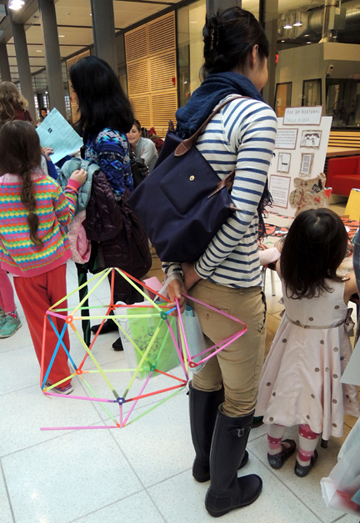
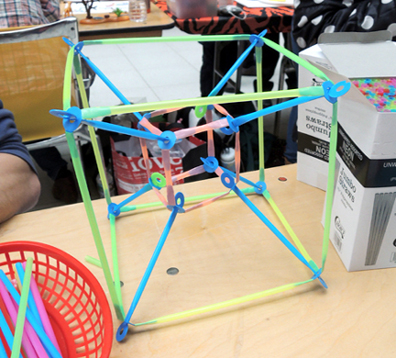
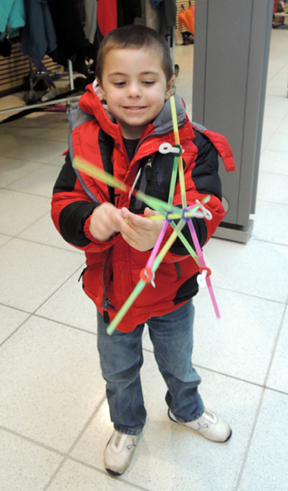
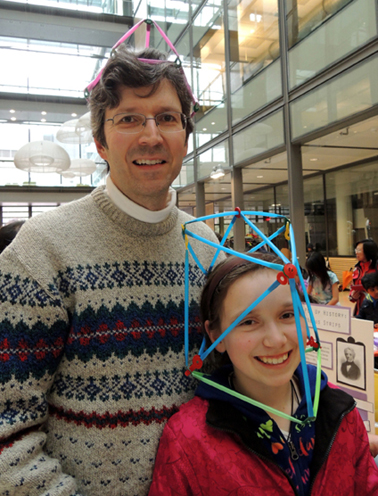
 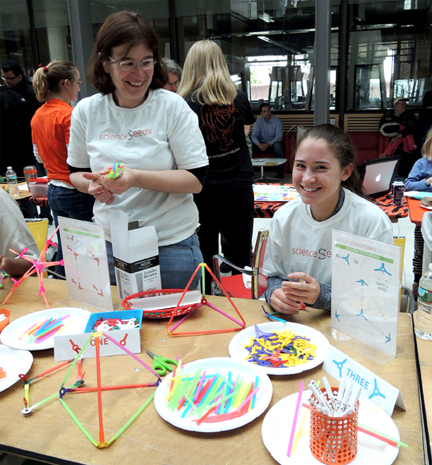 At the event table, kids learned about the different dimensions (1st is a line, 2nd is a square, 3rd is a cube, 4th is a tesseract). ScienceSeeds brought their 3D printers to the event and made models. You can see a tesseract in progress below. Awesome.
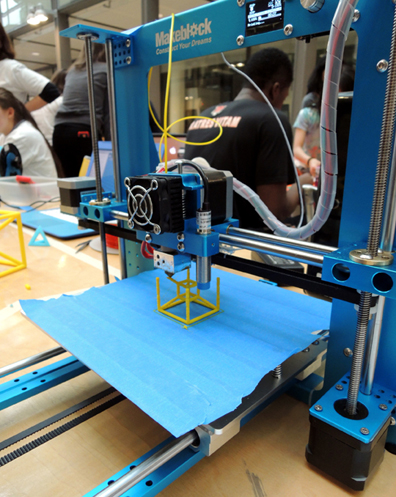 Kids could also make 3D models of their own using drinking straws and plastic connectors. You can buy the plastic connectors online (from Strawbees). However, scienceSeeds has a die cut machine and was able to purchase the die cuts (from Accucut) and make their own connectors from plastic sheets (from Grafix).
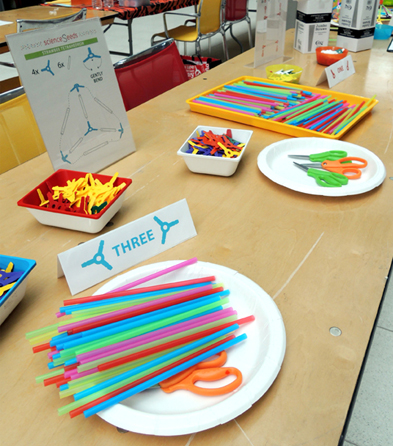 Like I said, their table was hopping – they estimate they went through at least 3,500 straws!
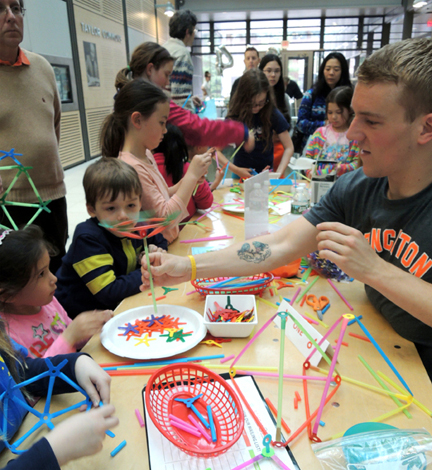 The thing I liked most about the project is that there was no limit to the shape, size, or intended use of the 3D models.