 It’s tall, furry, reclusive, and tree-hugging. Long considered to be a myth, we’re going to prove that the elusive sasquatch does, in fact, exist.
We read Larf by Ashley Spires (Kids Can Press, 2012). Larf is a sasquatch. The only sasquatch in the world. He likes his quiet life in the woods with his bunny, Eric. But one day, while reading the newspaper, Larf learns that a sasquatch is scheduled to make an appearance at a nearby city. Another sasquatch? Despite his love for solitude, Larf decides to brave the trip to see if there is someone like him. Navigating the city (with Eric in a baby bjorn), Larf is scared, anxious, self-conscious, and full of doubts. But he sticks it out, and discovers that the sasquatch is…a fake. Disappointed, Larf is waiting for the bus to take him home, when someone compliments him on his bunny. Lo and behold! It’s another sasquatch! Shurl (with her companion bird, Patricia) came to the city thinking she was the only sasquatch. It looks like the two loners, are not longer lonely!
You’ll need:
- 1 large oatmeal container
- 1 sasquatch parts template, printed on 8.5″ x 11″ paper
- 2 paper towel tubes (make sure they’re the same height)
- Some tagboard or brown poster board
- Dark brown, light brown, and white construction paper
- 1 piece of crepe paper streamer (mine was approximately 27″)
- Several large plastic buttons for counterweights, if needed
- Scissors, glue, and tape for construction
- Markers for decorating
- Hot glue
The trickiest part of the this project is getting the sasquatch to balance on its paper towel tube legs. Other than that, it’s very simple, and the templates for all the project parts can be found on the sasquatch parts template. You’ll need lots of construction paper fringes too.
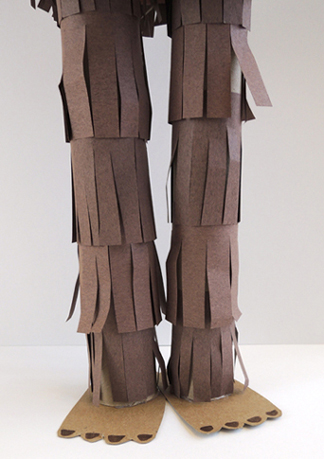
We’ll build from the bottom up! Trace two feet from the template onto tagboard, card board, or heavy-duty poster board. Hot glue the feet to the bottom of a pair of paper towel tubes, then wrap the tubes with several rows of brown construction paper fringe. Use markers to add toenails if you’d like.
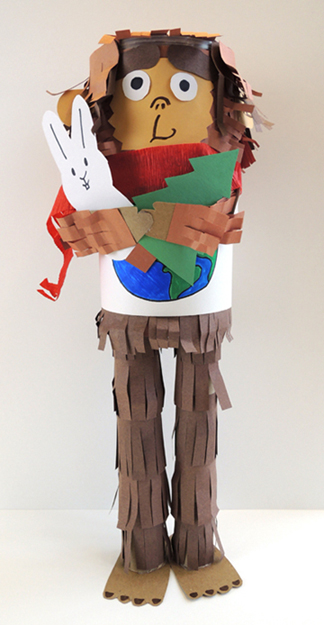
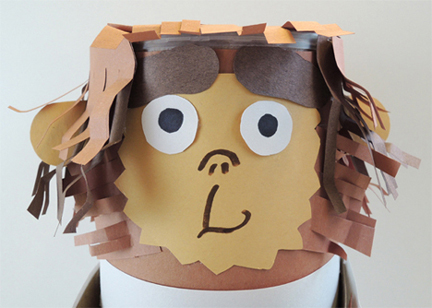
 Set the legs aside for a moment. Wrap an oatmeal container with brown construction paper. Add a fringe of brown construction paper around the bottom of the container like a skirt. Trace the face and ears from the template onto light brown construction paper, then tape or glue them to the container. Add eyes, eyebrows, and draw a nose and mouth. Add brown construction paper fringes around the face and head.
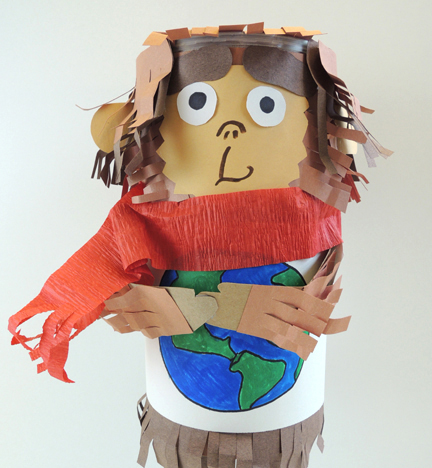
 Larf wears a scarf in the book, so we added a scarf (and a t-shirt) to our sasquatches. The t-shirt was a 5″ x 18″ piece of white construction paper. Kids used markers to draw a design on the t-shirt, then wrapped it around the middle of the oatmeal container. The scarf was a 27″ piece of crepe paper streamer (fringed on the ends of course). Some kids made hair bows out of crepe paper streamers as well. Very cute!
To make the arms, trace the arm template onto 2 pieces of tagboard, add some hair fringes, and hot glue the arms to the sides of the oatmeal container (you can’t see them in the below photo, but I added white short-sleeved t-shirt sleeves to the arms too). Cut some thumbs into the hands, then curl the arms around the chest and hot glue the hands together. Your sasquatch’s arms will now form a circle in front of his/her chest like so:
 Now for the trickiest step. Hot gluing the legs to the bottom of the oatmeal container. Stand the legs up on a level surface and lower the body on top of them. You’ll know right away if the body needs to be adjusted left, right, forward, or backward. When you think you’ve struck the right balance, remove the body, squeeze some hot glue around the rims of the leg tubes, and gently lower the body on top of the hot glue.
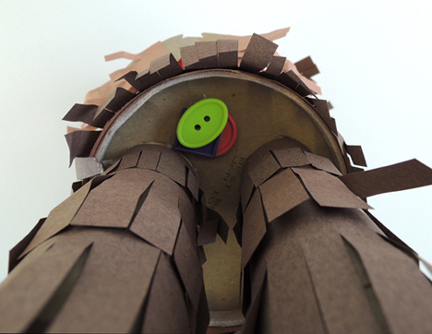
If your sasquatch is still a little wobbly, use large plastic buttons as counterweights. Hot glue them to the underside of the body – front or back – as needed. Here’s a shot of the underside of my sasquatch, with a couple button counterweights attached.
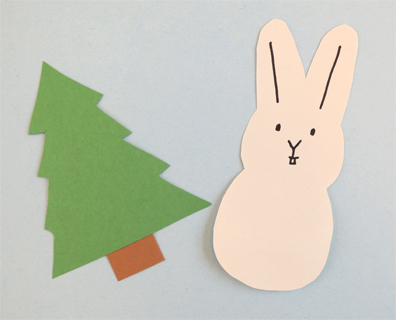
 The sasquatch is finished, but we’re not quite done with the project! You’ll notice a tree and bunny shape on the template. We made trees (with brown paper trunks) and bunnies (with white pom-pom tails) as prizes for a sasquatch finding game.
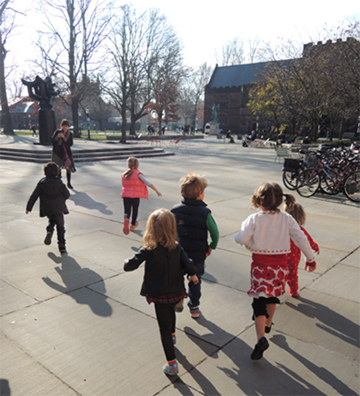
 Outside, we collected the sasquatches and hid them all over the library’s plaza. Then we shouted “1-2-3-Go!” and the kids dashed off to locate their furry friends.
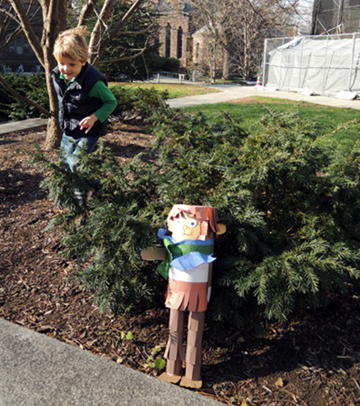
 The reward for discovery was a bunny and a tree, tucked safely into the sasquatch’s arms. Awwwww!
Believe it or not, this isn’t the first sasquatch activity I’ve posted on this blog. Here’s another project for older kids that also involves a slightly different sort of search!