
 It’s the ultimate global adventure that ends with custom postcards in your very own mailbox! We made classic blue mailboxes, then visited locations around the globe to create postcards to send home. And don’t forget the stamp!
We read Will Goes the the Post Office by Olof and Lena Landstrom, translated by Elisabeth Dyddegaard (R&S Books, 1994). Will is excited when the post office notifies him of a package that’s arrived from his Uncle Ben. At the post office, he discovers that the package is GIGANTIC! What could it be? With a little help from Karen, Peter, John and Susan, Will and the gang carry the package home and eagerly unwrap it. At first, it seems like the box is just full of paper…but then they discover a fantastic globe packed inside! And the globe lights up! The five children (and Mama) pile in the closet to see Will’s new globe lamp shine.
You’ll need:
- 1 small tissue box
- 1 box cutter
- Blue construction paper
- Blue poster board
- 1 mailbox signs template, printed on 8.5″ x 11″ white card stock
- A selection of
- 4 foam beads
- 1 small piece of drinking straw (ours was 1.5″ long)
- A blank postcards template, printed on 8.5″ x 11″ white card stock
- Print-outs of different locations around the globe
- Small stickers
- Scissors and tape for construction
- Markers for decorating
- Hot glue
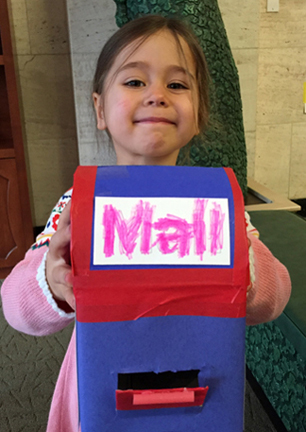
This project was created by Katie, and I have to say, the kids absolutely LOVED it. I mean, who wouldn’t love this cute little mailbox? The round top! The feet! The door at the bottom!
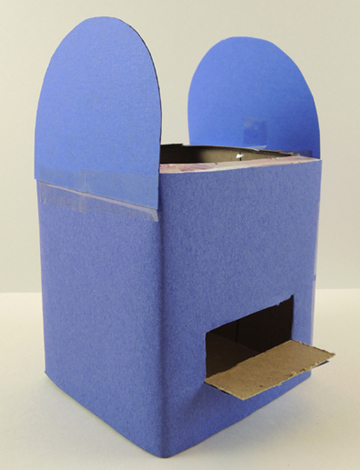
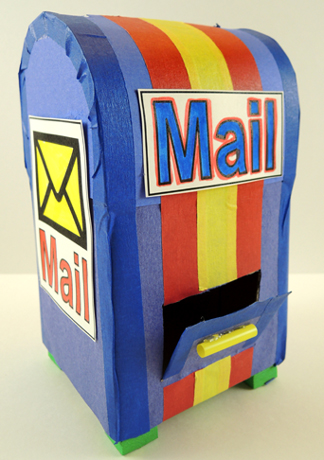 To make a mailbox, cut the top off a small tissue box. Use a box cutter to cut a little door at the bottom of the box. The postcards are 3″ wide, so make sure your door is 3″ or wider.
 Wrap the box with blue construction paper, then use the box cutter (or scissors) to re-establish the little door.
 The rounded sides of the mailbox are 2 pieces of blue poster board (ours were approximately 4.25″ wide, and 3.25″ tall). Secure them in place with tape.
 To make the top of the mailbox, cut a 3.5″ mail slot in the center of a 4.5″ x 9″ rectangle of blue poster board. Gently curl the poster board over the rounded sides of the mailbox, then tape in place. The curling and taping is definitely the toughest part of the project. Keep in mind that it doesn’t need to be perfect!
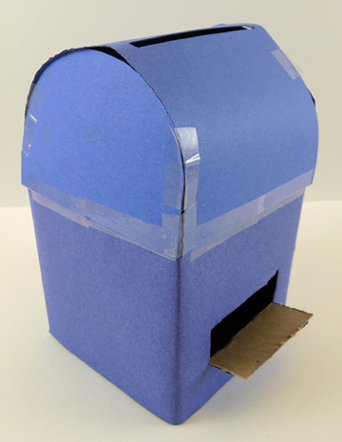 Next, use colored masking tape to reinforce the edges of the mailbox, and to decorate it. Color and cut the mailbox signs from the template and tape (or hot glue) in place.
Finish by hot gluing 4 foam bead “feet” to the bottom of the box, and a small piece of drinking straw to the front of the little door. Your mailbox is done – grab it and get ready to travel!
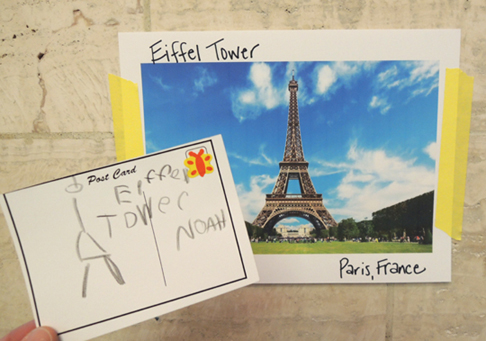
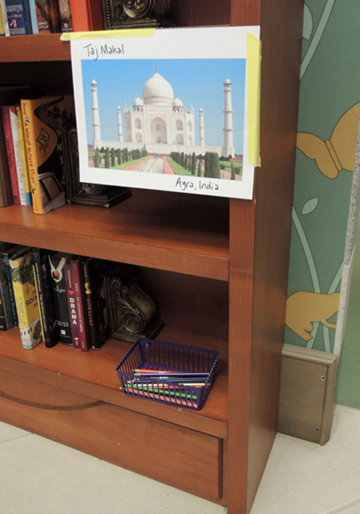
Katie printed up photos of different places (thank you, Google image search!), and taped them up around the gallery. Katie wrote the names of the locations or landmarks, as well as the country, on the photos as well. Underneath each photo was a basket of color pencils.
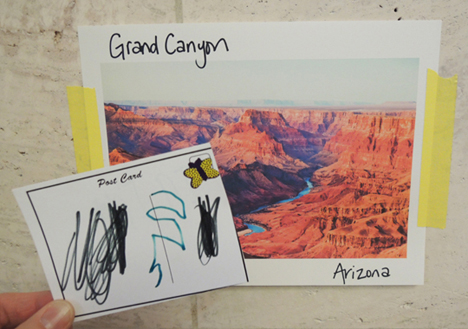
We invited kids to grab 6-8 blank postcards and visit different locations, sketching what they saw in the photos on their postcards. Here’s someone visiting London, England:

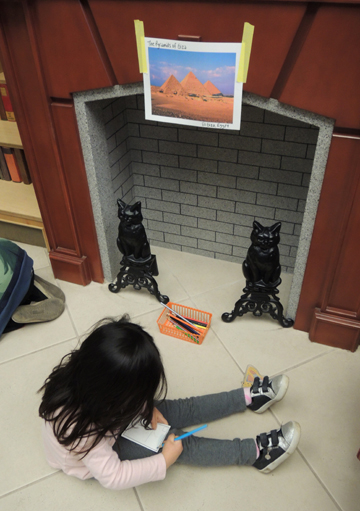
And another traveler enjoying the Pyramids of Giza in Egypt:
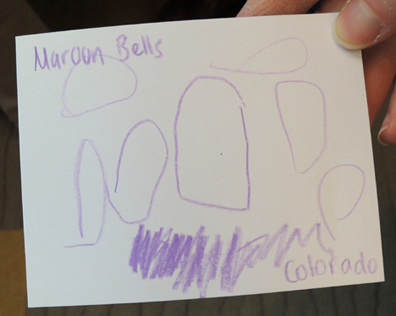
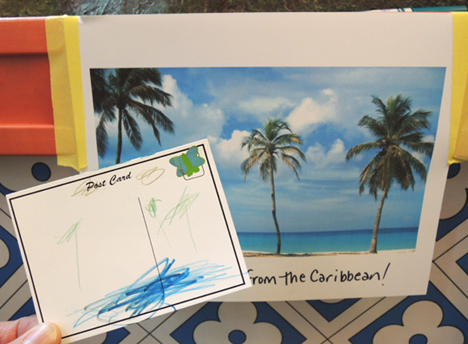
Ready to see some postcards from around the world?
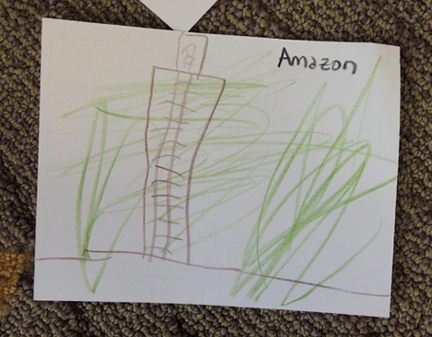
 We even got postcards from places we didn’t include! Here’s a postcard from the Amazon, even though it wasn’t one of our photo locations. I think that’s a person on top of a giant tree with a ladder? Cool.
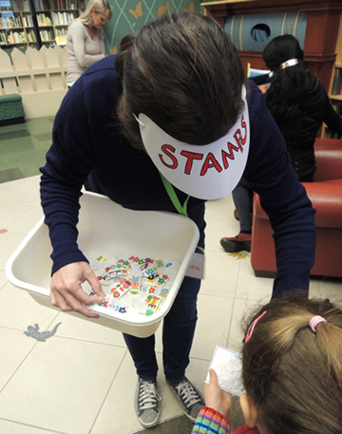
 To make the postcard activity official, Miss Melinda donned a stamp-selling visor and circulated the gallery, “selling” stamps that were actually cute little stickers.
Melinda joined us this fall – she’s a Cotsen volunteer who works at the Princeton Writing Program. I went easy on her the first couple weeks, but slowly, inevitably, Melinda will be drawn into the vortex of ridiculous story time tasks. Today, a visor-wearing stamp seller. Tomorrow, a giant paper cookie!
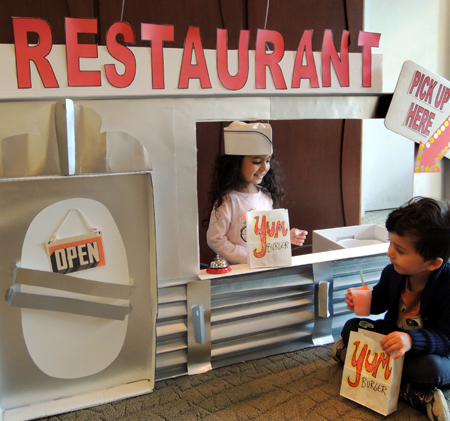 Get your piping hot hamburger, crispy crinkle fries, and ice cold soda served over the counter of this awesome 1950s diner! The cook is taking orders, and our fun matching game insures that your customers will get exactly what they like.
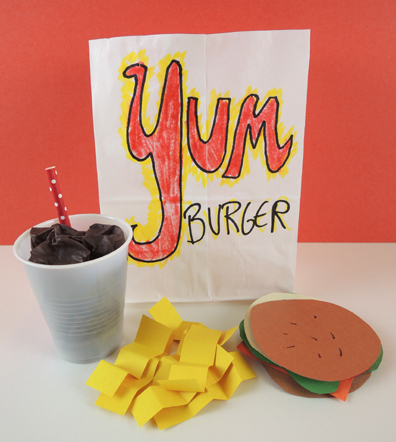 This project consists of 3 paper bags, 3 sodas, 3 sets of fries, 3 burgers, and 3 “customer cards.” First, cut the paper bags down to 7″, then decorate the fronts with your restaurant’s logo. To make the soda, squish three, 9″ x 13″ pieces of tissue paper into 3 small plastic cups. Add a half of a drinking straw to each cup (our straws were 4′ long). For the fries, accordion fold 1″ x 3″ pieces of yellow construction paper. We’ll get to the burgers in just a moment.
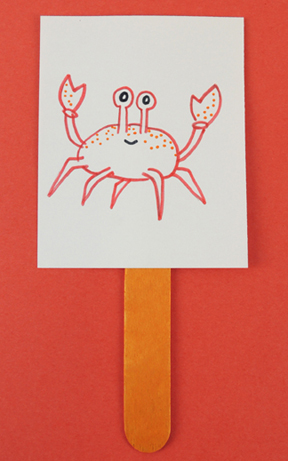 Now for the matching burger! Each burger consists of 6 pieces of construction paper: 2 brown buns, 1 slice of cheese, 1 lettuce leaf, 1 tan burger patty, and 1 tomato slice. Since you’re making 3 burgers, you’ll need 3 sets of those 6 pieces.
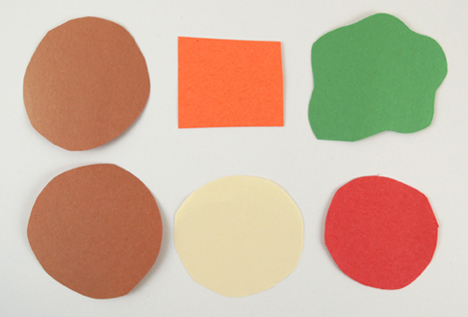 To customize the 3 burger patties, draw what each creature eats on a patty. For example, one of our creatures is a crab. Among other things, crabs eat fish parts and algae. So we drew them on the burger patty (here’s a
 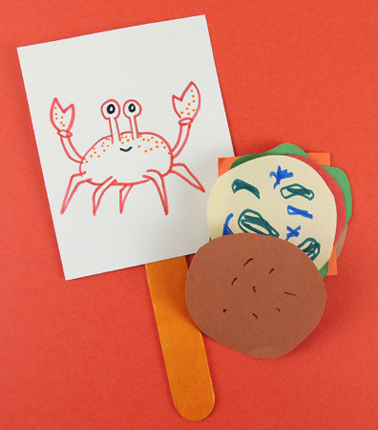 Use
Use 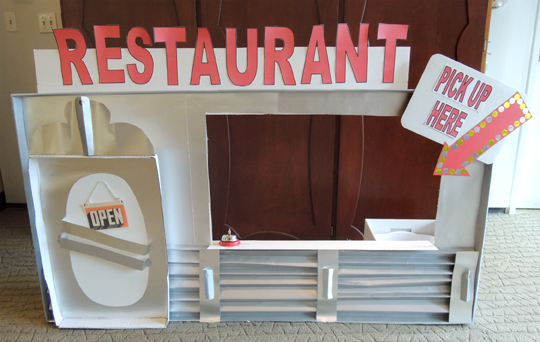 This diner is Marissa in all her awesomeness. The front is a recycled box lid (first used for this
  If you don’t have time to make a diner, no worries. Use a tabletop, small desk, or even an overturned box! However, I do recommend including a counter bell (in the past, I’ve borrowed the bell from the library’s circulation desk). Since our bell was going to get repeatedly slammed by kids, I taped it to the counter. You might want to do the same.
 Kids matched the customer to the appropriate burger, took a drink order (we offered cola, lemonade, or orange pop), and grabbed a generous serving of crinkle fries.
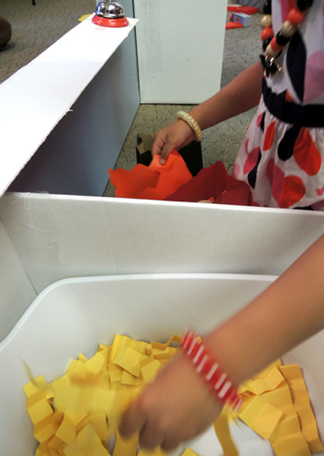 They bagged everything, briskly dinged the bell, and shouted “Order up!” Once that customer had left, it was on to the next customer until every creature had been matched to a burger. Did we have fun? Oh yeah! In fact, we left the diner up for 20 minutes after story time for repeat customers. There was lots of enthusiastic bell dinging and BIG smiles!
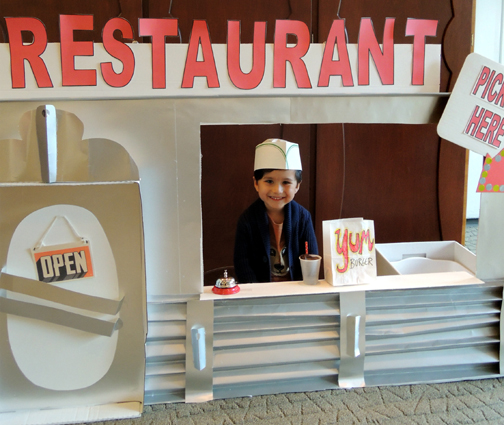 Want to supersize that? Check out these
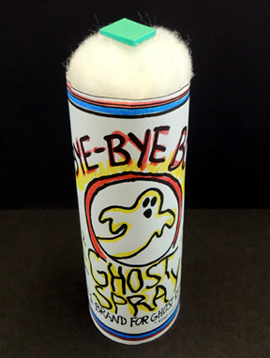
 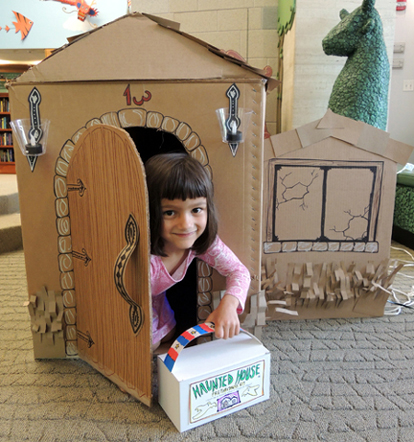 Boldly enter a haunted house armed with your wits and your handy Haunted House Preparedness Kit! Trap a spider, catch a mouse with some cheese, deter a ghost with ghost spray, and use your skeleton key to exit through a secret door. There’s nothing you can’t handle!
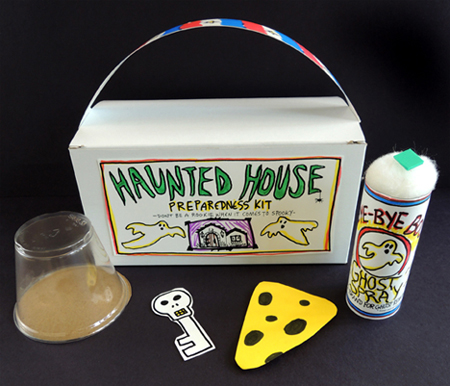
 The final item in the kit is a piece of cheese, which we made out of yellow card stock. Draw holes on the cheese with black marker and hot glue a button magnet to its tip.
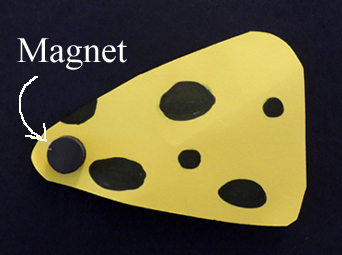 The next round of items are the things you’ll be catching inside the haunted house – a spider, a ghost, and a mouse. First, the spider. Color a wooden bead with black marker and hot glue a wiggle eye on the front. Cut 2 pipe cleaners in half, then thread the 4 pieces through the hole in the bead. Bend the pipe cleaners to create wiggly spider legs.
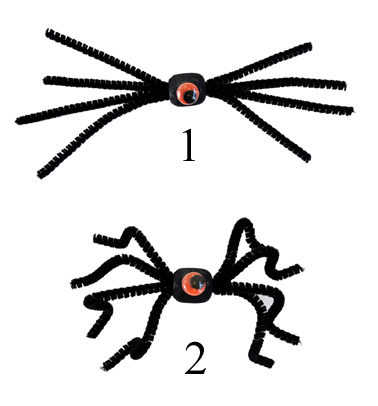 To make the ghost, wad up a facial tissue and fold 2 facial tissues over the wad. Tie the end of a 24″ string around the wad to create the neck of the ghost. Make sure to leave plenty of string free to dangle your ghost later! Use a maker to add eyes and a mouth.
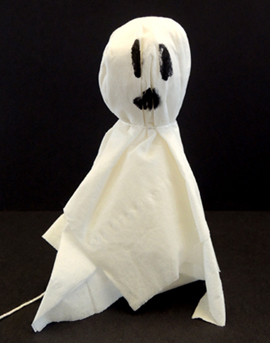 Finally, color and cut the mouse from the template. Tape a jumbo paper clip to the underside of its mouth. Later, this paperclip will attach to the magnet on the cheese.
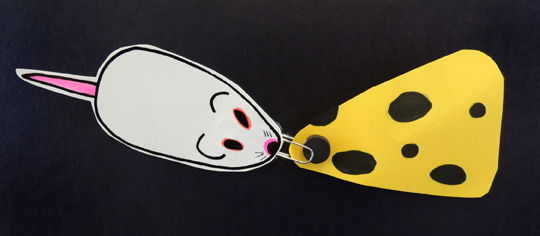 That’s everything you need for your adventures in the haunted house…now you just need the house! It doesn’t have to be fancy. Drape some sheets over the shelves in your stacks, or drape a tablecloth over a table and have kids crawl under it. But if you have a giant box, 2 smaller boxes, and a black light handy, go for it! Here’s the front of out house (plus a photobomb by Marissa).
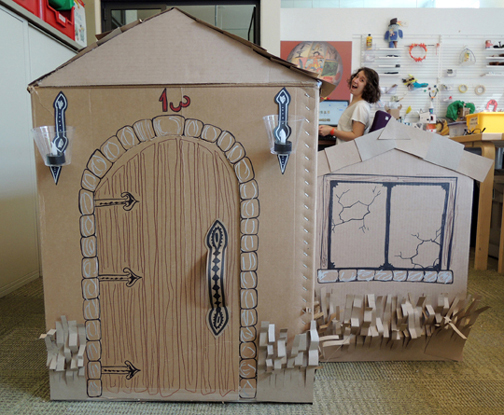 I love the lanterns by the door. They’re LED candles inside plastic cups, which are attached to the box with black poster board. There’s a little poster board flourish hot glued to the bottom of the cup too.
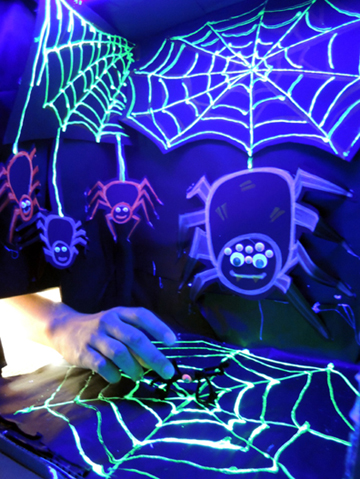
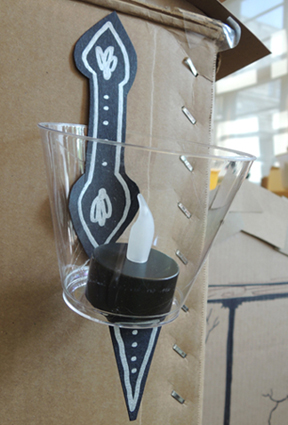 Here’s a shot of the house’s interior, as seen from the front door. There are LED wall sconces, a mirror, a bookcase, old-fashioned portraits, a clock, and a fireplace that leads to the black light room. And there were also 4 activities for the kids…coaxing a mouse out of the mouse hole, catching a spider, spraying a ghost with “Bye-Bye Boo” spray, and using a skeleton key to exit through a secret door.
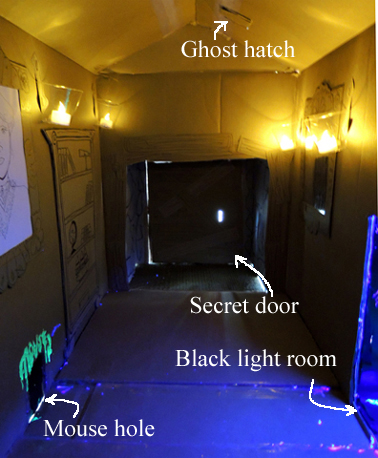
 At the very back of the house was a secret door, which was covered with tagboard strips made to look like wooden planks. The interior of the secret door box with lined with gray felt. To give it an underground kind of feel, I used a thick black marker to draw outlines of stones on the felt.
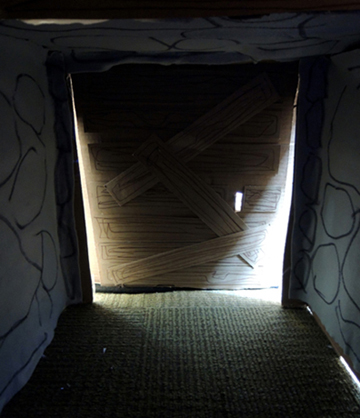 Here’s a shot of the haunted house from the right side. Everything was was held together with lots of hot glue and packing tape.
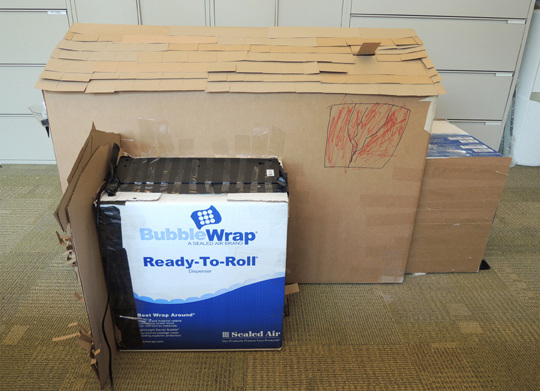 The left side of the house had the mouse hole, which we covered with black felt to keep light from leaking in. My kids did all the exterior decoration. Like the dead flower garden on the lower right?
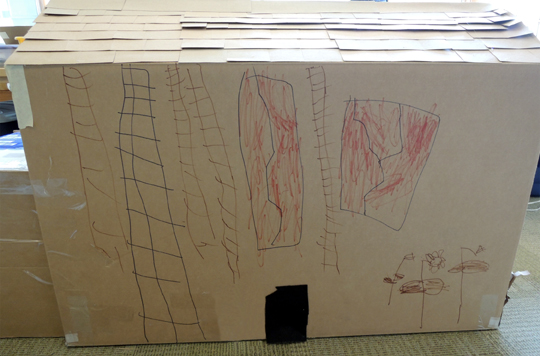 So! Here’s how it went! Kids lined up outside the house. When it was their turn, they handed us their spiders, mice, and ghosts. Then they entered the house with their kits.
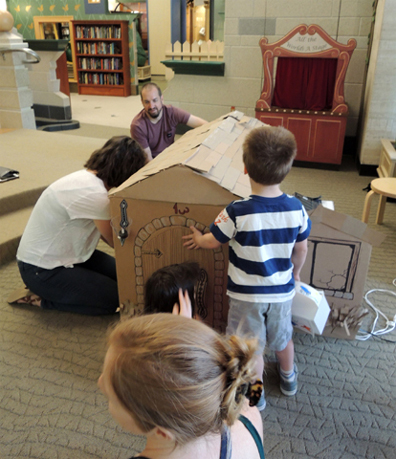 Once inside, they listened for the mouse squeaking in the mouse hole (this was literally Marissa saying “Squeak squeak!” and wiggling the nose of the mouse outside the hole). Kids stuck the magnet end of the cheese into hole and “caught” the mouse. Into the kit it went!
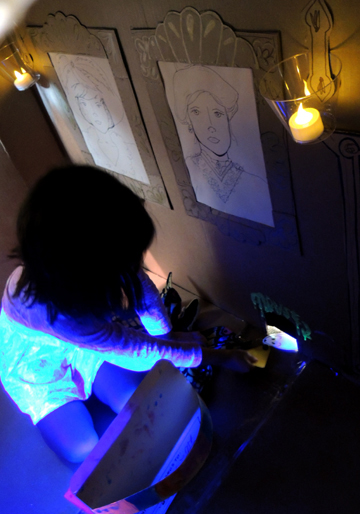 Next, kids reached into the black light room, grabbed their spider, and put it in their collection jar. By this time, I had opened the trap door in the roof and dangled their wailing ghost in (I followed Marissa’s lead, enthusiastically saying “Wooo wooo!”). The kids doused the ghost with a ghost spray, causing it to drop to the floor of the house. Into the kit the ghost went.
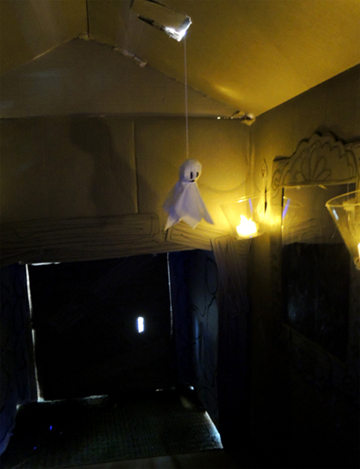 The final task was for kids to shimmy into the secret room and use the skeleton key to unlock the door. We wouldn’t lift the door until we saw a key in the key hole!
 Kids could go through the house as many times as they wanted, and we kept story time going 20 minutes past our end time to accommodate repeat explorations. It was…wait for it…a total scream! Awwww.
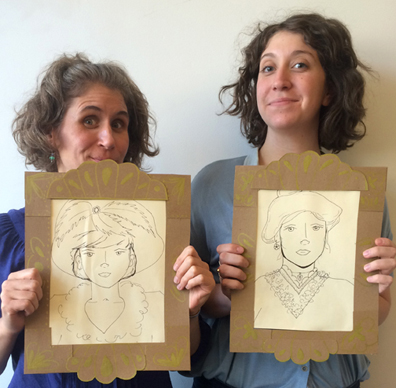 The portraits are a nod to the day we spent sipping Victorian tea at