

Image courtesy of U.S. 1
Q: Do you have any suggestions for promoting programs on a small budget?
Sure! I’ll start with the obvious ones first, and then move on to the not-so-typical. These days, the go-to promotional mechanism is online media – Facebook, Twitter, Instagram, blogs, etc. Lower tech options are to make door signs, or put out a stack of flyers so people can grab one and stick it on their fridge. Once, for a major event at a children’s museum, I took over an entire bulletin board, adding updates to it in creative ways. I would see families stop by during visits to see what was new.
E-mail notifications are also a great ways to get the word out. We run our e-notification list through a University listserv service, but you can use the Contact Group mechanism in Microsoft Outlook (go to Contacts tab > New Contact Group):
 I believe Google has some Group Mail options too. One very, very important thing to remember when sending group mailings? Only insert the e-mail addresses in the bcc (otherwise known as the “blind copy”) field! Otherwise, everyone on the list is going to see the addresses, which leads to privacy issues.
Press releases to local newspapers (and online news sources) are also a great way to get the word out. Here are my 4 rules for press releases:
- Keep it short.
- Include your contact information in the release.
- In the subject line of the e-mail, include the date the program is happening. This helps the editor file it more effectively, increasing your chances of having it run.
- Send the release at least 3 weeks in advance. Newspapers have crazy publishing schedules. Give them time to put your press release in place.
But my BIG hint when it comes to press releases is to include a promo photo. Most newspaper calendar listings include a smattering of photos. Nab one of those photo spots! Your promo photo does not have to be elaborate. Here, for example, is the photo for a 2007 Harry Potter event.
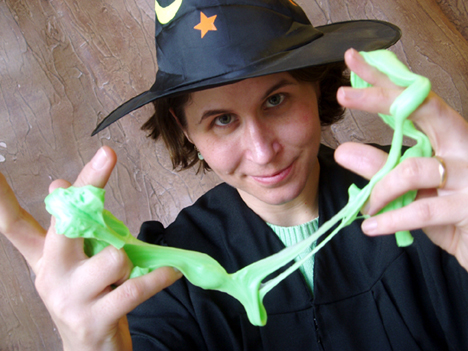 That’s a donated graduation robe, a witch hat from the Dollar Store, and some goop I bought from a gumball machine for 50 cents. The photo ended up running in 5 local publications. How about this one for a 2011 Lightning Thief event?
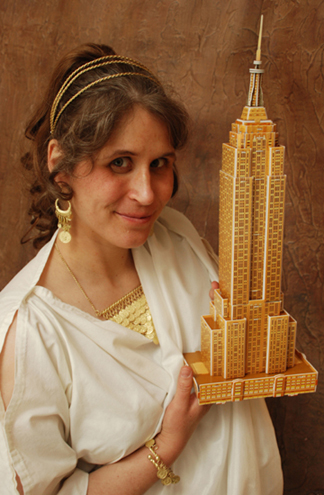 I’m wearing a bed sheet tacked together with hot glue, an old curtain, some costume jewelry, and a fake ponytail I bought on Amazon (which made a comeback for my Victorian Tea costume, woot woot!). That’s a paper puzzle of the Empire State Building. Oh, and I’m 6 months pregnant.
If you don’t feel like being the subject in the photo, you can always ask your co-worker, significant other, relative, or neighbor to pose. Here’s my student assistant Katie McGee in 2009. Isn’t she an amazing Alice?
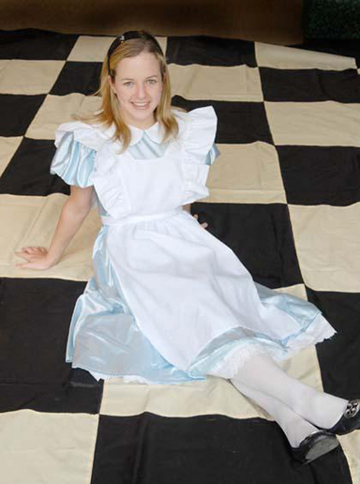
Courtesy of the Princeton Packet, photo by Mark Czajkowski
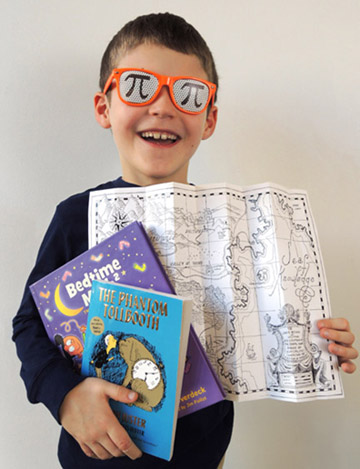
You can ask kids to pose too (with parental permission of course). This lad is gearing up for A Day in Digitopolis, our massive math event, which you can read about here and here. If you do photograph kids, be prepared to take lots of photos very quickly. Kids can get wiggly, distracted, bored, or suddenly shy. Also, the fewer props kids have to handle, the better.
 You can also use objects for your promo photos. When we did a Richard Scarry creative car-building program in 2015 (read about it here), I couldn’t use an image from his books, nor could I pose a person as a car. So I sculpted Mr. Frumble’s pickle car out of an oatmeal container:
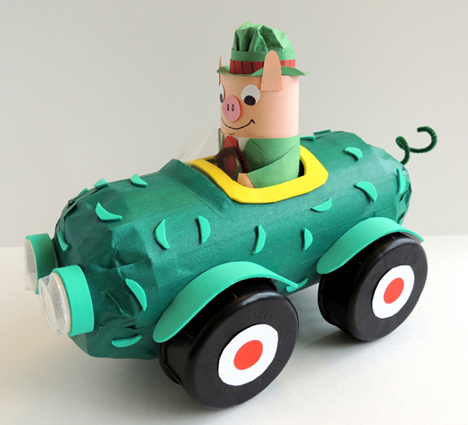 It took some time to make (especially that fedora) but it paid off! The photo ran in quite a few places, including a highly visible pop-up box in Town Topics, one of our local papers.
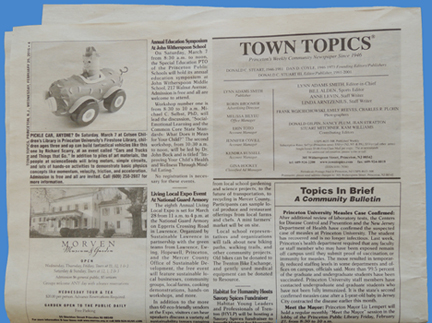
Town Topics, February 25 2015 edition
Mr. Frumble enjoyed an encore performance when we took the program to the Eric Carle Museum of Picture Book Art (you can read about that here). His final destination? Jeanne Birdsall’s studio in Northampton. I am pickle green with envy because he’s totally going to get to read the final Penderwicks book before I do. Lucky pig. Jeanne sent me this shot of Mr. Frumble happily zipping along under blue skies and puffy clouds.
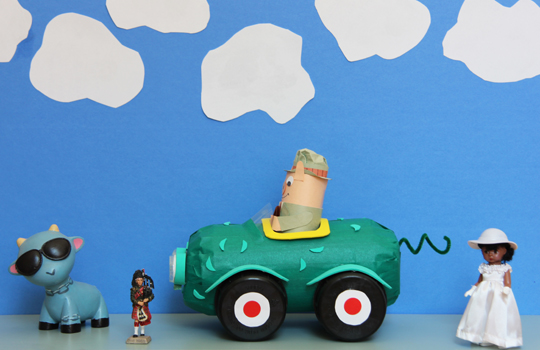
Photo by Jeanne Birdsall
By the way, the goat on the left is from Jarrett Krosoczka’s picture book, Punk Farm. It’s hand-painted by Jarrett himself (and as a quick aside, check out this fantastic timeline of his childhood artwork – wish I had saved mine!).
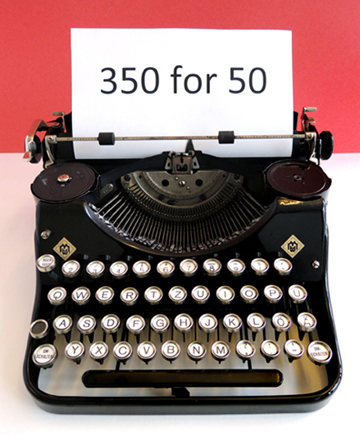
You don’t have to spend hours hand-crafting an object for a promo photo. Here, for example, is a photo for our annual 350 for 50 writing contest. I borrowed a typewriter from a colleague, put it against a red background, and voila! A lovely, bold photo.
If you do send a promo photo to a newspaper, make sure the photo is high resolution (300 or higher). Anything lower will blur when they print it, and they won’t use it. If you’re taking the photo with your phone and it only captures images at 72, that’s OK. Just leave the image as large as possible. My phone shoots in 72 and the resulting image is 34″ x 45.” The newspapers can shrink a large, low resolution file down and still print it. But 300 is really the ideal.
If you’re having an event, starting a new initiative, or just have something of interest to the community, you can always call newspapers and pitch an idea for a story. That is how my student assistant Emily Garcia and I ended up on the cover of Central New Jersey’s publication U.S. 1. Michele Alperin wrote a fantastic feature article about the event as well, which you can read here.
Image courtesy of U.S. 1
Another local newspaper, the Princeton Packet, would often (and very graciously) premiere our annual literary extravaganza with a “sneak peek” article. Like U.S. 1, they would send a photographer to take a couple of fun photos to run with the article. Sometimes, one of those photos would end up on the cover of TimeOFF, their weekend insert! Here’s one of their 2010 photos from an article on Treasure Island. Aye, that’s Katie McGee again, this time sporting an eye patch and carrying a old shovel from my neighbor’s garage.
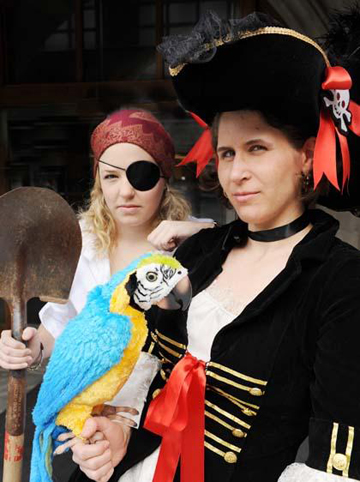
Courtesy of the Princeton Packet, photo by Mark Czajkowski
A word of advice…if you do decide to suggest an article to a newspaper, choose your topic wisely. Don’t call the editor all the time, pitching every single program you’re offering. Pick and choose, and don’t be discouraged if he/she declines.
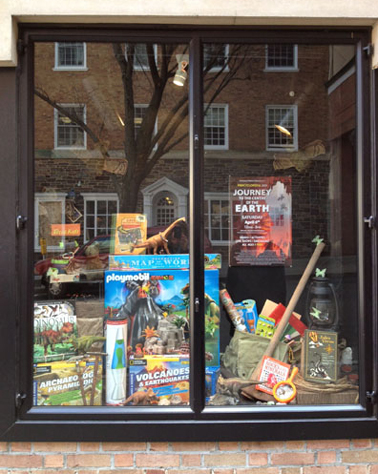
One final bit of unusual promo? The windows of local stores. We have a stupendous family-owned local toy store called JaZams. In 2013, they not only agreed to host an activity table at our Journey to the Centre of the Earth event, they let us promote the event in one of their picture windows! Katie and I gathered all the dinosaur, geology, cave, Jules Verne, and night creature related things we could find in their store and put together a thing of beauty.
 In 2015, JaZams let us use the window again, this time for our Very Hungry Caterpillar food drive. If you’re wondering who created that beautiful poster, it was our very own Aliisa Lee, artist extraordinaire.
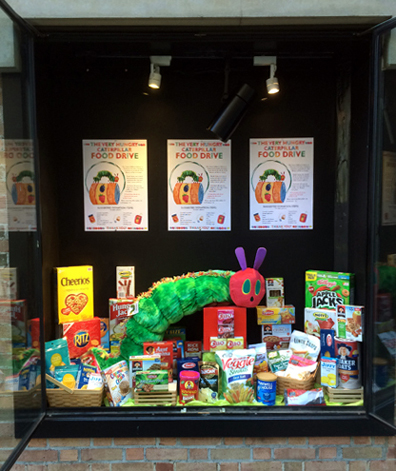
Food drive title and art inspired by the work of Eric Carle.
The nice thing about the food drive was that every donated food item earned the donator a chance to win that gigantic stuffed caterpillar. One generous little girl came every week with new groceries to give. Pounds and pounds. And she won, too!
I always love getting questions from you guys, so keep ’em coming! danas@princeton.edu
 Recently, while in Brooklyn, I wandered into a little toy store called Matt & Juliette. There, I discovered some neat-o wind-up butterflies by Seedling. The clerk at the toy store explained that some people like to put the butterflies inside birthday cards. When the recipient opens the card, the butterfly flutters out. If it works for cards, I thought, it’ll totally work for books! I immediately purchased a pair to test out. They retail for $3 each and come in 4 different colors and styles.
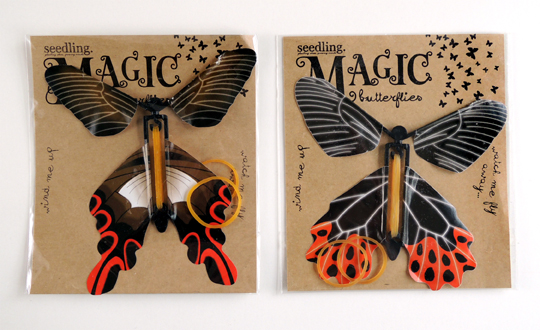 As you can see, the toy is pretty simple. You hold one half and twist the other half. This motion winds the 2 rubber bands, which ultimately propel the toy skyward.
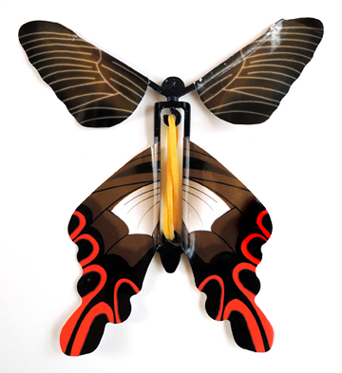 The directions warned that winding the rubber bands too tightly could cause them to snap. This is true. Over the course of 20 test flights, we broke 2 rubber bands. But there are two spare rubber bands in each package, so no problem! Alas, one of the plastic hooks on the smaller butterfly snapped within 5 minutes, rendering the toy useless, but the other one held out just fine. Ready to see a butterfly in action?
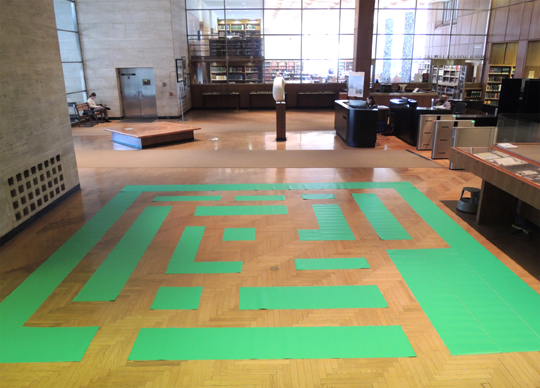 Today, we offer an exclusive first look at something big on our horizon. This month, my library is hosting a major math event. It’s called A Day at Digitopolis (named, of course, after the famed city in The Phantom Tollbooth). Today, you’re going to get a sneak peek at one of the activities – a giant 16′ x 16′ floor maze. But this is no ordinary maze! You have to get from start to finish without taking a single right-hand turn. Want to build one of your own? Read on!
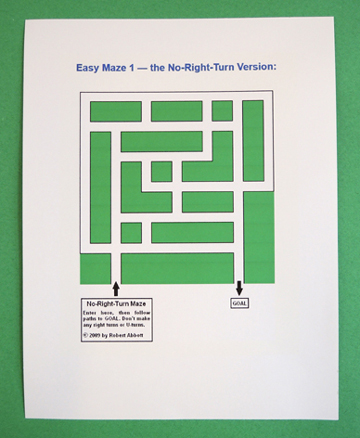
 Once I finalized the maze design and decided that it was going to be 16′ x 16′, I had to calculate how much contact paper we needed. The rolls I found on Amazon were a standard width of 18″, so I just had to determine the length. I work best with models, so I crafted a little maze, in which 1″ = 1 foot.
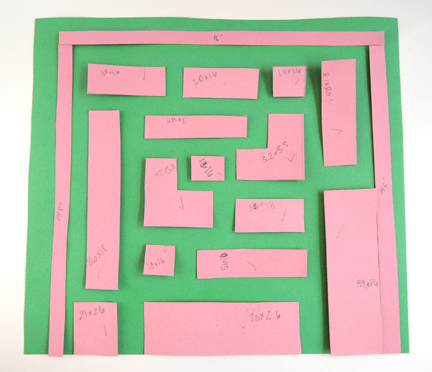 Once I added up the lengths of all the pink pieces, I had a rough estimate of how much contact paper we would need (112.25′). I ordered two, 75′ rolls, which left plenty of extra paper for mistakes. The task of actually building the maze fell on Marissa and Casandra Monroe. Casandra is a Princeton University student and super math whiz!
 Casandra sketched the maze on graph paper, in which 1 square = 1 square foot. Then she drew a 16 x 16 square and sketched the various pieces inside it. To make the calculations nice and simple, she made path through the maze 1′ wide.
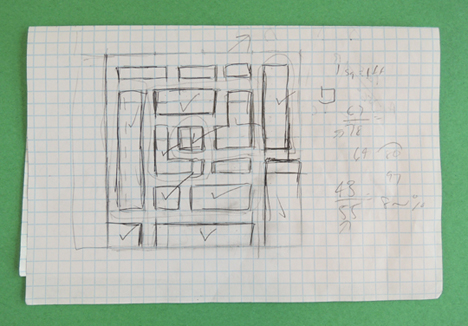 Then, Marissa and Casandra headed to the library’s cavernous main lobby and started building. They laid down the outer walls of the maze first:
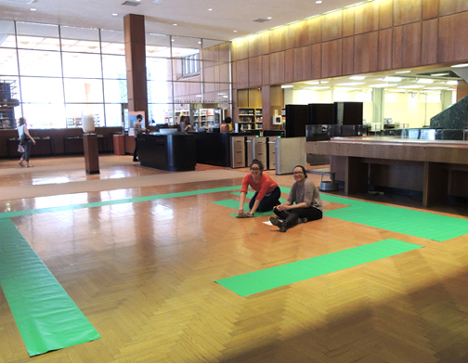 And then cut and placed the internal pieces of the maze.
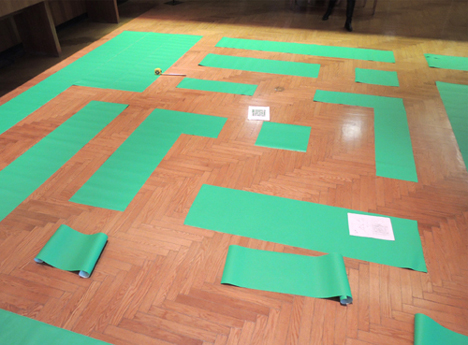 While they were filling in the pieces, they used a measuring tape to keep the path as close to 1′ as possible (even though there were some areas where the path was wider).
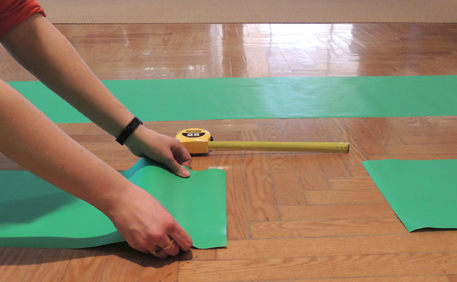 Marissa and Casandra kept the backing on the contact paper. But to keep the pieces from curling up, they used masking tape loops to temporarily adhere it to the floor.
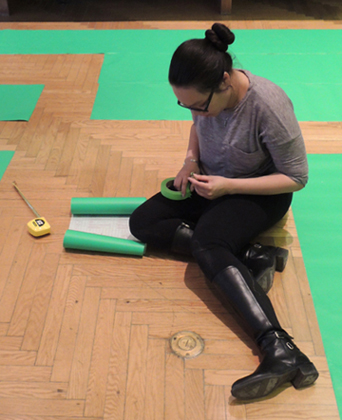 They also used permanent marker to label the backs of all the pieces and match them to a diagram of the maze.
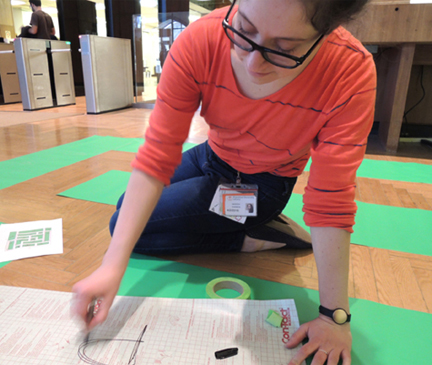 The morning of the event, we’ll be able to glance at the diagram, check the backs of the pieces, and peel and stick the maze quickly (we’ll have a measuring tape on hand to remeasure the pathways too).
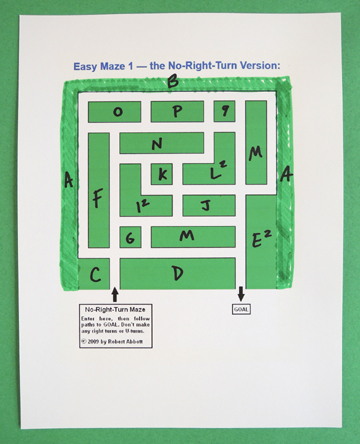 All in all, the maze took about 3 hours to put together. Cue “Eye of the Tiger!”
 Three important things: 1) Don’t forget to mark the start and finish of your maze (we’re using extra pieces of contact paper with “start” and “finish” written on them in permanent marker); 2) At the event, make sure to have the
 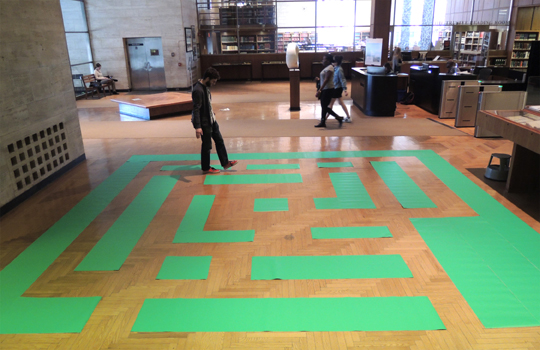 The real test, of course, will be at the