Miraculous Mechanism

miraculous mechanism
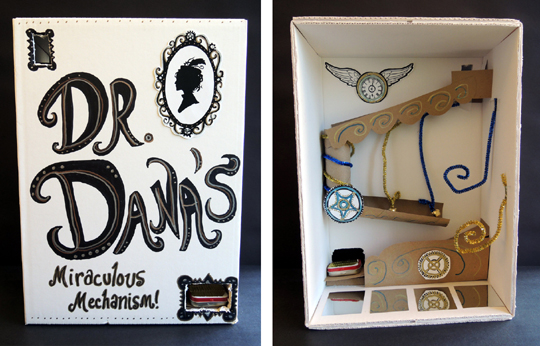
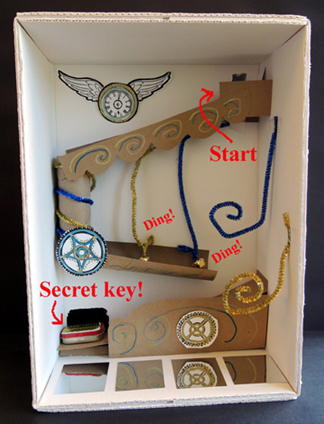
If you have a hankering to create an old-fashioned, coin-operated, yet somehow completely modern mechanism that dispenses a secret key, you’ve come to the right place! For this particular model, the coin goes in, hits a marble, which then rolls down the various tubes, dings two bells, and nudges a mini Altoid container out the bottom.

mechanism markedMost of the projects you see on this blog are from Tiger Tales, our weekly story time for 3-5 year-olds. But we do have another weekly story time for 6 – 8 year-olds called To Be Continued. Basically, I read from a chapter book over a series of weeks, and then we do a project (or activity, or field trip) when we finish the book. This project is from that program.

We read Horten’s Miraculous Mechanisms: Magic, Mystery & A Very Strange Adventure by Lissa Evans. Ten year-old Stuart Horten, recently relocated to the town of Beeton, is steeling himself for a long, boring summer of nothing (topped off by a set of annoying triplets next door). But everything changes when he discovers a hidden message and a cache of old coins from his Great-Uncle Tony Horten. Great-Uncle Tony, a renowned magician, stage illusionist, and creator of fabulous contraptions, mysteriously disappeared in 1940, leaving behind a secret workshop. If Stuart can follow the clues and solve the puzzles, he’ll find the workshop!

You’ll need:

  • A box (or box top) that can stand up on its own and has some depth – my box was 16.5″ tall, 12″ wide, and 6″ deep.
  • A box cutter
  • Toilet paper tubes
  • Paper towel tubes
  • A selection of sparkle stems
  • A few sheets of tagboard (or other super stiff paper)
  • 1 coin
  • 1 mini Altoid tin (about 2.5″ long)
  • 1 marble
  • 2 jingle bells
  • A couple pieces of mirror board (optional)
  • 1 mechanism template, printed on 8.5″ x 11″ card stock
  • Markers for decorating (I used metallic markers, but regular work too)
  • Scissors and tape for construction
  • Hot glue

During this project, I stressed – repeatedly – that testing and failing is part of designing and engineering. We tested, and tested, and then tested some more. There were a lot of escaped marbles rolling on the floor, but there were no lost tempers! Also, some kids opted to use just the marble for the mechanism (as opposed to putting the coin in juuuuust right).

The only prep I did for this project was to use a box cutter to cut the coin slot and the dispenser slot. I also helped with the very first step – setting up the initial platform for the marble. The platform had to hold the marble steady, but also allow it to roll free when it was nudged by a coin or finger. With that in place, I turned them loose with the supplies and circulated around the tables, assisting when needed, hot glue gun ready.

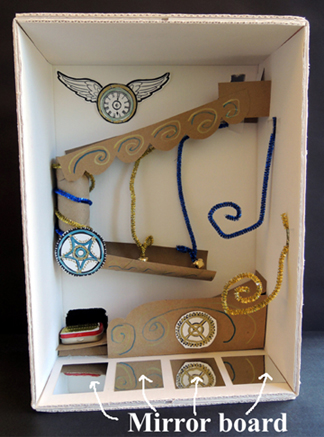
If you can get it, I highly recommend mirror board to add some flash and fullness to your mechanism. I buy mine online at Discount School Supply.

mirror
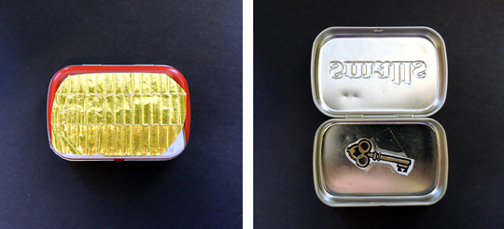
I found a little textured gold paper in the Bling Bin, so I added it to the top of my key box. And don’t forget to enclose the key from the template!

key boxThe template artwork was created by Princeton student artist Aliisa Lee. Originally, it was used for a Steampunk hat decorating activity that was part of a larger Journey to the Centre of the Earth event. I mostly used Aliisa’s gears for the mechanism template, but if you’d like to see more of her artwork in action, take a look at this dapper gent!

steampunk hatIn May 2015, I interviewed Lissa Evans about her fantastic books. If you’d like to hear it, click here! If you’d like to see the project we did for the sequel, Horten’s Incredible Illusions, click here and prepared to be astounded and amazed!

Chick Magnet

barnyard with magnetThis little farm is fun, but adventure takes on a new meaning when your pom pom chick starts exploring on his/her own, compliments of a magnet wand underneath the base!

We read Good Morning, Chick by Mirra Ginsberg, illustrated by Byron Barton (Greenwillow Books, 1989). A newly hatched chick explores a barnyard and learns about animals, sounds, and…getting wet! The plot is very simple, but this book reads in a lovely, fun, and engaging way – especially if you invite kids to make sounds and imitate movements along with you.

You’ll need:

  • 1 small yellow pom-pom
  • 2 tiny wiggle eyes
  • 1 tiny orange construction paper triangle for chick’s “beak”
  • 2 button magnets
  • 1 flat corrugated cardboard base (mine was 7.5″ x 15″)
  • 1 small box (mine was 2” x 3” x 3”)
  • Red construction paper
  • 1 piece of brown poster board for barn roof (mine was 3″ x 4″)
  • 1 piece of brown poster board for tunnel (mine was 2.5″ x 4″)
  • 1 toilet paper tube
  • Green tissue paper
  • 1 fence and sunflower template, printed on 8.5″ x 11″ card stock
  • 2 green pipe cleaners, cut into thirds.
  • 1 small piece of blue cellophane (mine was 2″ x 4″)
  • Green construction paper
  • 1 wooden spool
  • Markers for decorating
  • Scissors, white glue, and tape for construction
  • Hot glue

For this project, it’s important to make the chick first. You will need the chick to measure the various openings you create in your barn, tree, fences, and tunnel. It would be tragic to get everything glued down and then realize your chick won’t fit!

I prepped the chicks in advance, using white glue to attach 2 wiggle eyes and the orange construction paper beak to a yellow pom-pom. Then I hot glued the chick to the button magnet.

chick magnetNow for the farm! We’ll start with the biggest object first – the barn. Here are the steps I used to create it. Your barn might vary slightly, depending on the size and shape of your box. The box I used had a lid at the top, and four tabs on the bottom that interlocked to create the bottom of the box.

barn step 1I cut the lid off the box entirely, and then flipped the box over so the interlocking tabs were facing upwards (the above image on the right).

One important thing to note – the bottom of your barn needs to be open. Meaning, the “floor” of the barn is actually the corrugated cardboard base. This is so the chick magnet can slide in and out of the barn.

barn step 2To make the roof of the barn, I cut two of the interlocking tabs into triangles to form the “front” and “back” of the roof.  Then I folded the other two tabs together to form the peak of the roof. Trim and tape securely.

barn step 3Next, I cut out the barn doors. Make sure you measure to make sure the chick fits through the doors!

barn step 4Cover the barn with red construction paper, and add a brown poster board roof. Use markers to add some details.

finished barnThe tree is next! Cut four tabs in one end of a toilet paper tube like so:

tube tabsThen cut a entryway at the base of the tube for your chick. Make sure to measure!

tree testTo create foliage for your tree, ball up some green tissue paper and glue it to the tube tabs. Use markers to add a hole and some “bark” on the tree.

finished treeTo create the pond, draw some fish and frogs on the corrugated cardboard base. Then tape a piece of blue cellophane over your drawing. Try to make the cellophane as flat as possible, so your chick magnet can glide over the pond and take a “swim.”

pondTo make a sunflower garden, color and tape the flowers from the template onto the pieces of green pipe cleaner. Then bend the bottom of the pipe cleaner into an “L” shape and tape it to the corrugated cardboard base.

The fences on the template can go just about anywhere, but if you want to create a corner fence like mine, follow these steps. Cut the fences from the template, making sure to leave some space below the fence for your tab. Then, fold along the dotted line of the fence.

fence step 1Now you have a tab that attaches the fence to the corrugated cardboard base.

fence step 2Cut a slit in the middle of the tab…

fence step 3Then fold inward and tape the corner securely.

fence step 4Your corner fence is complete! And don’t forget…if you want your chick to get through the fence, make sure to cut a hole for him/her (and measure, measure, measure!).

finished fenceFor the tunnel, tab the bottom of each side of the brown poster board, and then fold and shape it into a tunnel. And…let’s say it all together now…don’t forget to measure your chick!

tunnelWhen all the pieces are complete, hot glue them to the corrugated cardboard base (the tunnel, however, does better if it’s taped). We used green tissue paper (crumbled and glued) and fringed green construction paper (secured with tape) for landscaping. We also added some details with markers (including worms for the chick to eat).

birds eye view farmThe final step, of course, is the magnet wand. This is simply a button magnet hot glued to the top of the wooden spool. HOWEVER…before you hot glue it, test it out on the chick magnet. Make SURE that the two magnets attract (rather than repel).

magnet connection checkOnce you’ve confirmed that the magnets attract, glue the magnet onto the spool.

magnet holderTo set the farm in motion, place the chick on top of the corrugated cardboard base. Place the magnet wand underneath the base and slide it over to the chick. The two magnets will connect through the base, and your chick can explore the farm!

A Real Page-Turner

rube goldberg machineThis machine really DID turn a page – after automatically cranking a half-dozen ping-pong balls up two towers and dropping them randomly through a number of pathways until one ball finally hit a mechanism that turned…a single page. Then the process started all over again!

The machine was built by Princeton University Engineering students Sarah Tang and Tanner DeVoe. It was built entirely of K’Nex, was over 7 feet tall, and it took 45 hours to complete. Not to mention zillions of test runs!

The “Page-Turner” was the centerpiece of a Rube Goldberg program at our library. Rube Goldberg was an American cartoonist famous for illustrating crazy, intricate machines meant to make life “easier.”

In addition to the machine, we had student group Princeton Engineering Education for Kids constructing simple (and not so simple) LEGO machines with kids, an extensive marble maze set for younger kids to build and test, a video loop of OK Go’s music video This Too Shall Pass, and student artist Kemy Lin inspiring kids to draw their own machines using this Rube Goldberg template.

Here’s a way cute example of “How to Catch a Butterfly” by a budding engineer:

kids machine