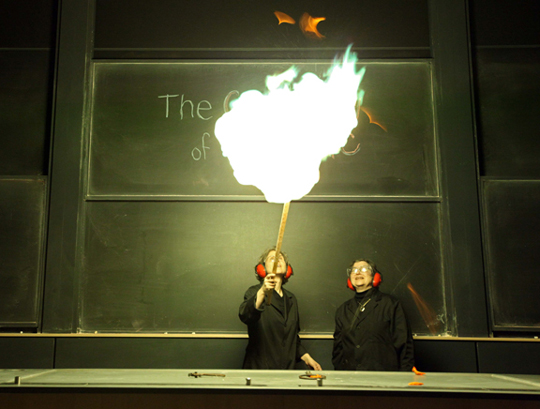
Our 50th Post!

our 50th postWow, that was fast. Cue the band and fill up the punch bowl. It’s our 50th post!

It seems only yesterday that I launched this blog and became a first-time blogger. Thank you for your interest and support, especially the subscribers who have joined me along the way, and the folks who have sent in questions, comments, and suggestions.

Now that there’s a good stock of posts to explore, this seems as good a time as ever to announce my new blogging schedule. Moving forward, I’ll be posting one story time project a week (I’ll aim for Tuesday mornings), with at least 2 posts from other categories per month. We’ll see how it goes!

I’d love to hear from you. What parts of this blog do you like? The story time projects? The art supply recommendations? What would you like to see more of? Are there any new directions you’d like me to take? Is there a book you’d like to see featured? A craft project you’d like me to develop? The goal of Pop Goes the Page is to be a creative resource for librarians, teachers, museum educators, parents, and children…so how can I serve you best?

E-mail me! danas@princeton.edu

One tantalizing glimpse into the future…I’m planning a contest to celebrate our first birthday in August, and the prize is plenty o’ goodies for your art cabinet. So stay tuned!

Breakfast is Served

breakfast is servedStart your day out right with some toasted bread, butter, jam, and a delicious beverage. Thanks to your magic magnetic knife, preparing breakfast has never been easier (especially when there are hidden paperclips in your essential ingredients)!

magic knifeWe read Hooray for Bread, written by Allan Ahlberg and illustrated by Bruce Ingman (Candlewick, 2013). One morning, a lovely loaf of bread is born. The story follows the loaf of bread as it progresses, slice by slice, throughout the day. Breakfast for the baker’s wife, a sandwich for the baker’s boy, a snack for the ducks in the park, afternoon tea, and so on until the last crumb serves as a meal for a mouse. Hooray hooray for bread!

You’ll need:

  • 1 “toaster” box (mine was 4 ½” X 4 ½” x 9”)
  • A box cutter
  • 2 rectangles of white poster board for bread slices (mine were 5″ x 6.5″)
  • 2 jumbo paperclips (approximately 2″)
  • 1 wooden coffee stirrer
  • 1 pipe cleaner
  • 2 rectangles of self-adhesive foam (approximately 1.5″ x 2″)
  • A selection of color masking tape
  • A selection of self-adhesive foam shapes
  • 4 small pom-poms (mine were 1″ in diameter)
  • 1 large rectangle of white poster board for “place mat” (mine was 11″ x 15″)
  • A selection of patterned tape
  • 1 paper plate
  • 1 square of white paper towel (mine was  5.5″ x 5.5″)
  • 3 paper cups
  • 1 jumbo craft stick (mine was 8″ long)
  • 1 button magnet (mine was 3/4″)
  • 1 piece of aluminum foil (approximately 2.75″ x 5.5″)
  • 2 squares of yellow self-adhesive foam for “butter” (approximately 1.5″ x 1.5″)
  • 2 rectangles of purple cellophane for “jam” (approximately 3″ x 4.5″)
  • 2 small paperclips (approximately 1.5″)
  • Scissors and tape for construction
  • Markers for decorating
  • Hot glue

toasterBegin with the toaster! Use the box cutter to cut two slits in the top of the box. Then use scissors to enlarge the slits into rectangular toaster slots.

toaster slitsNext, cut bread shapes from the 2 pieces of white poster board. Make sure the top of the bread extends well past the top of the toaster. Otherwise, your bread will fall into the toaster and you’ll have to constantly fish it out (and even with a fake toaster, I hate to see kids thrusting anything that looks like a knife into anything that looks like a toaster)!

bread up topUse markers to draw crusts on your bread, and then slide a jumbo paperclip diagonally on each slice (this will create a nice, semi-horizontal surface for the magnet to attach to).

bread steps To create the toaster cord and plug, break both ends off a wooden coffee stirrer (each piece should be about 1.5″ long). Then, peel the backing off a rectangle of self-adhesive foam. Press the coffee stirrer pieces AND the pipe cleaner onto the sticky backing (making sure the smooth ends of the coffee stirrer are sticking out) like so:

plug Peel the backing off the second rectangle of self-adhesive foam and press it firmly on top of the first rectangle. Use scissors to cut the rectangles into a plug shape.

finished plugCurl the pipe cleaner “cord” around a marker to make it spiral, then tape it to one end of the box. Decorate your toaster with color masking tape and self-adhesive foam shapes. Finish by hot gluing four pom-poms on the bottom of the toaster for “feet!”

finished toasterYour toaster is complete – time to set the table!

breakfastUse markers and patterned tape to decorate your place mat, plate, and napkin. Two of the paper cups will hold your butter and jam, so you’ll need shorten these cups with scissors (my butter cup was approximately 1.5″ tall, and my jam cup was 1.75″ tall).

I hot glued the plate, napkin, and the two shortened cups to the place mat to make it easier to carry. I left the “beverage” cup and the knife unglued (and filled the beverage cup with polyester fill “milk” or “soy milk”).

To make the magic knife, wrap the bottom of a jumbo craft stick with color masking tape. Then hot glue a button magnet to the top of the craft stick (I did this step in advance to save time). Wrap the upper section of the stick with aluminum foil.

knife steps The final step is to prepare your butter and jam for the magic knife! Peel the backing off the yellow self-adhesive foam square, but don’t pull it all the way off! When you’re about halfway peeled, press the small paperclip onto the sticky back of the adhesive.

butterThen re-attach the backing to the foam square, sealing the paperclip in.

sealed paperclipTo create jam, simply tape a small paperclip to the purple cellophane.

jamReady for breakfast? Place the butter and jam in their cups, then use the magic knife to fetch the bread from the toaster, carry it to the plate, and load on the toppings!

The Other Half

tiger talesQ: I’m curious about the read-aloud portion of your story times. Do you have any suggestions, advice, or tips?

Sure! Most of the projects you see on this blog are from Tiger Tales, our story time for 3 – 5 year-olds, so I’ll talk specifically about that.

Tiger Tales doesn’t require registration, so it’s first-come, first-served until we fill (24 kids maximum for the project portion of the story time). We do restrict by age range, so while everyone is free to listen to the story, only 3 – 5 year-olds can actually do the project. We bring out bins of toys to occupy the younger sibs (older sibs read or help with the project).

It’s time for story time to begin. Behold the tools of my trade!

tools of my tradeAt the very beginning of the program, kids line up to receive a name tag (I use these handy-dandy name tag stickers). I use a Sharpie to write the tags because kid-friendly markers tend to smudge something fierce.

Name tags are useful for many reasons:

  1. It helps me learn names!
  2. I ask kids to spell their names for me, so it gives them some practice with their spelling (and sometimes breaks the ice with the shy ones).
  3. Later in the program, it’s much easier to say “Pat! Stop running with those scissors!” then “Hey you! Stop running with those scissors!”
  4. I count out 24 name stickers at the start of the program and then recount at the end of the program to tally my attendance numbers. Simple. This technique is also useful at super busy story times. When my 24 stickers run out, I know the program is full!

It can be quite hectic before story time begins. Rather than trying to shout over the din, I ring a story time bell, wait for everyone to quiet down, and then I make the announcements. I ask adults to refrain from cell phone conversations and, if someone gets restless or cries during the story, to please move to the front of the gallery so we can work on our listening skills in the story time area.

Then I ask a few questions about the book (“What’s on the cover?” “Would you like a dragon for a pet?”), connect the questions to the book (“Well, this boy knows exactly what it’s like to have a dragon for a pet…”) and announce the title of the book. But before I even open it, I have everyone put on their “listening ears” and then I do…THE BIG SHUSH. Basically, THE BIG SHUSH is everyone putting a finger in front of their mouths and, all together, we count:

One (big, audible breath)
Two (big, audible breath)
Three (big, audible breath)
SHHHHHHHHHHHHHHHH!

If you think one person shushing is effective, try everyone in the room shushing! It even quiets the babies down!

Then I start reading.

My reading style involves multiple character vocalizations (and even a few sound effects). Sometimes, the book becomes a prop as I flap it like a butterfly, climb it up a tree, or jiggle it during a storm. At times, I ask kids to act things out or make sounds to match the story (“Stomp your feet!” “Let’s hear your best parrot squawk!”) Often, while I’m reading, I’ll offer a little comment on the story, ask the kids a question, or pause while a kid makes a comment on the book.

That said, sometimes I’ll read a book all the way through without very much audience interaction at all. Just character vocalizations, a steady narrative, and the riveted attention of the children. It always feels a little magical when that happens.

Story time with kids is about engagement with the text, but let’s face it – it’s also about crowd control. That’s where those name tag stickers come in handy. “OK Paul, I’m going to read again now…” or “Avery, shhh, sit down, sit down please.” Once the book concludes, I reveal the project and we proceed to the project area to get started!

project area I never reveal the project before the book, and the toys for the younger kids don’t come out until the book is finished. The focus is always on the book first.

You might notice that I don’t do songs or finger play. That’s because the Princeton Public Library features these things pretty regularly at their story times and I wanted to supplement, rather than replicate, their offerings. I don’t do flannel boards either (the folks at Flannel Friday have that totally covered!). I did, however, do a post on some amazing conductive thread that will illuminate your next flannel board story time!

If you’re wondering what book I’m reading in this post, you’ll find the answer here.

Have a question of your own? E-mail me!