
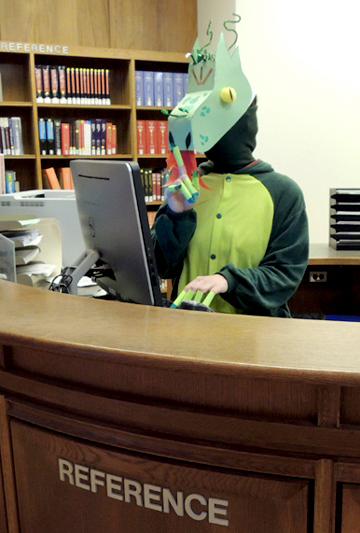
 Wow I hear that new librarian is a total dragon. Like…literally.
We read The Library Dragon, written by Carmen Agra Deedy, and illustrated by Michael P. White (Peachtree, 1994). Miss Lotta Scales, the new librarian at Sunrise Elementary School, is, in fact, a dragon. A dragon who takes her book-guarding duties very seriously. The students (and the staff) are all but exiled from the library, lest they face the wrath of Miss Scales and her fiery temper. Then one day, little Molly Brickmeyer wanders into the library, looking for her lost glasses. She happens across a book and starts reading aloud. Shocked but entranced, the other students gather in the library to listen. Mean Miss Scales moves in to grab the book…but then stops. Hmmm. The children appear to be enjoying themselves in the library. And the book is about a magic dragon so…Miss Scales finishes the story herself. And as she reads aloud, her formidable scales fall off, revealing Miss Lotty, the new, and very kid-friendly, librarian.
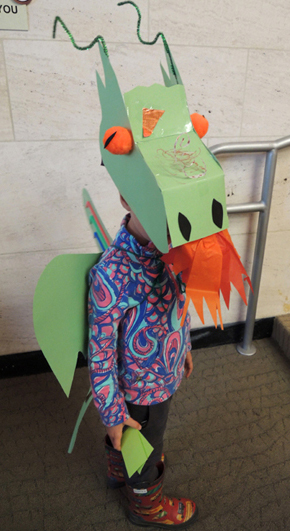
We transformed into dragons with wings, tails, and heads with crackling tissue paper flames that activated with a quick puff of air!
 You’ll need:
- 1 box (mine was 4 ½” X 4 ½” x 9” – a large tissue box works too)
- 1 dragon head left section template, printed on 8.5″ x 11″ paper
- 1 dragon head middle section template, printed on 8.5″ x 11″ paper
- 1 dragon head right section template, printed on 8.5 x 11″ paper
- 2 sheets of green poster board
- Dragon decorating supplies (more in this below)
- 2-3 rectangles of orange & red tissue paper (approximately 4.5″ x 7.5″ each)
- Hole punch
- Green yarn
- Scissors and tape for construction
- Markers for decorating
- Hot glue
First, cut the lid and tabs off one side of a box (or, if you’re using a large tissue box, just cut the entire top off). Set the box aside for a moment.
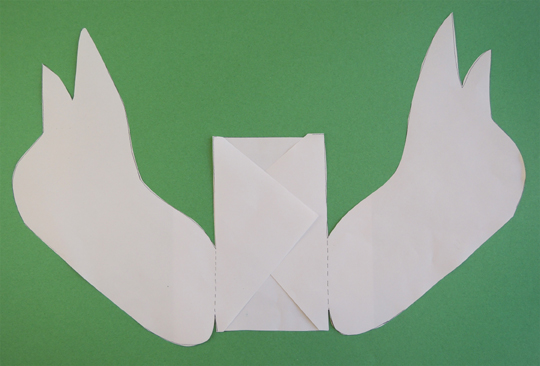
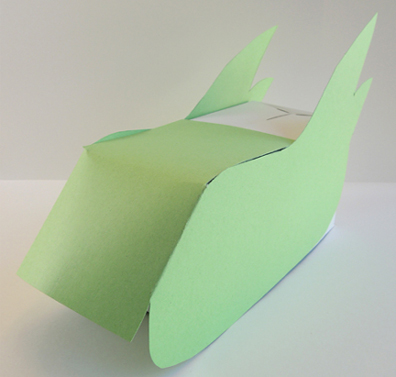
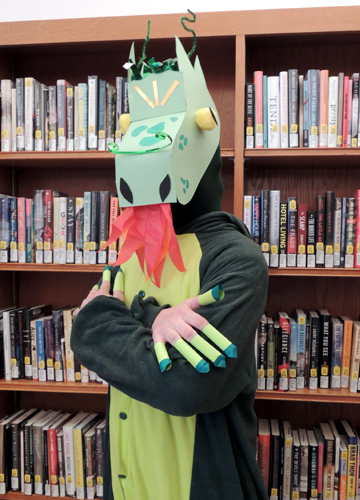
We spent quite a bit of time figuring out how to make the dragon head template fit easily over a box. The final template turned out to be over 22″ long, so I broke it into 3 separate pieces to create a printable template for you.
Print all 3 paper template pieces and cut them out. Place the middle section down first, then lay the left and right sections on top of it, using the curves of the dragon’s nose as guides. Secure the 3 template pieces together with tape.
 Next, lay the paper template on a piece of poster board (we ultimately decided to use light green). Trace the template on the poster board, then cut the entire thing out as one big piece. You’ll notice that there are 2 dotted lines on the paper template. Fold the poster board template downwards along the dotted lines. Then slide the poster board template on top of the box, and hot glue the sides of the template to the sides of the box.
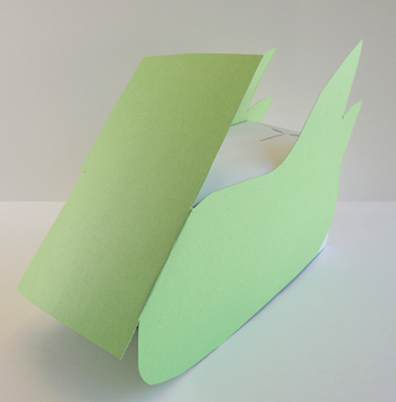 Next, hot glue the middle section of the template to the top of the box.
 Trace the forehead template onto green poster board, and tape it to the front of the dragon’s head.
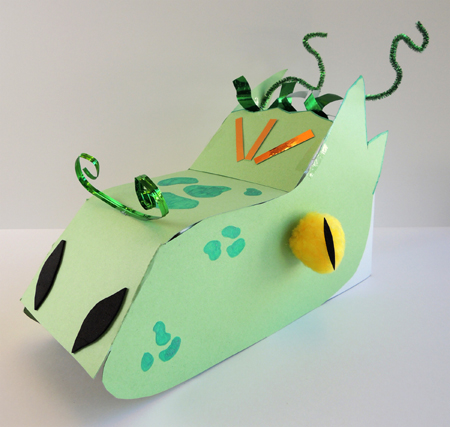
 Now decorate! We used markers to create spots, slivers of self-adhesive foam for nostrils, some embossed foil paper for hair, 2 sparkle stems for horns, gold mirror board pieces on the forehead, and a craft tie curly whisker. Our eyes were 2 jumbo pom-poms with self-adhesive foam pupils. You could also just use markers or construction paper to decorate the head.
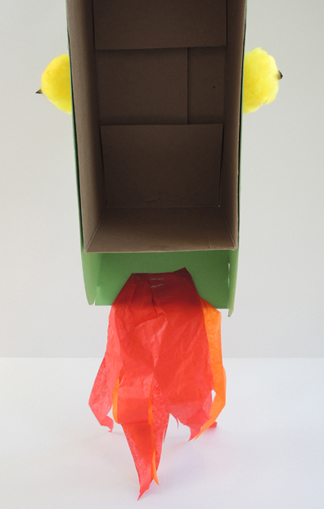
 To create flames, cut 2-3 rectangles of tissue paper into flame shapes, then staple them together. Hot glue (or tape) the flames to the underside of the nose. Make sure to attach the flames to the end of the poster board nose, not the end of the box. Otherwise, the flames won’t flutter properly. Here’s a shot of the underside of the box, so you can see where the flames are attached.
 Try your head on. If it’s a little loose, stuff the back and front of the box with sheets of tissue paper. To breath fire, simply blow upwards and outwards on the tissue paper flames!
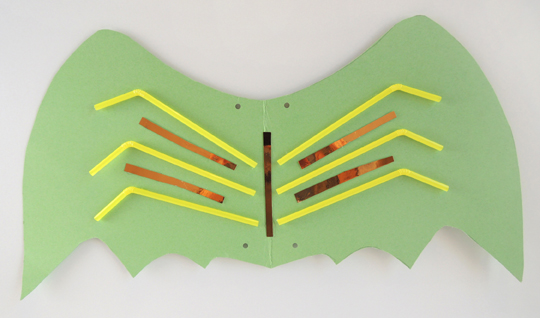
Now for the wings and tail! Unfortunately, the templates for these were too big to fit on a printable page – you’ll have to freehand them. We drew half a wing, then traced it onto a folded piece of poster board. Unfolded, our wings were approximately 12″ x 22″. Bendy straws make awesome wing ribs, and so long strips of mirror board. Punch 4 holes in the wings and run yarn through them. Knot the yarn around your shoulders like backpack straps!
 Here’s our dragon tail, which was roughly 6″ x 19″. We decorated ours with a couple pieces of mirror board (some kids went with drinking straws or just markers).
 You’ll notice that the tail in the above photo has a 2.25″ fold at the top. The folded end tucks into the back of your pants (or, if you’re wearing a dress, punch a hole in the tail and run a yarn belt through it).
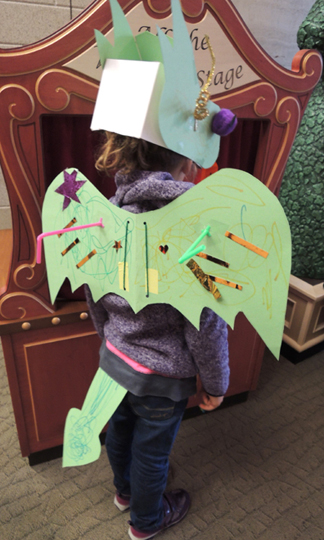 If you’d like dragon claws (and some kids really liked this part), wrap a 3.5″ x 4″ piece of green paper around your finger, then secure the tube with tape. Wrap one end of the tube with green masking tape and cut the masking tape into a point. Here’s Marissa modeling a fine set of claws and a truly awesome dragon onesie.
 Now go forth dragon, and guard some books!
 This winter, we had a couple of intense snow storms. Whenever it snows, my program attendance drops dramatically. And yet, there are always a couple of hard core patrons who don their snow pants and brave the drifts to come to story time. This causes a bit of a conundrum. You see, some of my projects involve quite a bit of prep work (a-hem! I’m looking at you
 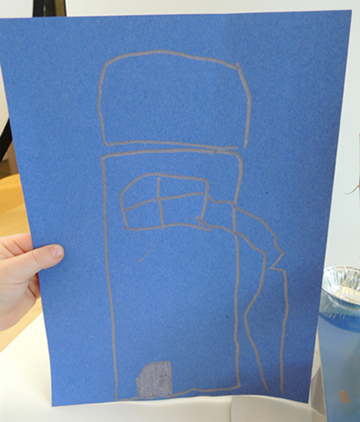 As the kids drew their houses, I rummaged through the office for boxes, tubes, cardboard, items left over from other projects, and interesting odds and ends (including, of course, the
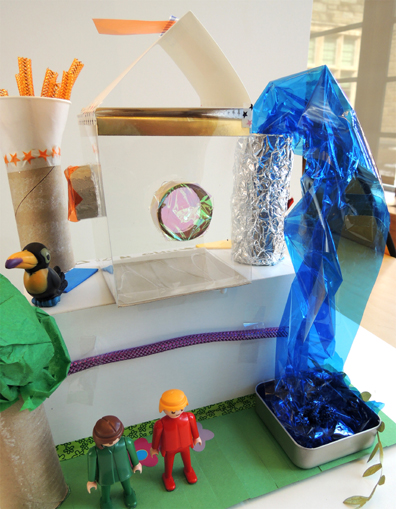
 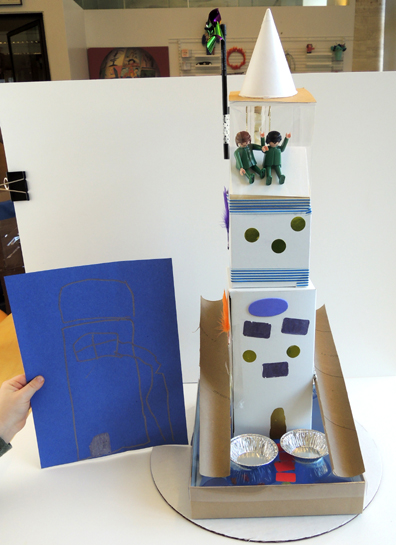 This house’s base is a box with a clear lid (leftover from
  The next architect went for wide and stacked, with multiple boxes for multiple rooms. I like the ladder to the second floor!
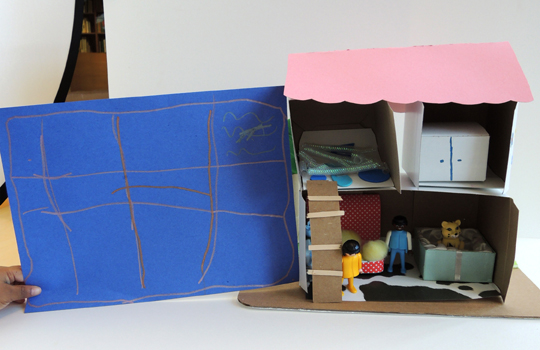 She also forayed into interior design. That polka-dot couch is made out of patterned paper, pink and yellow cottons balls, and an Altoid tin!
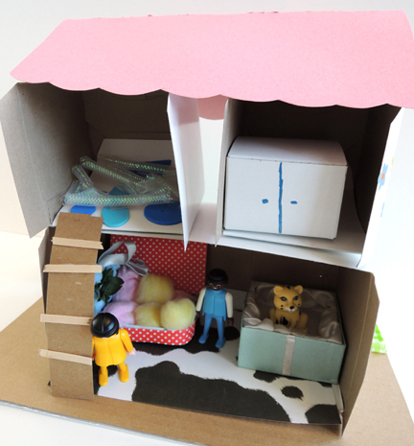 The final house’s blueprint appeared to have a tree, a squiggle of water, and antenna. I was curious to see how the model would develop, and I was not disappointed.
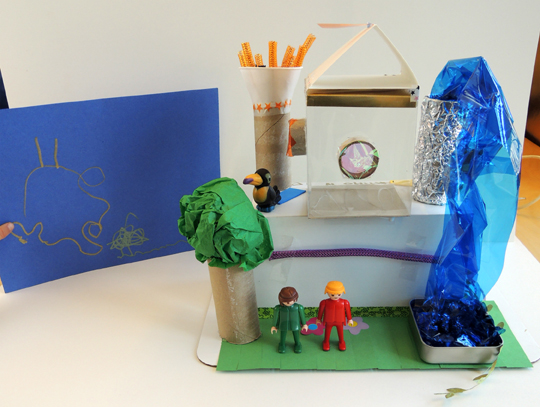 LOVE the fountain! And I’m not sure if you noticed that the “glass” room at the top has multi-color portholes made out of tape rolls with cellophane panes?
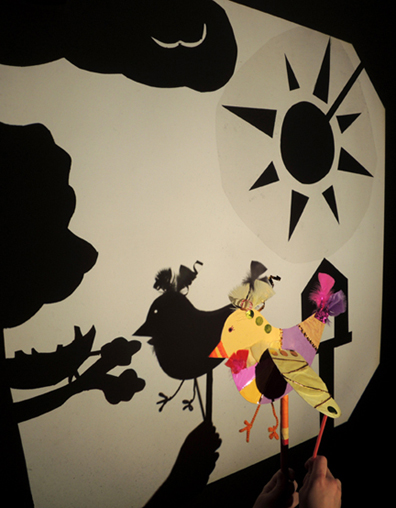 Make a shadow puppet bird, then fly through a story as your narrative appears on the big screen!
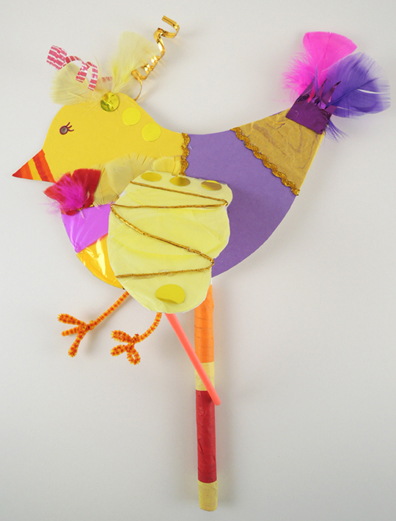
 Use packing tape to attach a 12″ piece of PVC pipe to the back of the bird (regular tape isn’t quite strong enough). We wrapped our PVC pipes with color masking tape, but that’s definitely optional. Your bird is done!
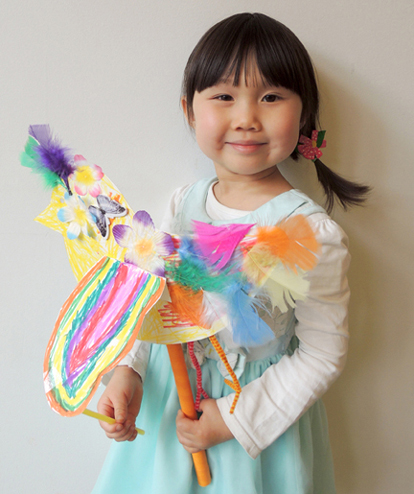 All we need now is a shadow puppet show set! We made our set on an old overhead projector. Oh how do I love thee overhead projector? Let me
 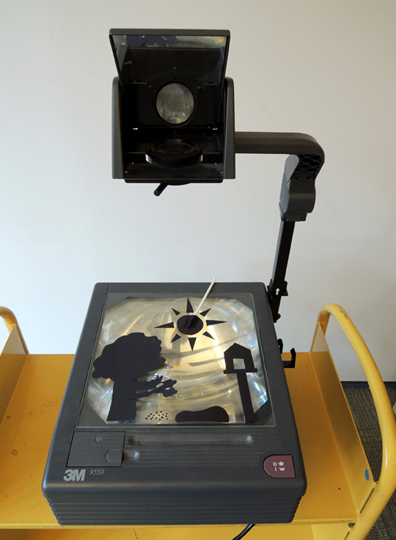 To build the set, Marissa cut a tree, a nest, a lake, and a birdhouse out of black poster board. Making the sun was a little more challenging – our initial attempts looked like a giant spider or a vicious super nova. Marissa solved the problem by hot gluing sun rays to a piece of
 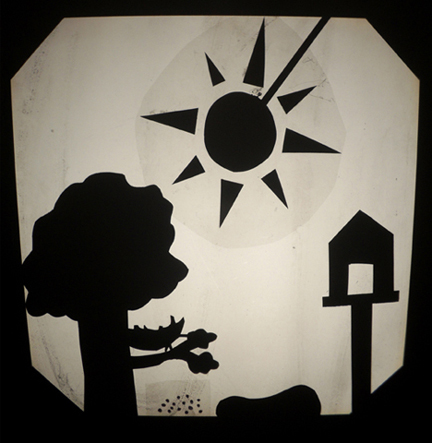 During the shadow puppet story, a storm rolls in, so Marissa also made a cloud, mylar rain, and a thunderbolt.
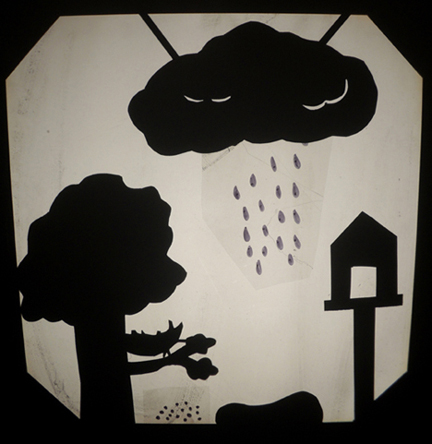 She mounted all the moving set pieces on bits of balloon stick (pencils work too).
 At story time, we lowered the shades, turned out the lights, and fired up the projector! One by one, kids stepped up to the screen. Then, as I narrated, they flew their birds through the story! Hmmm…we might have made that birdhouse a little too tall…
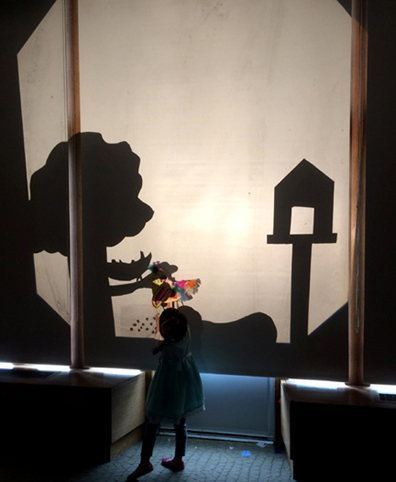 Here’s our lovely puppeteer in action! Ready for a show?