 We read Not Norman: A Goldfish Story, written by Kelly Bennett, illustrated by Noah Z. Jones (Candlewick, 2008). A little boy is terribly disappointed when, instead of a dog or cat, he gets a goldfish for his birthday. However, Norman the fish’s goofiness, appreciation for the boy’s tuba playing, and his friendly presence when there is a scary noise at night wins the boy over. Now, he wouldn’t trade any pet in the world for Norman!
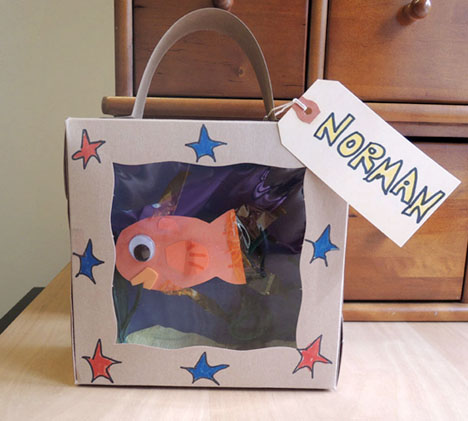
The boy pulls Norman around in a little red wagon, but I thought we’d go even more portable for our story time. Hence, a fish in a suitcase!
You’ll need:
- 1 box with a window (I used a 7″ x 7″ x 3″ pastry box)
- Blue construction paper
- 2 green pipe cleaners
- 4 pieces of green raffia
- A selection of crepe paper streamers
- Small shells (optional)
- Orange poster board for fish
- 1 piece of orange self-adhesive foam
- 1 wiggle eye
- Hot glue
- 1 small piece of clear elastic beading cord
- Markers, yellow cellophane, and golden paper for decorating
- Scissors and tape for construction
- 1 tagboard strip for suitcase handle (mine was 12″ x 2″)
- 1 luggage tag (optional)
The key to this project is finding a box with a window. I had a bunch of pastry boxes left over from another program, but you can find something similar in the bakery section of your local supermarket.
Cut the blue construction paper to fit the back of the box and secure with tape (or a glue stick). Draw in a few bubbles and waves with markers. The “water” is done…time to add some aquarium plants!
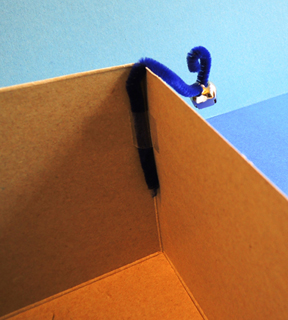
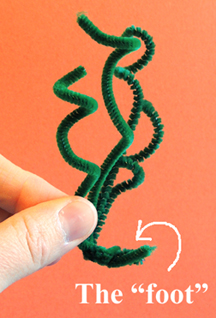
Plant #1: Cut two green pipe cleaners in half. Bunch the four pieces together and twist at the bottom. Give the pieces a little curl if you so desire. Then bend the twisted part into a “foot” and tape it to the bottom of the aquarium.
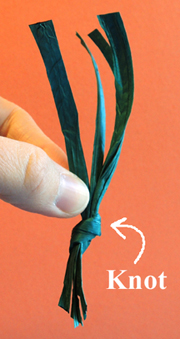
 Plant #2: Knot four raffia pieces together. Tape to the bottom of the aquarium.
 With the plants in place, it’s time for your “aquarium sand.” Crumple up some crepe paper streamers to give them a “sandy” texture, then hot glue them around the plants and the bottom of the aquarium. You can hot glue some little shells on the “sand” as well.
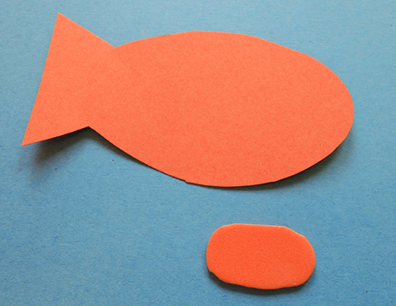
Now for the fish! Cut a fish shape out of orange poster board. To create fantastic fish lips, cut the piece of orange self-adhesive foam into an oval:
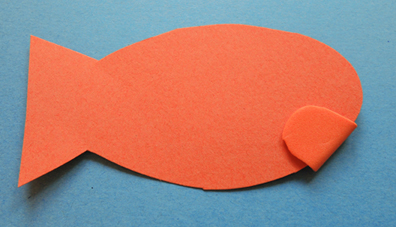
 Then peel and stick it on the fish’s mouth:
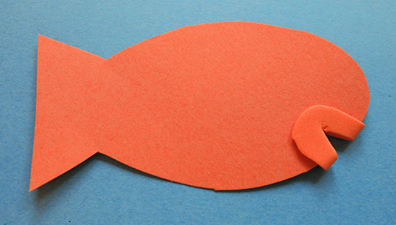
 Use scissors to cut a smile!
 Secure a wiggle eye on with a dash of hot glue, then tape the elastic beading cord to the back of the fish. Decorate with yellow cellophane, gold paper, and markers. When the fish is complete, dangle it from the elastic cord, adjust for height, and tape the cord to the top/lid of your aquarium. Get the height just right, and your fish will wiggle and sway in a realistic way.
To turn the box into a suitcase, simply add a tagboard handle to the top. Originally, I used hot glue to attach the handles to the box, but they popped off pretty fast. So I would recommend using brass fasteners to really secure it.
With the handle in place, all your suitcase needs is a “luggage” tag. Write your new friend’s name on it and get ready for adventure!