 I get lots of questions about my programs, but the program that consistently generates the most inquiries from Youth Services Librarians is To Be Continued, our chapter book story time for kids ages 6-8. I invented the program in 2007, when I was looking to bridge the gap between Tiger Tales (our weekly story time for 3-5 year-olds), and Cotsen Critix (our literary society for 9-12 year-olds).
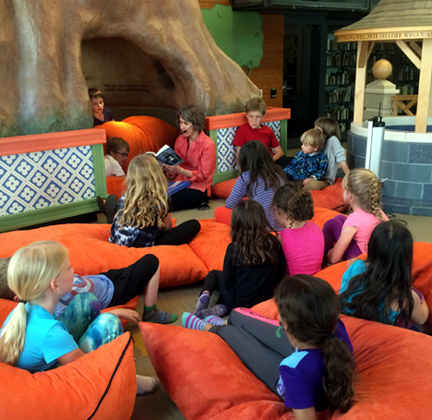
Here’s how the program works. Over a series of weeks, I read from a chapter book. At the end of the book (typically 6-8 weeks, depending on the length of the book) we celebrate with a hands-on project, activity, or field trip that is somehow related to the book.
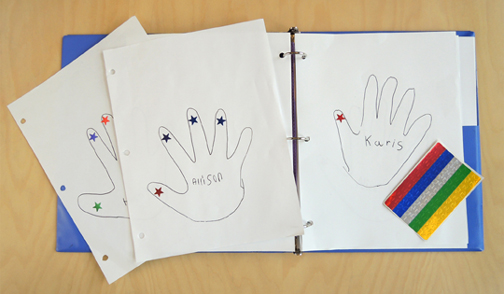
 In addition to listening to books and doing fun projects, kids can also earn books. Each time kids participate in the program, they earn 1 foil star sticker. When they reach 5 stickers, I buy them whatever book they want (up to $12.99 in value). I keep track of their stickers by tracing their hands on sheets of paper. All the sheets are kept in a binder, which I bring out at the end of each session.
 When it comes time to order the reward books, kids and parents can shop locally and put something behind the register for me to purchase, or they can send me a link to the book on Amazon. And by “book” I mean anything with pages! I’ve purchased Sudoku puzzle collections, bird watching guides, comics, blank writing journals, and the sheet music to Frozen. I’ve also purchased used books, out of print books, and books in other languages.
Oh, and I always wrap the books up like presents before I give them to the kids. Because who doesn’t want to get a present? Especially when it’s a BOOK!
So, how does To Be Continued go over? Fantastically. We have some really dedicated attendees that I’ve read to (and grown up with) for 3 years! There’s nothing more magical than opening a book and reading to kids. And to put a book they’ve earned into their hands and see them get excited about it? Man. Sometimes it brings tears to my eyes.
Over the years, I’ve answered lots of questions about To Be Continued. Here are some of the more frequent ones, in no particular order. If you have any additional questions, e-mail me and I’ll add them to the list!
When do you have the program?
It’s every Wednesday from 3:45pm to 4:45pm year-round (with the exception of major holidays and the month of August). So it’s essentially an after-school program. Depending on when your school districts let out, you might want to hold the program earlier or later in the day.
This is after school! Most kids just want to run around and blow off steam! How do you keep them listening instead of wiggling?
Oh, let me count the ways!
I have a cache of enormous floor pillows I bring out 15 minutes before the program begins. As the kids arrive at the library, they pounce, drag, stack, and pummel the pillows. That definitely helps them blow off some steam. After about 10 minutes they settle down and the pillows become giant mattresses for them. I’ve actually had kids fall asleep when I was reading!
I also keep the kids engaged by reading the books like they’re radio plays. I use different voices for the characters, pause at dramatic moments, sometimes I even make sound effects. I’ll stop sometimes and talk to the kids about what’s happening in the story – get their opinions, ask them how they feel about something, or ask them to make a connection to something in their lives, etc.
Approximately 30 minutes into the program, we take a 10 minute break so the kids can stretch their legs, use the bathroom, talk, play with their friends…within reason of course. If they are acting totally out of control during the break, that’s not good for anyone.
Do you have any rules for the program?
There are two rules at To Be Continued. The first is “Listen or Leave.” If you’re not listening to the story, if you’re jumping on pillows when everyone else is settling in, talking loudly while I’m reading, or if you’re pestering someone, you must leave the area until you feel you can listen.
The second rule is “During the break, there is NO running, NO screaming, or NO stickers.” Getting the wiggles out after 30 minutes of concentrated listening is fine. But pounding around the gallery and shrieking at the top of your lungs is not.
And I always, always give kids a warning before I enforce either rule. That gives them a chance to regulate themselves. And it works! Especially rule number two. Losing a sticker is a big deal for the To Be Continued kids. In 9 years, I’ve only had to take away 2 stickers.
How did you come up with the title of the program?
The title is a nod to all those cliffhanger radio plays and television shows that ended with a suspenseful “To Be Continued!” In fact, when we reach the end of my program, I always close the book and say “To be continued!” and all the kids invariably shout “Noooooo!” But they perk up when I tell them it’s time to do the book-earning stickers. Sticker earning (and book awards) always come at the end of the program.
Do you serve snacks?
Our library doesn’t allow food or drink (we have rare books sharing the gallery with us), so we don’t serve snacks.
I would love to do the book earning thing, but we don’t have room in our budget for it. Any suggestions?
I award a 1 book for every 5 stickers earned. And I cap the purchase at $12.99. On average, kids order books that are $7 – $8. You could always expand the book-earning time frame to say, 10 weeks instead of 5. Or you could cap the purchase at $8. You could have them choose an inexpensive little toy from a prize box instead. I considered doing that (or giving out fun bookmarks). But I decided that my ultimate goal was to get as many books into the hands of kids as I can. And I’m very fortunate that my budget allows me to do that.
How many kids attend the program?
We’ve had as few as 2 and as many as 26. Typically, attendance is between 15-18 kids.
What do you do with siblings who come to the program?
Younger and older siblings are absolutely welcome to sit and listen to the story (and many do!). If we’re doing a hands-on project, they can join in. However, only 6-8 year-olds can earn books.
What happens when new kids join the program when you’re in the middle of the book?
I always begin the program by welcoming the kids, briefly explaining the program, and reminding them of the rules. Then I recap the entire book for them (not just what we read the previous week). When that’s done, I start reading. If there’s a new kid and something in the story needs a little more explaining, I’ll stop reading and quickly supply more backstory. From what I can tell, it only takes a few pages for new kids catch on to the story.
What’s your biggest challenge with this program?
The biggest challenge is finding books to read. You want a book that is appropriate for 6 years-olds, but intriguing enough for 8 year-olds. Additionally, our community is steeped in literature, so most of the kids have already heard “the classics.” There’s no way I can read Charlie and the Chocolate Factory at To Be Continued. Everyone already knows it!
In my experience, the best To Be Continued books have some action and a story that moves forward quickly. A little spookiness, adventure, or mystery doesn’t hurt either! The Books of Elsewhere: The Shadows was one of my personal favorite. It was so much fun to read aloud, and the kids LOVED it. Once girl loved it so much she requested all the sequels for her award books – all the way to the end of the series.
Here’s a list of all the To Be Continued books and projects I’ve posted on the blog thus far (to scan them visually, see our Pinterest board):
Nim’s Island: Coconut experimentation (and bowling!)
The Books of Elsewhere: The Shadows: Shadow puppets
The Mysterious Benedict Society: Kate Wetherall bucket game
Measle and the Wrathmonk: Rubber cockroach magnet mazes
Igraine the Brave: Swords and shields
Charmed Life: Herbal amulet and dragon’s blood identification
Horton’s Miraculous Mechanisms: Rube Goldberg-esque mechanism
Horton’s Incredible Illusions: Magic show in a box
The Imaginary Veterinary: The Sasquatch Escape: Sasquatch search and certification
Floors: Box of puzzles, riddles, optical illusions, and ducks
Lily Quench and the Dragon of Ashby: Tin foil black light dragons
Missing on Superstition Mountain: Visit to Dept. of Geosciences, pyrite, and singing rocks
Castle Hangnail: Gothic castle votive
The Creature Department: Glowing creature essence bottle
The Rise and Fall of Mount Majestic: Giving Pots (plus a kid-created book activity!) Addison Cooke and the Treasure of the Incas: Explore an ancient temple – with traps!
The 13 Clocks: This elegant box lid clock was one of our most popular projects ever
The Wizards of Once: Potions and liquid nitrogen
Arlo Finch in the Valley of Fire: Supernatural survival skills and a water compass
The Serpent’s Secret: A moveable map (a.k.a. myriorama cards)
The Train to Impossible Places: A rubber band powered banana car!
The Uncommoners: The Crooked Sixpence: Mighty uncommon coins and yo-yos
Arlo Finch in the Lake of the Moon: An amazing, but super tabletop simple optical illusion
The Menagerie: Baby griffins? Yes!
Do you read entire series of books at the program?
Generally speaking, I’ll read the first book in a series, and then encourage kids to follow up on the other books on their own (and many do!). However, there was one exception to this rule. The kids unanimously voted to have me read Horton’s Incredible Illusions, which is the sequel to Horton’s Miraculous Mechanisms. They really, really wanted to find out what happened to Stuart and April!
If, by the way, you’d like to hear my interview with Lissa Evans, the author of those fabulous books, follow this link. Another author I’ve interviewed from the above list? Mr. Trenton Lee Stewart, puzzle master extraordinaire.
Do you think the program is effective?
I do. I can see the kids listening, I hear them discuss the books as we’re reading them. I watch them become wrapped up in the characters and the plot. Also, I’ve also seen kids change from distracted non-listeners to very intent listeners. The change doesn’t necessarily happen overnight, but over the course of a few weeks (or sometimes months) the change does happen. Best of all, I’ve had parents tell me that the program has inspired more reading at home. YES!

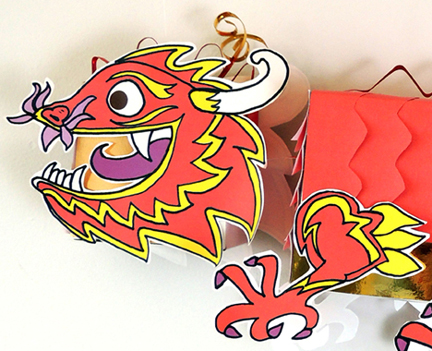 This colorful dragon marionette twists, turns, dives, and flies with you! It was a project at To Be Continued, our chapter book story time for kids ages 6-8.
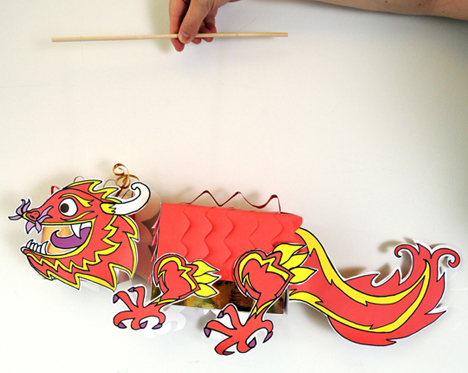 You’ll need:
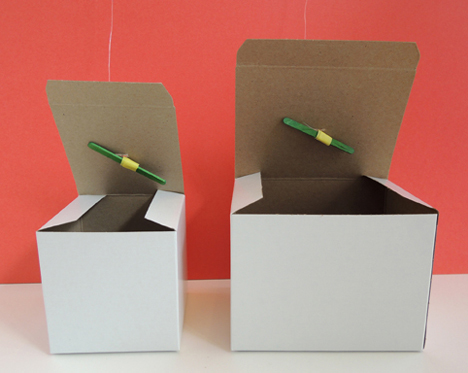 Connect the two boxes together with a 1.25″ x 2.75″ rectangle of poster board that is tabbed at both ends (my tabs were approximately 0.75″ each). Tape the connector’s tabs to each box.
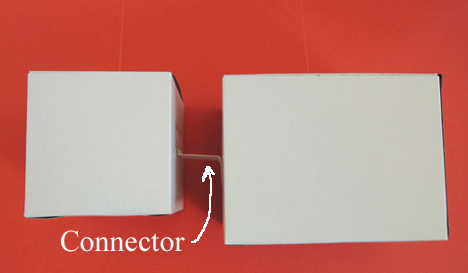 Next, wrap the boxes with construction paper (we went with layered strips of construction paper, cut to resemble dragon scales). Cut and color the dragon pieces from the template and attach them to the boxes. If you don’t have time to color in all the template pieces, here is a full color version. We added some craft tie spines and curls along the top of the dragon as well!
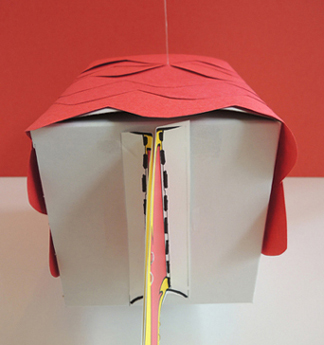 When your dragon is finished, tie the elastic cords to a wooden dowel (and secure the knots with tape if needed). Your dragon is ready to fly!
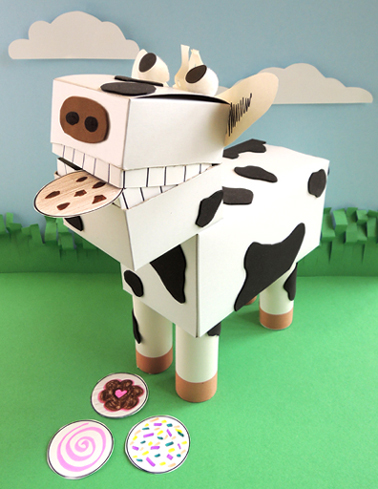 Do cows and cookies go together? You bet. Especially in this matching and sequencing game we created, complete with a grinning, cookie-eating cow!
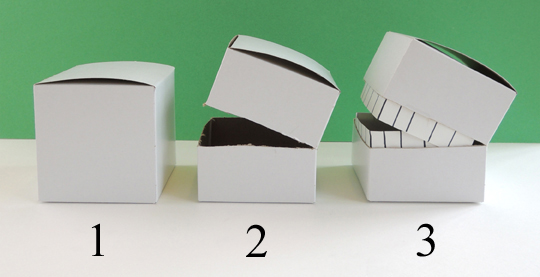 Stick a brown oval nose on the front of the box (we used self-adhesive foam, but construction paper works too). Hot glue a pair of pom-pom eyes to the top of the box, and use black dot stickers (or circles of black construction paper) to create pupils. Use white construction paper to add ears and a fringed forelock.
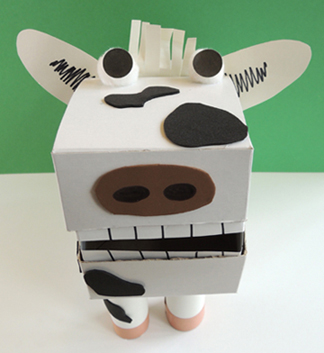 Wrap 4 toilet paper tubes with white construction paper, then hot glue them to the bottom of a large box. Hot glue the cow’s head to the edge of the box as well. Add an udder, a tail, and 4 brown construction paper hooves.
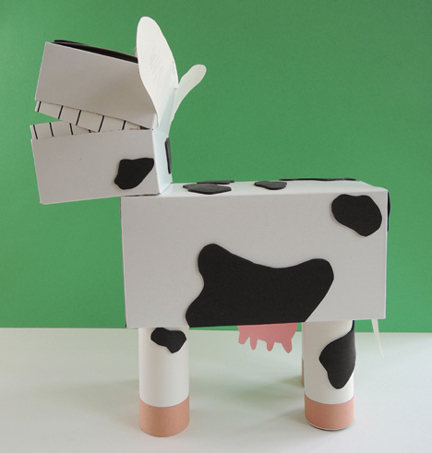 The final step is to cover your cow with spots. We used sheets of self-adhesive foam that the kids cut into customized spots, but construction paper is also an option. I definitely recommend offering a rainbow of spot colors – the results are fantastic. Check out this pink and white cow with the heart spot on her flank!
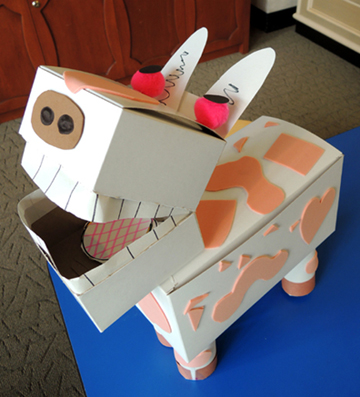 The cow is finished, now for the cookie matching and sequencing game! Here’s how it works. Cut 4 white circles from the template, then use markers to decorate each circle like a cookie. All the cookies needs to be different.
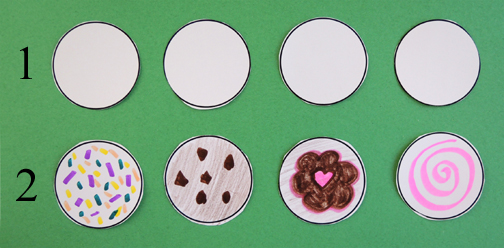 Cut the rest of the template into 5 strips, making sure that each strip contains 4 cookie circles. Decorate the strips with different cookie sequences. All the strips should be different (and it’s totally OK if you don’t decorate all 5 strips).
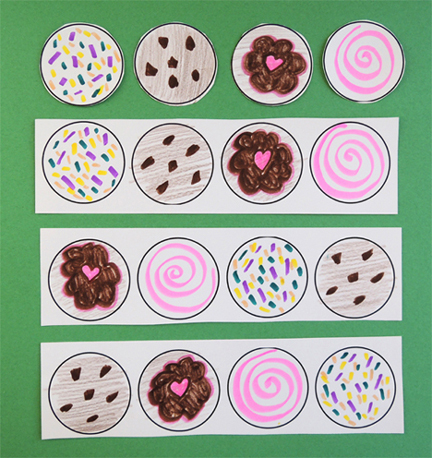 To play the game, randomly select a cookie strip. Match your cookie circles to the sequence on the strip, and then feed the cookies to the cow in that order. When done, remove the cookies from your cow’s mouth, select a different strip, and play again! You can play the game at your own pace, or have a countdown from 10 to make it more challenging. Another option – place the cow on the other side of the room, so you have to run back and forth from the cookies to the cow!