Gone Was Any Trace of You

Need to keep things like a secret? Well tortured poets, we have the perfect pen for you! Katie tested the Elemental Ink Pen by The Shop of Many Things. That’s right. You’ll have your own blank space, baby. And you’ll write your name. Take it away, Katie!


I am constantly searching for clever ways to develop clues for future Cotsen escape rooms. The Shop of Many Things Elemental Ink pens (a 3 pack is $20) definitely sounded like they would be perfect for a riddle mastermind.

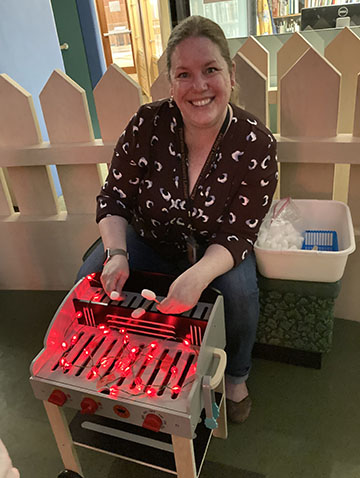
According to the packaging, the elemental ink disappears when exposed to heat (104°F or 40°C) and reappears when cold (14°F or -10°C). I used my gas burner stove and a lighter as the heat source, and ice packs and my freezer for the cold. Other heat ideas include a light bulb, steam from boiling water, or an iron. Dry ice is recommended for cold. And if you are fortunate enough to have access to a laboratory with liquid nitrogen, that would be ideal!

Right out of the bag, all three pens didn’t work. I wasn’t sure if it was user error or lack of ink, but I was rightfully disappointed. It took a few minutes of scribbling lines and circles on a piece of scrap paper before the pens miraculously came back to writing life. Armed with a clever notepad (courtesy of Pop Cult Paper), I created a list of tasks:

The ink couldn’t take the heat over the stove burner and it disappeared immediately. In fact, the first time it happened, I gasped out loud. It was pure magic!


I also used a lighter both in front of and behind the paper with the same result. The lighter did leave burn marks on the back of the paper, so please be careful. We don’t want your paper to go down in flames!

It took longer for the ink to return in the cold. Simply placing the paper on an ice pack didn’t work. At all. I tried putting it between two ice packs. No go. The ink really wasn’t legible until I put the paper in the freezer where the air was cold and left it inside for around five minutes.

The Shop of Many Things claims the ink will disappear and reappear multiple times without fading, so I put that claim to the test. I went through the heat and cold process five times with the note on the left and just once with the paper on the right. Dear reader, you be the judge.

I also tested regular ink and the elemental ink to compare any differences. The elemental ink disappeared and reappeared, as expected. Absolutely nothing happened to the regular ink, also as expected.So you could write a message in regular and elemental ink, heat it up, and watch part of your message disappear! So go on, draw those hearts in the byline.

Overall, the Elemental Ink pens are a fun new addition to my escape room tool box. The ink instantly fading away using a heat source is highly entertaining, but I feel it is too arduous and takes too long for the ink to return in the cold. The bigger question is… will the Elemental Ink pens be used in an upcoming escape room? That hot topic inquiry stays cool with me.

A Real Class Act

Fall weather is here, kids are back in school, and that means…school picture day! We put a fun twist on class photos when we invited awesome author and illustrator Mary Lundquist to our library. Check out her interview at the end of the post!

We read Cat & Bunny by Mary Lundquist (Balzer + Bray, 2015). Cat and Bunny are inseparable friends who do everything together. But when Quail asks to join the fun, Cat is unsure about sharing. So she runs away. Alone, she wonders what to do. A kitten arrives and play is well underway when Giraffe asks to join. This time, Cat barely hesitates, answering with a cheerful “Of course!” Soon, all the friends are playing together, including a joyfully reunited Cat and Bunny.

You’ll need:

  • 1 piece of cardboard or poster board
  • Construction paper
  • Scissors and tape for construction
  • Markers for decorating

We loved the book’s themes of sharing and togetherness, so we devised a card sharing activity and paired it with a customized class photo display!

First, the class photo display. The base of our display was a flat 12″ x 15″ cardboard box (we scored a bunch of them through this initiative). The front was decorated with construction paper (we also offered patterned tape as well as star, butterfly, and dot stickers). The pockets that held the “classmate cards” were strips of clear archival mylar. Below you can see a close up of a mylar pocket with the cards tucked inside:

The back of our boxes had flaps, so we hot glued a strategically-placed jumbo craft stick to the top flap, which allowed the class photo display to be propped up like an easel.

This project also works with a flat piece of cardboard or poster board and simple construction paper pockets. It’s super easy to modify!

Once kids had finished their class photo display boards, we had everyone gather on the gallery floor. Next, we distributed packs of cards containing the characters in the book. One kid had a pack of just cats, another had just bunnies, another had just foxes…you get the idea. When we said “Go!” the kids (and their caregivers) mingled, trading cards back and forth until they had a complete deck of all eleven unique characters.

As you can imagine, trading was brisk, and involved a lot of saying hi, talking, sharing, keeping track of your cards. It was so friendly, and so sweet.

There was one extra special bonus! Each deck had a blank card, so kids could draw themselves on the card as part of the class photo. OR…even BETTER…Mary Lundquist could draw you as one of her characters! Look at this Princeton tiger!

Mary was so fantastic to have at our library! Not only did she give a fabulous read aloud of Cat & Bunny, she did a free draw portion where kids voted on a new book character and she demonstrated how she illustrates!

Later, I caught up with Mary to ask her a few questions about her delightful work…


You have lived a LOT of places…California, Vermont, North Carolina, Maine, Cape Cod, and THREE different cities in the UK! How do these places manifest in your art?

The many places I have lived are certainly an influence on my art. Each place has its own architecture, fashion, flora and fauna and even weather! These have all made its way into my mind as I walk or drive or ride my bike through the places I have lived. I noticed it first when we moved from the UK to California because I began adding more vibrant colors into my palette. Lots of light blues and pinks, too. Colors I normally wouldn’t reach for suddenly felt natural. California has bright sun and vibrant colors, Vermont and Maine are very green with lots of old wooden houses and barns. England is not as colorful but there is a lot of lush countryside and the cities, towns and villages have beautiful old brick and stone buildings. I can look at my work and remember where I was when each piece was made!

In the story, Bunny is very outgoing, but Cat needs a little more time to say yes to new things. Are you more of a Bunny, a Cat, or neither?

This is a great question! The answer is that I am both. I wrote the story based on a strong memory from when I was about 4 or 5 and I had a best friend who I saw all the time. We watched The Princess Bride and played He Man and Shera! But when we got to kindergarten he started playing more with other boys than with me and I felt confused and hurt by the change. I was like Cat then. And just like Cat, I found new friends! I have always really loved having a best friend but I as I got older I became more outgoing and befriended new people much easier. It’s an important skill, especially when you move as often as I have. So I guess I started out like Cat but have grown to become more like them both.

In addition to writing two children’s picture books, you have illustrated books for other authors as well. What’s your process for bringing another artist’s characters to life?

I love illustrating for other authors because the collaboration inspires me to create work I wouldn’t have done otherwise. When I get a manuscript I first read it over slowly several times and just let the imagery come to me. Sometimes I see details of characters or scenes in my mind or sometimes more vague ideas of an image. I really get to know the story. Then I grab my sketchbook and begin drawing out the images as I read through the text. After I have drawn many different versions of characters and scenes there are always ones that stand out to me as the stronger ones. I draw a lot, many more ideas than what is ultimately in the final art. My sketches end up adding things which aren’t in the text but feel like a part of the story to me, maybe a gift is being given or there’s a campfire. Good writing leaves room for an illustrator (and reader!) to fill things in and my job is to imagine what that is and put it into pictures.

Do you have any new books or projects in the works?

Yes! I have just started working on a new picture book for a publisher but it’s too soon to share the details quite yet. I’m also writing two books of my own and hope to get them published in the future. Like many other places I’ve called home, Princeton has been inspiring to me (and I’ve made some great friends!). One of the books I’m writing takes place here and I hope to bring out the unique character of this interesting and beautiful town!


We’ll conclude this blog post in the spirit of which it began…autumn, back to school, and school photos. Can you guess who is who in these super fab library celeb photos???

Total Rock Star

People might think rocks are totally boring and just sit there. But this book proves them all wrong! Turns out when it comes to eras, rocks win the time travel marathon, hands down! Why be sedentary when you can be…wait for it…sedimentary?

We read Old Rock (is not boring) by Deb Pilutti (G.P. Putnam’s Sons, 2020). Tall Pine, Spotted Beetle, and Hummingbird are convinced that Old Rock is boring. He doesn’t go anywhere, see anything, or do anything. But Old Rock explains how many millennia ago, he flew from a volcano, gazed at dinosaurs, rode a glacier, tumbled down a ridge, and watched a forest grow around him. It’s all about perspective!

You’ll need:

  • 1 small tissue box
  • 2 foam beads
  • A short piece of bamboo skewer (ours was 5″)
  • A 7″ paper plate
  • One time travel wheel template, printed on 8.5″ x 11″ paper
  • Tin foil
  • 1 rock
  • Box cutter, scissors, glue and tape for construction
  • Markers for decorating

We loved the idea of time passing for Old Rock, so we created this simply time machine project! Begin by placing a small tissue box on its side. Use a box cutter to cut a 1″ wide space in the sides and top of the box (leave the bottom intact):

Next, glue a foam bead to the center top of the box. No foam bead handy? Use a small snippet of drinking straw instead. Repeat with a second bead on the opposite side of the box. The bamboo skewer should thread easily through them, creating an axle for your paper plate:

Now for your spinning time travel wheel! Cut the template from the paper and color. A special shout out summer intern, Malaysia for her volcano, dinosaur, and glacier artwork! You’ll notice the final panel on the template is blank. That’s where kids can draw their own homes.

Use the bamboo skewer to poke a hole through the template and the paper plate. Thread the skewered plate through the foam beads to create your rotating time travel wheel like so:

Decorate the outside of the box with tin foil (we offered embossed foil paper and sparkle stems as well). If you’d like the “Totally Rockin’ Time Machine” sign, here is the template. Make sure not to cover the open mouth of the tissue box open – that’s your time travel machine’s viewfinder. Finally…the rock!

We didn’t have a supply of rocks handy, so we crafted these out of model magic. Just add grey craft paint and wiggle eyes and you have one very charismatic rock. Place the rock inside the time machine, spin the wheel, and watch the millennia fly by!


This book went over SO well at story time! It’s lovely, well-paced, and exciting. It’s no surprise it’s a multiple award-winner. The kids were absolutely riveted. But we were further delighted when, completely randomly, a youngster arrived with a couple rocks of his own! You can see them in the intro image, but we wanted to give his special rocks a portrait of their very own: