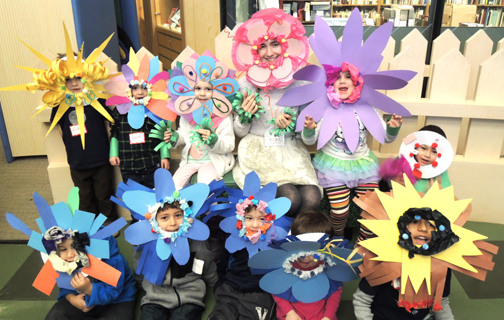
 What could be better than this lovely bluebell, orchid, and dandelion? How about an entire garden full of this fantastical flowery headgear?
 We read My Garden by Kevin Henkes (Greenwillow Books, 2010). While a little girl is helping her mother in the garden, she daydreams about her own garden. In her garden, the flowers change color according to your thoughts, chocolate bunnies pose no threat to your lettuce, colorful jelly bean bushes bloom, the air is full of birds and butterflies, and the strawberries glow like little lanterns at night. Beautiful!
You’ll need:
- A circle of white poster board (approximately 10″ in diameter)
- A pencil
- 1 long strip of poster board (approximately 2″ x 20″)
- 1 shorter strip of poster board (approximately 2″ x 15″)
- Pieces of poster board, assorted colors
- Pieces of construction paper, assorted colors
- Pieces of tissue paper, assorted colors
- A selection of pipe cleaners, assorted colors
- A selection of pom-poms, assorted colors
- 2 rectangles of green poster board (approximately 5.25″ x 10″)
- 2 pieces of green britelace
- Green masking tape
- Scissors, stapler, tape, white glue and/or glue stick for construction
- Markers for decoration
- Hot glue
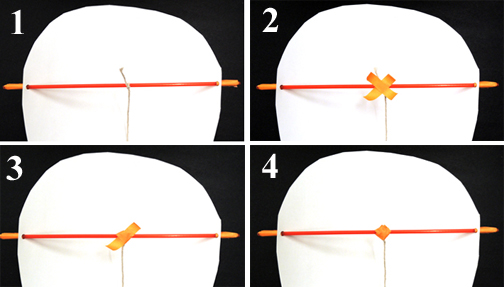
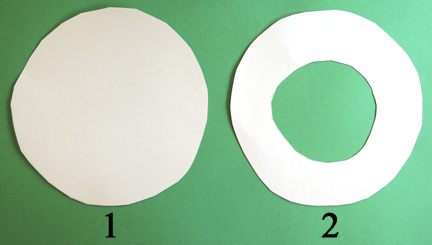
Press the circle of poster board up to your face and use a pencil to trace an opening for your face in the center. The top of the face opening should be under your eyebrows, and the bottom should be just below your lips. For this particular project, it’s best if the face circle is on the small side (my face circle, for example, was 5.5″ in diameter). Once the circle is traced, cut it out.
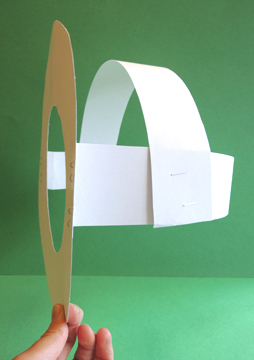
 Now for the straps. Tab one end of the long construction paper strip and staple it to one side of the circle. Then hold the circle up to your face and wrap the strap around the back of your head. Make sure the strap is fairly snug, then tab it and staple to the other side of the circle.
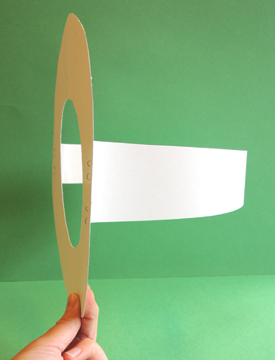 Next, lay the shorter poster board strip over top of your head. Measure for snugness and staple the short strip to the longer strip. You now have two straps – one that fits around the back of your head, and one that rests on the top of your head.
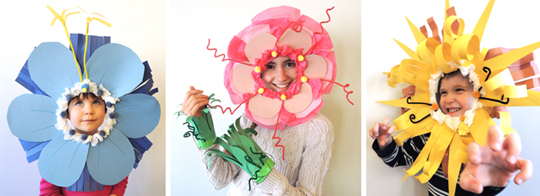
 Now it’s time to decorate! Use markers, poster board, construction paper, tissue paper, pipe cleaners and pom-poms to create your flower. I made 3 example flowers – a bluebell, a pink orchid, and a yellow dandelion.
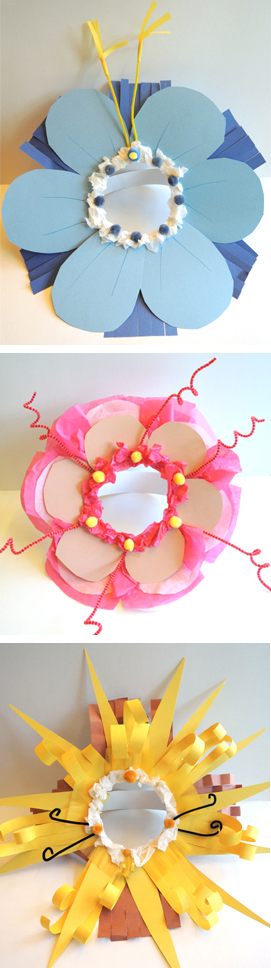 I figured I wouldn’t have to sell girls on this project, but I thought boys might be a little hesitant to become flowers. So the dandelion was designed to be appealing to boys, as was the color / name choice for the bluebell. We had 9 boys and 3 girls at this story time. I’m delighted to report that not a single boy balked at being a flower.
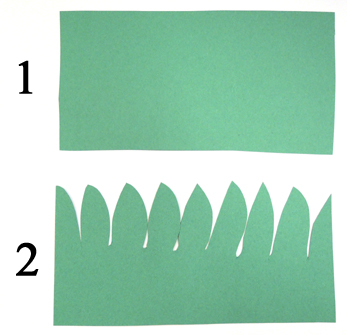
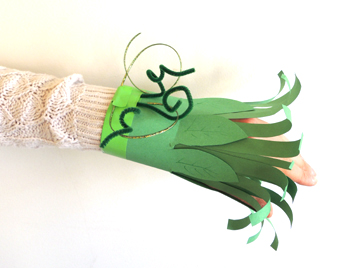
With your headdress complete, it’s time for leafy wristbands! Cut fringes, leaf, or petal shapes out of your green construction paper rectangle.
 Then wrap it around your wrist and staple. Make sure you staple the wristband a little loose so you can slip it on and off easily. Next add construction paper fringes, green masking tape highlights, twisted green pipe cleaners, green britelace “vines”…whatever strikes your fancy!
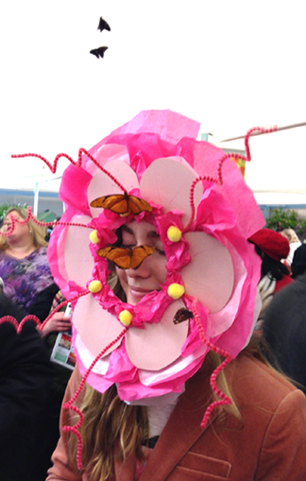
 Your project is complete, but we’re not done with this post just yet. This weekend kicked off the world-famous Philidelphia Flower Show and my assistant Joani celebrated by wearing her orchid headdress to the event! Just look at this image and tell me it isn’t the sweetest thing you’ve ever seen.