
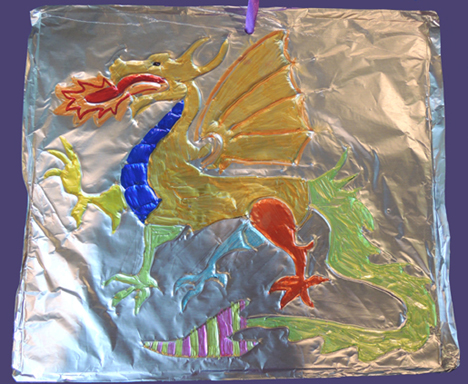
 One of our regulars called this her “most favorite project, ever.” It’s amazingly simple to do, yet has fantastically beautiful results. Best of all, if you use the right markers, your metallic marvel of a dragon will illuminate under a black light! Get ready to test your metal at To Be Continued, our reading program for 6-8 year-olds.
 We read Lily Quench and the Dragon of Ashby, written by Natalie Jane Prior, and illustrated by Janine Dawson (Puffin Books, 1999). The town of Ashby Water used to be peacefully ruled by a King and Queen. But then the Black Count invaded, usurped the throne, tore up the botanical gardens, and built a grommet factory. Now the town is filthy, the river is polluted, and the people are suffering. To make matters worse, a dragon has landed on the grommet factory, and doesn’t appear to be leaving. Captain Zouche and Miss Moldavia (the baddies in charge), demand that young Lily Quench (a dragon slayer only by inheritance), defeat the dragon. But rather than slaying the dragon, Lily befriends it. With the help of Queen Dragon, Lily learns that there just might be a chance to defeat the Black Count, find a lost Prince, and rescue Ashby Water from ruin.
In the book, Queen Dragon explains to Lily that dragons eat metal, not people. In fact, gold is like rich chocolate to a dragon (mmmmm, gold chocolate). I wanted something dragon, metallic, and fiery for the To Be Continued kids to try. This project totally fit the bill!
You’ll need:
- 1 dragon image, printed on white card stock
- A piece of tagboard or cardboard
- Tin foil
- Tape
- Sharpie permanent markers in assorted colors
- Hot glue
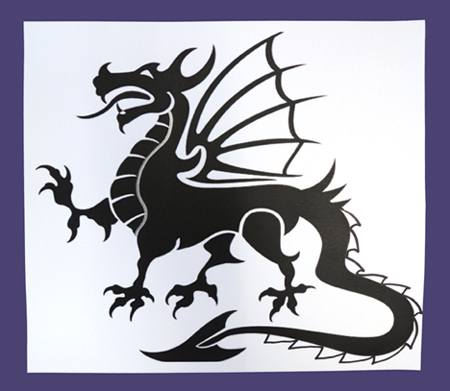
Begin by printing a dragon image on card stock (I found my image as a free download here). Use tape to attach the image to a matching piece of tagboard or cardboard. This step really is important! You want a nice firm base for your image, since you’re going to be pressing down on it quite a bit.
This project looks best with lots of different crevices to color, so we made a few extra on the original image. Below, for example, you can see that we drew spines along the tail. Those weren’t on the original image.
 Next, outline the image with hot glue. The more outlines you make, the better the final drawing will look.
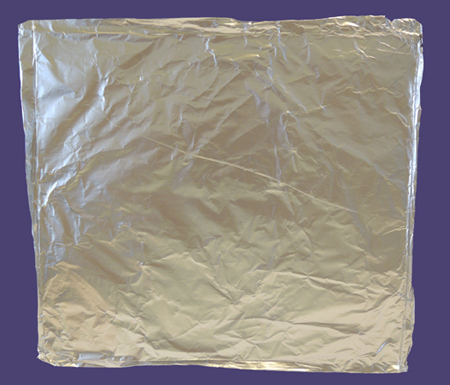
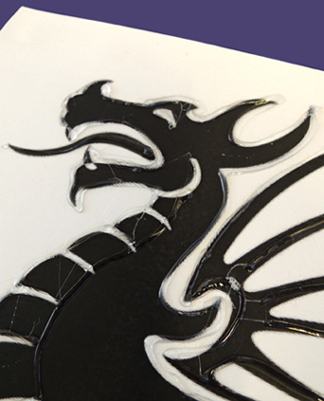 Once the hot glue is dry, cover the drawing with tin foil. Secure the tin foil to the back of drawing with tape – not hot glue! The hot glue will create unwanted ridges later. Below you can see exactly what we presented to the kids – a mysterious sheet of metal for them to explore with their fingers.
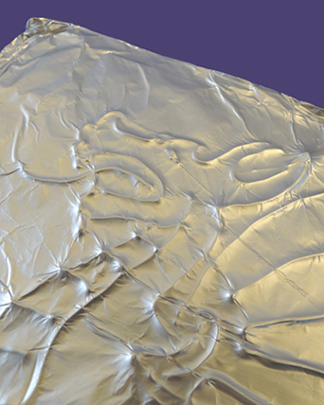
 Use your fingertips to gently, but firmly, press down on the tin foil. As you press, the hot glue ridges will pop out, revealing a raised outline of the the image underneath!
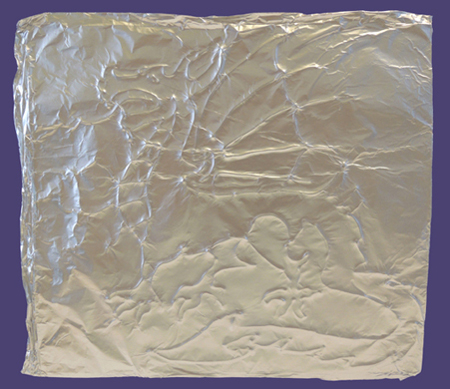 Here’s another shot that shows the ridges a little better…
 Some kids liked the idea of the image revealing itself from a “blank slate,” but other kids liked having an image to guide them. So have a few copies of the original image on your work tables, just in case.
Next, use Sharpie permanent markers to color the drawing (alas, non-permanent markers smear on the tin foil). Try not to press too hard, or your tin foil will rip. If it does rip, you can always put a fresh layer of tin foil over the drawing and start again.
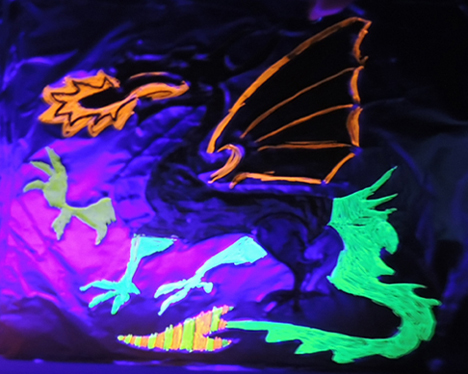
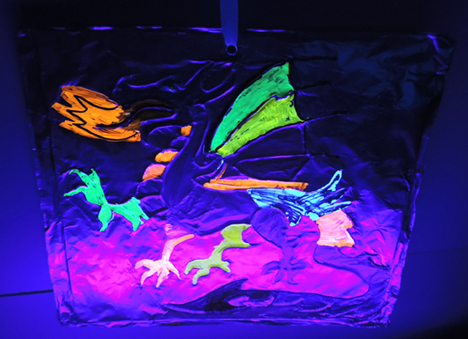
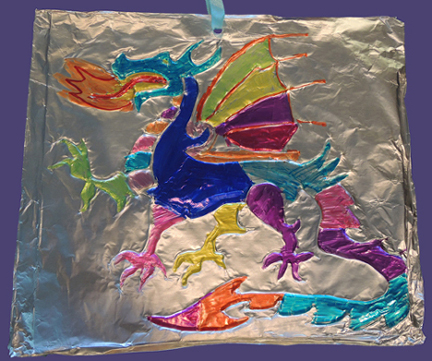 I was excited to learn that certain packs of neon color Sharpies fluoresce under black light (you’ll know because it says so right on the package). Awesome! I totally wish I had used them when we made this dancing black light skeleton! The kids were already delighted to see their metal dragons taking shape, but the glowing highlights – just made it.
 The final step is optional. I punched a hole in the top of each project and looped a ribbon through it so kids could hang their metallic creations up at home.
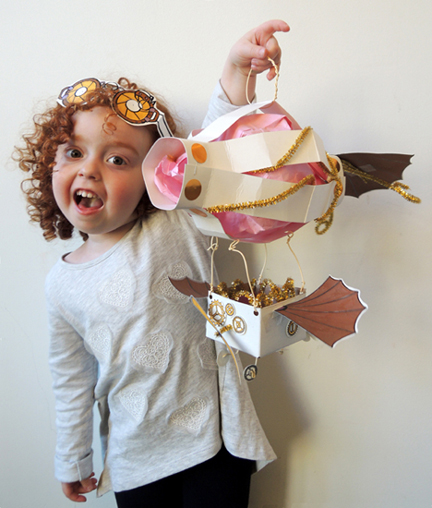 It’s sky-high adventure at a our steampunk story time! These amazing airships with matching goggles are a cinch, thanks to our ready-made templates and a few sparkly extras!
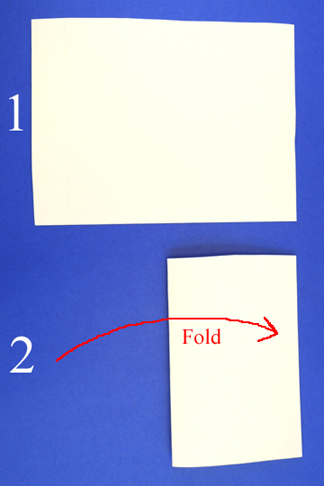 Starting from the folded end, make four, 4.25″ long cuts. Each cut should end about an inch from the end of the paper. These will form the “struts” of your airship’s framework.
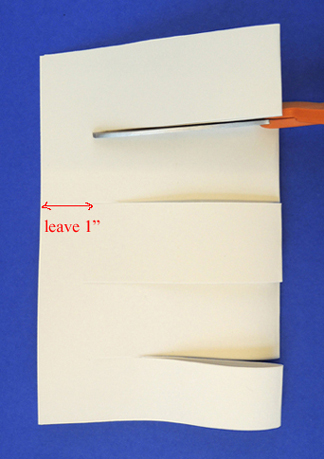 Unfold the poster board and flip it over. Currently, your struts have 1 central crease. You’re going to need to add 2 more creases on each strut (one on either side of the central crease). The new creases should be about 2.5″ away from the central crease.
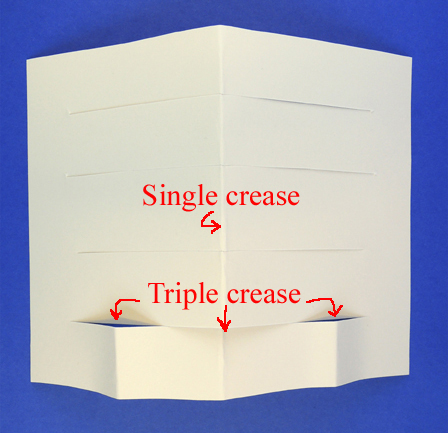 Crease all the struts, then circle the poster board and staple both ends. Your airship framework should now look like this:
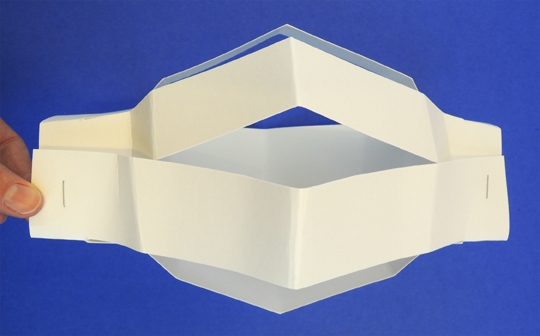 Punch four holes in one of the struts. This is where your airship’s basket will attach later.
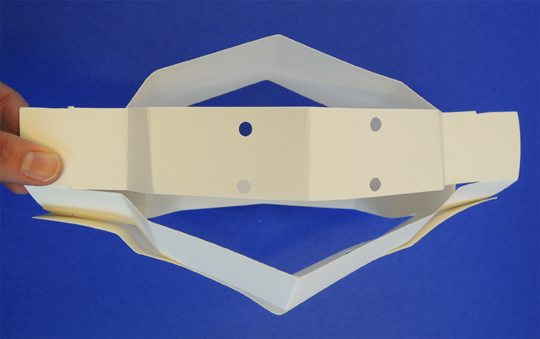 Now for the balloon! Open, then crumble, a paper bag. The more wrinkly the bag, the better it looks! Keeping the bag crumpled, slip it between the struts. Gently fluff the bag to fill out the framework.
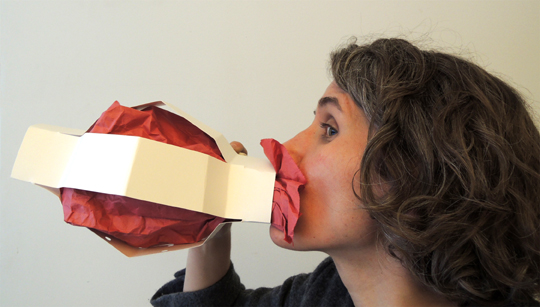 I have to say, that’s got to be the weirdest blog photo yet. And that’s saying a lot. Come to think of it, doesn’t it look a bit like a steampunk asthma inhaler?
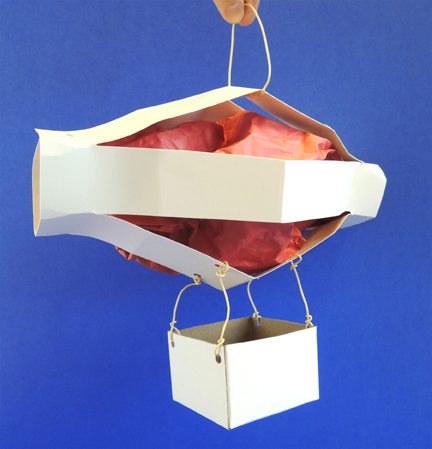 You’ll notice that the airship in the above photo has a hanging loop at the top. That’s a 9″ piece of twisteez wire circled around the top strut. Secure the loop to the underside of the strut with tape.
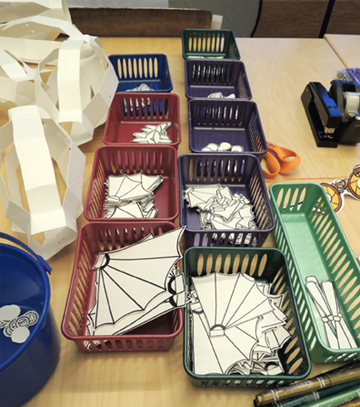 If you’re using a bucket, it helps to stick a little picture of the item on the front, for kids who are too short to lean over and peer inside.
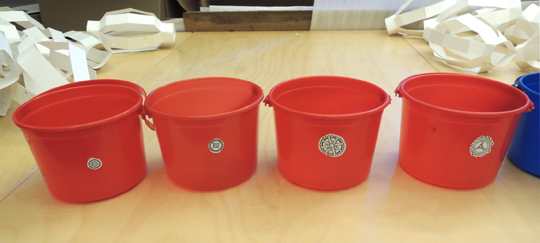 These buckets are great for organizing art supplies. I found them in the bulk candy section of Party City when I was researching red buckets for
 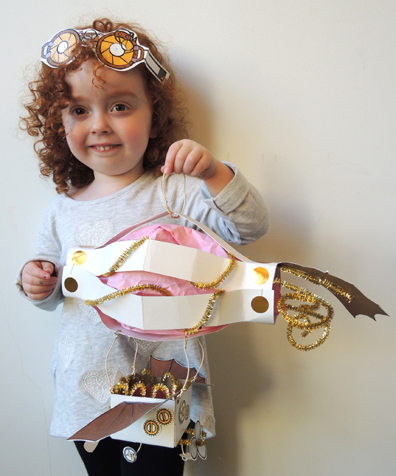 To make goggles, simply color a pair from the template, punch holes on the ends, and knot a 17″ piece of twisteez wire through both holes. Adjust for size, and perch the goggles on top of your head like a headband. Some kids, however, cut holes in their goggle’s eye pieces, which were incredibly adorable. Look at this duo!
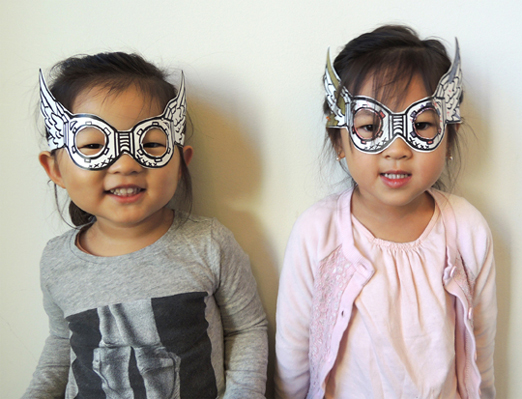
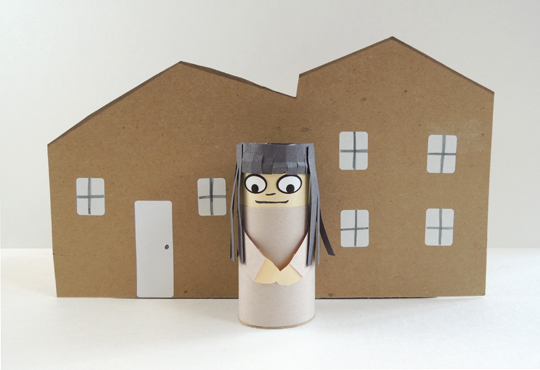
 We read Meet The Dullards, written by Sara Pennypacker and illustrated by Daniel Salmieri (HarperCollins, 2015). The Dullard kids (Blanda, Borely, and Little Dud) are causing trouble. For starters, they’re – gasp – reading circus books instead of staring at blank pieces of paper! And last week, their parents caught them trying to play outside! Things are getting so chaotic, the Dullards decide to move to a less exciting neighborhood. But while Mr. and Mrs. Dullard are (literally) watching the paint dry on their news walls, the kids sneak outside to play circus. This is just too much! The Dullards move back to their old neighborhood. As Mr. and Mrs. Dullard fall asleep, they feel assured that their lives are finally back to being perfectly boring. The kids, however, have other plans. They’ve joined the circus.
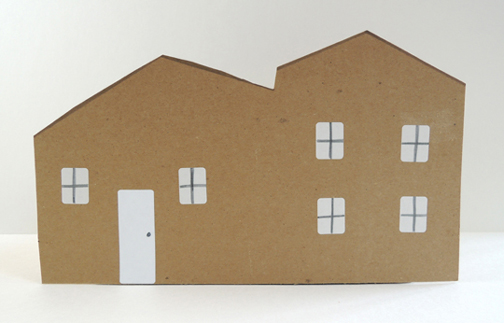 Next, we made a dull toilet paper tube person. Here, I used the book’s illustrations as a guide. Grey clothes, black hair, etc. I only offered one kind of eye sticker too! We don’t want any overstimulating variations on eyes now, do we?
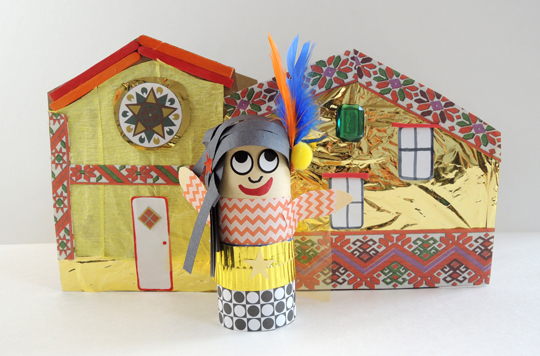
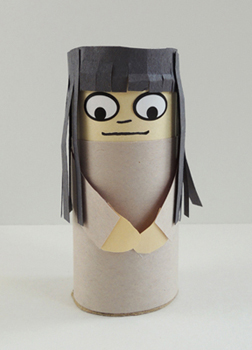 Your dull house and person are finished. Set them aside. Pick up the second house facade…and go CRAZY! We brought out the
  Our decorating supplies included
  When the exciting house facades are finished, hot glue them to one side of a large tissue box. Hot glue the dull facade to the other side of the box. Twirl the box around to view the dull and exciting sides. And speaking of exciting sides, check out these masterpieces…