
 Have a reluctant reader who might appreciate good race? This simple project will get them raring to read letters and words with the assistance of their own personal reading robot! Built out of things in your home or office, it’s low tech, but high levels of F-U-N!
You’ll need:
- 1 paper cup
- 1 small ball
- 1 piece of tin foil or sparkle stem
- Pens or markers
- Post-it notes
Flip the cup upside down, then decorate your robot with markers (we went a little fancy with silver circular file labels and eye stickers). Add tin foil or sparkle stem antennae. When you’re finished designing, place your robot cup on top of a ball. We used a squishy foam ball, but a tennis ball works great too!
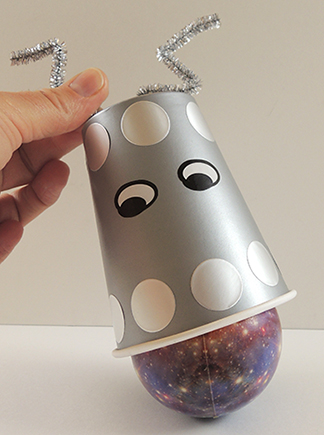 Next, write alphabet letters on Post-it notes and stick them to a tabletop. Have the reader and their robot sit on the opposite side of the table. As you call out the letter, they can slide and release their robot towards the proper Post-it!
There are plenty of variations on this game. The robots can read single letters, words, finish sentences, and seek out synonyms. They’re also multilingual if you’re trying to learn a new language. Or you can go multiplayer and race other robots in a full scale demolition derby!

 Pssst! For you eagle-eyed Swifties, did you also spot a very special house in
 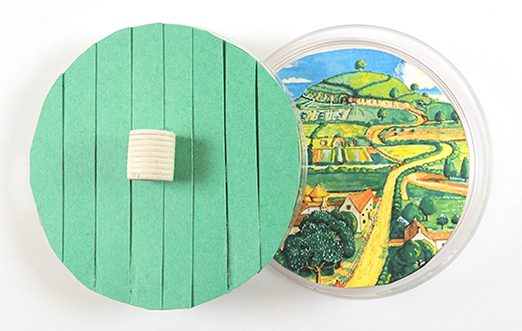 Bilbo Baggins’ birthday is September 22nd, and we’re throwing a huge bash that’s sure to be the talk of Hobbiton! We’ll share an extensive post about it soon, but today is a sneak peek at a craft project I designed for the big day….a petri dish hobbit door that doubles as a trinket box AND mini exhibit!
 Your competed hobbit hole is now ready to house little treasures. Like…I don’t know…a RING??? Yesssss my preciousssssss.