
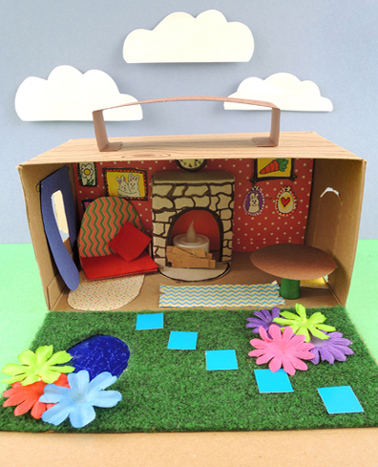
What could be cuter then a mama and baby bunny? A cozy log house with a fold-out flower garden, of course! And did we mention the house has a “working” LED votive fireplace? Such. Cuteness.
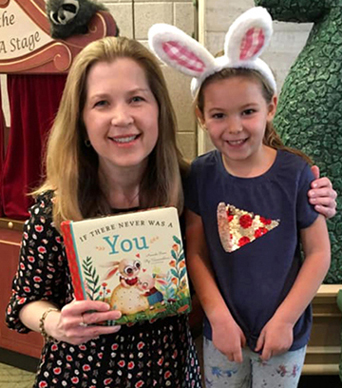
 This project was designed for a story time with author Amanda Rowe, who visited our library, fuzzy bunny ears at the ready. Scroll to the end of the post for an interview with Amanda, as well as a fabulous book giveaway!
 We read If There Never Was a You, written by Amanda Rowe, and illustrated by Olga Skomorokhova (Familius, 2019). A mother bunny lovingly asks what she would do without baby bunny in her life. This book is adorable, heartfelt, and beautifully illustrated. The perfect bedtime snuggle book, hands down!
You’ll need:
- 1 box (ours was 4.5” X 4.5” x 9”, a large tissue box works too)
- 1 box cutter
- 1 strip of poster board (ours was 1.75″ x 8.5″)
- 1 bunny house frames template, printed on 8.5″ x 11″ white card stock
- A selection of construction paper
- 2 small boxes
- 1 wooden spool
- 1 LED votive
- 1 toilet paper tube
- 4 mini pom-poms
- Scissors, tape, and glue for construction
- Markers for decorating
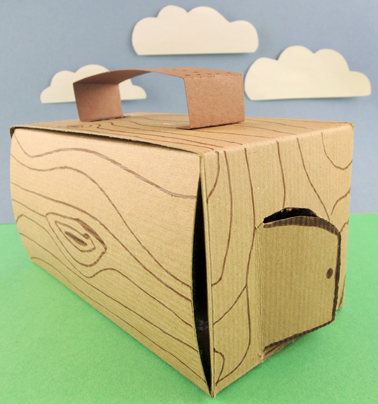
We used a 4.5” X 4.5” x 9” brown craft box for our project, but you can also modify a large tissue box. Just cut the top of the tissue box on a hinge, like so:
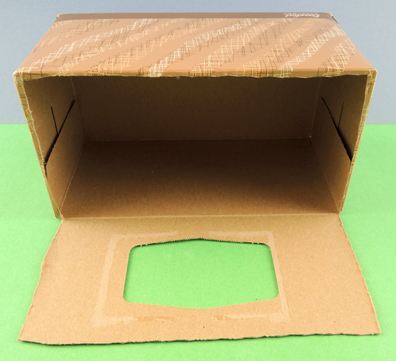 Use a box cutter to add a window and door to the ends of the box, then tape (or hot glue) a poster board handle to the top. Then decorate the interior and exterior of the log house! You can just use construction paper and markers to decorate. Or, dig around the supply closet for items with interesting textures.
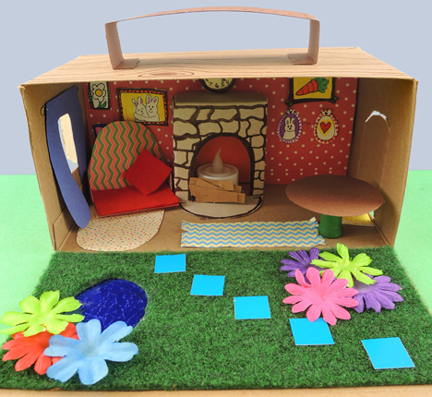 Our flower garden was a bit of outdoor carpet (reused from our Seuss mini golf event). We added fabric flowers, cardboard mosaic square stepping stones, and a blue embossed foil paper pond. For the interior, we offered both construction and patterned paper (and don’t forget to add some farmed art work from the template!). Here are the furnishings:
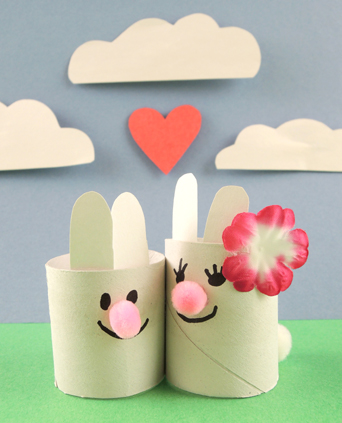
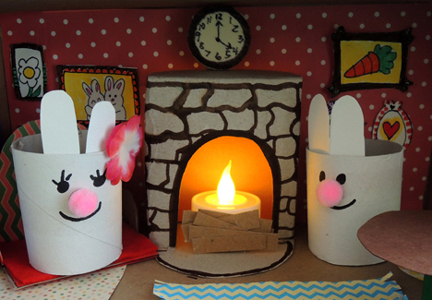
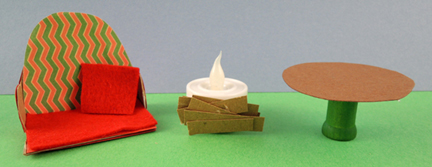 The armchair is a modified tape roll box, and the table is a circle of poster board with a wooden spool base. The fireplace is also a tape roll box. The “fire” is an an LED votive with poster board sticks attached to the front. Cut a toilet paper tube in half to create your 2 bunnies, then add ears and pom-pom tails and noses. Light the fire, get your bunnies cozy, and revel in the cuteness!
 Best of all, everything tucks inside the log box for easy transportation!
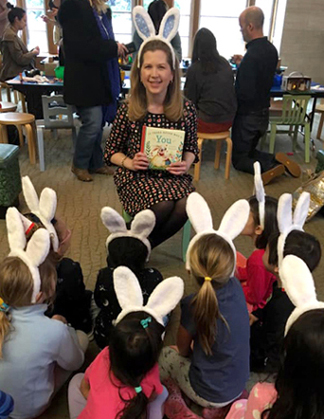
 After the project was finished, out came fuzzy bunny ears for kids to wear home, and we also gave away 3 signed copies of Amanda’s book! Here’s a lucky (and clearly very excited) winner!
 If There Never Was a You is Amanda’s first book! After story time, I caught up with her to chat about her process…
Tell us a little about yourself!
I’ve always been a creative person. When I was a child, I used to spend hours dressing my dolls with matching accessories and coordinating tiny ensembles. I made cards to give to people for birthdays and holidays, and I even learned calligraphy to make them look special! As a young adult, I made wedding and baby shower favors, and decorative wreaths. I scrapbooked and painted all sorts of wall decor for my children’s rooms when they were little. Creating is something I’ve always done, and writing is one of my favorite avenues of expression for my creativity. But I can’t draw, so I’m very thankful for gifted illustrators like Olga!
This is your very first book, tell us your inspiration for it!
My children are the inspiration for everything good that I’ve done, including this book. A few years ago, I was divorced, with only fifty percent custody, and my kids were approaching teenagerhood, so even when they were with me, they were often busy with friends or sports practices, and I missed them. As a mother, especially a working one, it is unusual to have free time, and I wasn’t sure what to do with myself. But I wanted to channel that time and emotion into something positive, and I started thinking about how much I enjoy spending time with my kids, and all of the wonderful experiences I would have missed out on if they had not been born. I wrote it down, and that became If There Never Was a You.
What was the process to publication like?
It was a long road that led me here. I first began trying to get published when my children were little. I was a stay at home mother at the time, and I cherished my time with my kids, but I needed an intellectual outlet. So, at night, after they were asleep, I would go to our home office and write. I wrote everything and submitted most of it – personal essays, greeting cards, slogans, poems, non-fiction articles and eventually novels.
I sold a few poems, a greeting card and a slogan, and lots of non-fiction articles. But my novels were terrible, and my essays did not get picked up. I think that there are a lot of different types of writing, and not every writer is good at all of them. So, in the beginning, you try many different things to see what fits.
I took a break from writing when I got divorced because I returned to work full-time and I needed to focus on creating stability and a new normal for my kids. When I resumed writing a few years later, I tried my hand at children’s books, and this one got picked up almost immediately. I kept writing personal essays, too, because I enjoy reading them, and those eventually became my blog posts. So, it is an interesting situation I find myself in now, writing for children and adults at the same time. But it works. I read the book to the kids, and I point their parents to the blog. Hopefully, I have something of value to offer to both groups.
The illustrations by Olga Skomorokhova are gorgeous. At your story time, you asked the kids what their favorite illustration was…what’s yours?
That’s a hard question – it’s like trying to pick my favorite child! There is so much I like about all of them. I love the bunnies playing soccer because my son is a soccer player so that page is a nod to him (and it’s adorable – bunnies playing soccer!). I also really like the picture of the mom serving carrot cake to the child, because my daughter and I like to bake together and carrot cake is a favorite treat in our house. But I’m also a big fan of the carrot rocket ship (so creative!), and that page has one of my favorite lines, “Who would do your greatest things, and who would dream your dreams?” I like the idea that each child makes a unique contribution to the world, and if they had never been born, we would be missing something important.
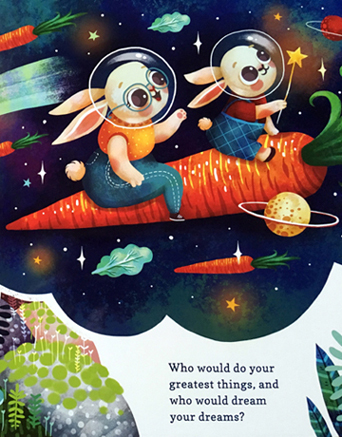
If There Never Was a You illustration by Olga Skomorokhova, used with permission of Familius, 2019
What’s the most unexpected thing about holding your first book in your hands?
The places and the life that this book has led me to. I imagined an author’s life as being a solitary existence, and it is anything but. It is true that I do most of the writing alone in my home office. But even at home, I’m not alone anymore – I’m interacting with people all over the world thanks to social media. There is so much networking and promotion involved when a book is published.
I’ve been everywhere lately – schools, libraries, bookstores – and I’m meeting so many people of various ages, from different walks of life, and it’s fascinating. I’ve been humbled and surprised by the warmth and the kindness of the people that I’ve met, and I’m so appreciative of all of the support that I’ve received from libraries, schools, bookstores, and parents.
And the kids are the best! They’re so sweet, curious, and openhearted. I’ve gotten some fantastic cards, pictures, and letters from kids that are so beautiful they made me cry. It’s a privilege, writing for and visiting with children, and they’ve inspired me to write more children’s books, so I have an excuse to hang out with them again!
Would you like to win a copy of the book? We have 3 copies of If There Never Was a You (Familius, 2019) to give away, signed by Amanda! Just send a mental hug to someone who means a lot to you, then e-mail cotsenevents@princeton.edu with your name. We’ll randomly draw 3 winners on Tuesday, April 9th. Good luck!
 We also recommend markers, just in case kids wanted to add details, or draw expressions on their animals…
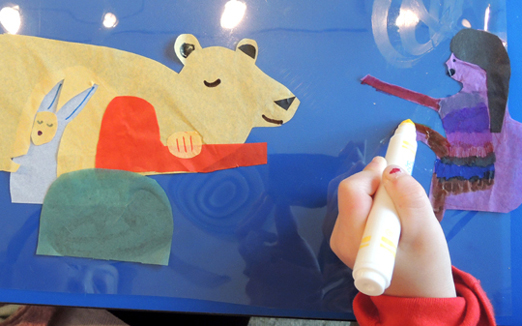 When your creation is complete, tape it to a window or door and admire the shapes and colors. It’s especially cool when the colors overlap!
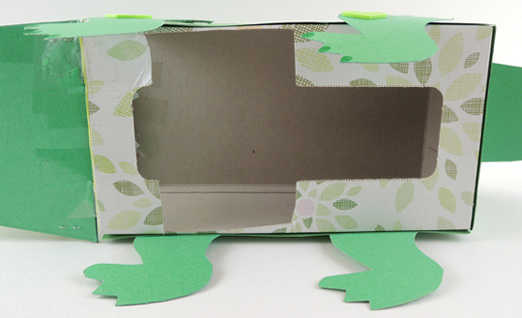 The alligator’s mouth consists of 2 “mouth pockets.” Print the template, and then cut 2 top mouth pockets out of green poster board. Staple the 2 pieces together to form a pocket:
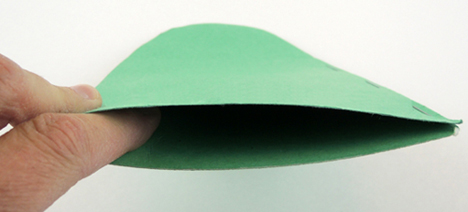 Now tape the mouth pocket to the top of the tissue box. Important! Just tape the TOP piece of the mouth pocket to the box. You’ll need to leave the bottom piece free so you can slip your fingers into the pocket and operate the puppet. Here’s a photo of the taped mouth pocket. I used red masking tape so you can see what I’m describing more clearly:
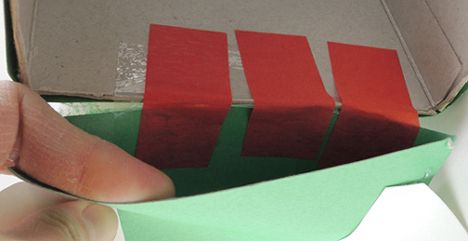 Repeat the above steps with the bottom mouth pocket, then add card stock teeth to the mouth. To operate the puppet, slide your fingers in the top mouth pocket, and your thumb in the lower mouth pocket.
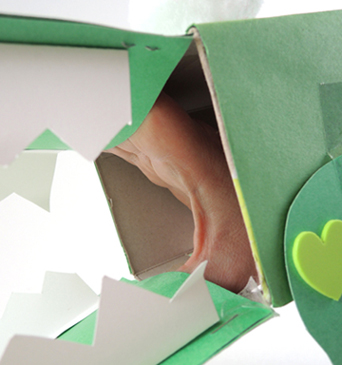 Here’s the finished alligator…we used green construction paper for the body, and green poster board for the legs and tail. Notice that the legs dangle off the bottom of the box with tape hinges – the puppet sits better in your arms that way. The eyes are jumbo pom-poms with
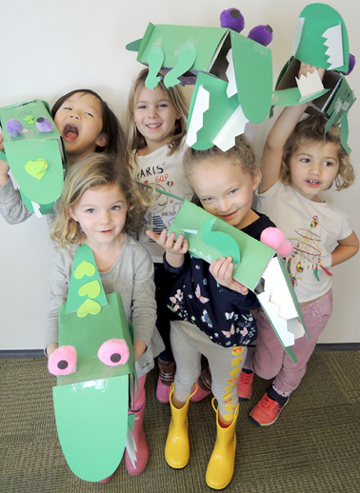
 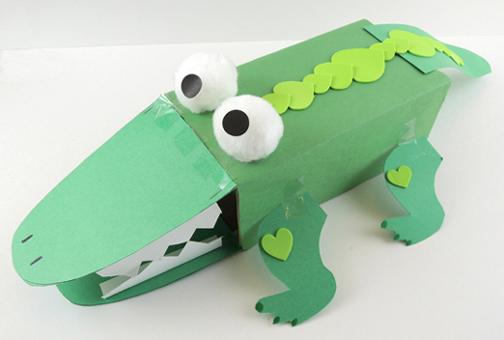 Each kid got to take home a plastic ball for the alligator to consume, but as the kids milled around the gallery, the alligators started eating EVERYTHING. Scarves, pens, socks, hats…if it fit in the box, the gator consumed it!