Food Allergies & Children’s Programs

food allergiesIn 2009, I gave my 13-month-old son a taste of a peanut butter snack I was enjoying. 15 minutes later, we were in an ambulance rushing to the emergency room. His eyes were swollen shut, he was covered in hives, and his crying was choked and ragged. Turns out he’s severely allergic to peanuts, tree nuts, and eggs.

Being the parent of a kid with food allergies has definitely changed my approach to the programs I develop. I thought I would share some of these changes with you! Here they are, in no uncertain order…

  • So long egg cartons. I no longer do craft projects with egg cartons. Also on the “do not use” list, any packaging that once stored food. The exception to this is non-nut flavored tea tins and oatmeal containers. But I always have alternative non-food containers ready, just in case.
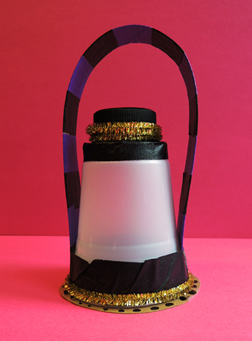
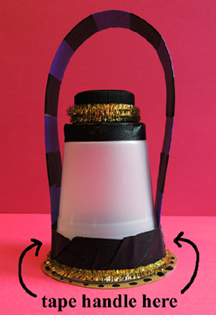
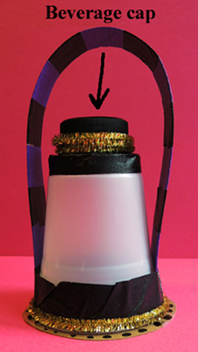
  • Careful with food lids and beverage caps. Very rarely, I use food lids for projects. Mostly, I use beverage caps (water, soda, or juice caps). I never use lids or caps from mayonnaise, nut butter, or milk containers. I clean the caps before the program, announce that I’m using food lids and drink caps at the program, and provide hand wipes for cleaning them during the program. I also offer an alternative non-food item to use.
  • Goodbye candy prizes. These days, I seldom award candy prizes. Instead I opt for stickers or little trinkets. If I do use candy prizes, I always have an alternative available for food allergic kids. Example: I developed a Robin Hood tax game for a large-scale event. Once the players “lost” all their money, they received a chocolate coin as a consolation prize. But food allergic kids got to take home a metal replica of a Medieval coin (to the envy of all).
  • Save packaging and labels. Parents of kids with food allergies always have to check food packaging because allergens are sometimes listed in sneaky ways. If you offer food at your program, keep the original packaging on hand so parents can check the labels. Example: At a program about discovering India, kids had an opportunity to enjoy mango lassi samples from a local restaurant. But there was no ingredient label for the restaurant lassi. So for kids with food allergies, I offered mango juice poured straight from the original bottle into dedicated cups. There were quite a few takers (including some folks without food allergies!).
  • Consider going nut free at events. Part I. Approximately 1 in 13 kids have food allergies today. The rest of the population is raring for all the fantastic things we enjoy at events – yummy, delicious, goodies dyed neon colors. As a recovering cotton candy addict myself, I certainly don’t want to deny anyone their fun. However, I must say that peanuts and tree nuts (which appear to be the most dangerous in terms of severe allergic reactions) have a way of showing up in unexpected places. A peanut butter ice cream cone drips on the floor where a baby is crawling and mouthing a toy. Sticky hands that previously held a piece of walnut baklava grasp markers at a neighboring table. Eeek.
  • Consider going nut free at events. Part II. Going nut free doesn’t have to be limiting. For example, at a Journey to the Centre of the Earth event, we served a custom “dirt” gelato. It was basically chocolate gelato with chocolate cookie crumbles. No nuts. True, the gelato was processed in a kitchen with nuts and was therefore inedible to kids with nut allergies – but that’s OK. Food allergic parents are prepared for that sort of thing. But at least there was no chance that a random almond was going to show up at the “cave crawl,” or peanut butter was going to be smeared on a bench.  And lemme tell you – not one single person complained about the lack of nuts in that amazing dirt gelato.
  • Clean up art supplies. Recently, I did a program at a local pool, and kids worked on their craft project while eating snacks they brought from home. Later, I cleaned all the markers and scissors, to insure no allergens were clinging to them.
  • Save a line for allergens. Any time a kid registers for one of my programs, I always include a line on the registration form for food allergies and an emergency number. If a program is going to involve food, I contact the child’s parents for clarification about the allergies (if you’d like to see an example of this process, take a look at this post). If the parents don’t feel 100% safe about the food, we work out an alternative. And yes, there have been times when I’ve completely removed food activities from a program to keep a child safe. I don’t mind doing that at all. There are plenty of creative alternatives to food!
  • Listen & Ask. I’ve been doing children’s programs for over 15 years. In the beginning, food allergic children were rare. Even though I was respectful to parents wishes and made modifications to my programs, I always wondered if those parents were being, well…just a little too sensitive about their child’s diet. But watching my son suffer in that emergency room, I quickly realized that no…they’re not being too sensitive. If a parent contacts you with a concern about something, listen to them and ask what they need to feel safe at your program or event. Parents of food allergic kids are used to planning for, and coming up with, reasonable alternatives for things. They will definitely appreciate you helping them make more informed decisions about what to expect at your event!

Robot Fun

robot puppetWhat could be more fun than a robot pal to play with? Ooooohhhhh yeaaaaaah!

We read Boy + Bot, written by Ame Dyckman and illustrated by Dan Yaccarino (Knopf Books, 2012). One day, a boy meets a robot. The new friends have a blast playing together, but while rolling down a hill, Bot’s power switch is accidentally bumped off. The boy tries everything (applesauce, story, bedtime) to take care of his unresponsive friend, but nothing works. Exhausted, the boy falls asleep. While the boy is sleeping, his parents unknowingly switch Bot back on. Bot, distressed that the boy is not responding, tries everything to revive him (oil, instructional manual, battery). Finally, the Inventor sets Bot straight, the boy wakes, and they run off to play once more.

You’ll need:

  • 1 box for the robot’s body (I used a 9” x 4 ½” X 4 ½” box)
  • 1 smaller box for the robot’s head (I used a 4” x 4” x 4” box)
  • 2 extra-long pieces of clear clear elastic beading cord
  • 2 craft sticks
  • Masking tape
  • A box cutter
  • 4 poster board strips for the arms and legs
  • Hot glue
  • Art supplies to decorate your robot. This could be anything – sparkle stems, tin foil, mylar, shiny paper, stickers, etc.
  • An assortment of beverage caps (optional)
  • Scissors, tape and glue sticks for construction
  • 1 wooden dowel

The first step is to super-duper secure the elastic cords to your robot’s body.  This is important because the robot is really going to get bopped around. Wrap each piece of elastic cord around a craft stick, double knot it, and cover the knot with masking tape like so:

prepped cordThen, use the box cutter to make two vertical slits in the “shoulders” of the robot. Starting INSIDE the box, thread the cord through the slit and then pull until the taped craft stick is right up against the inside of the box. Repeat on the other side.

cord throughYou don’t need to secure the craft stick inside the box. In fact, it’s better if it wiggles because it produces a bouncier robot! With the cords dangling outside the body, hot glue the head, arms, and legs. I also offered a choice of beverage caps for eyes, ears, buttons, and hot glued them on.

Now it’s time to decorate! I broke out the Bling Bin, heaped even more metallic supplies on the tables, and told the kids to let their imaginations go wild! While they were working, I walked my robot around the art tables for inspiration. I was quite proud her dainty robot shoes.

robot shoeWhen the decorating is done, rig your robot up to the wooden dowel. Start by dangling your robot from the elastic cords so its feet are touching the floor. Then, wrap the elastic cords around the ends of the dowel and secure them with masking tape.

final cordsFinished! We walked our robots around the gallery in a sparkly, bouncy parade, but you can also put on some music and host an awesome robot dance party!

Spooky Old Classic

spooky old tree with kidsReady to do some daring exploring? All you need is a lantern, a map, and a classic book!

We read The Berenstain Bears and the Spooky Old Tree by Stan & Jan Berenstain (Random House, 1978). Three little bears journey to a spooky old tree, daring to explore an old stair, an alligator-challenged bridge, a secret hall, and finally, the Great Sleeping Bear.

This was one of my favorite picture books when I was a kid, and when 2 extra-large recycled boxes graced my doorstep, I knew exactly what I was going to to with them. Create a spooky old tree for kids to explore!

Our spooky (but not too spooky) adventure begins with a glowing lantern…

lantern…and ends with a key hunt inside the spooky old tree!

spooky tree interiorYou’ll need:

  • 1 standard clear (or opaque) plastic cup
  • Glow-in-the-dark foam dough, glow paint, or a LED candle (optional)
  • tagboard circle for a lantern base (should be slightly larger than the mouth of the cup. Mine was approximately 3.5″)
  • 1 tagboard (or poster board) strip for lantern handle (approximately 14″ x 1.25″)
  • Markers for decorating
  • Scotch tape
  • A selection of color masking tape
  • 1 beverage cap
  • Hot glue
  • 2 sparkle stems
  • 1 spooky old tree map template, printed on 11″ x 17″ paper
  • 1 spooky old tree (read on for construction details!)

To make the lantern, begin by putting the glow-in-the-dark material inside the cup. I had some leftover glow-in-the-dark foam dough (from a program 3 years ago!) so that’s what I used. But you can also paint something that will glow, use a LED votive candle, or simply skip this step.

Decorate the tagboard circle with markers. When finished, tape (or hot glue) the circle over the mouth of the cup. Then flip the cup over so it’s resting on its tagboard base.

Now for the lantern handle! Decorate your handle with markers or color masking tape. Then use scotch tape to secure the handle near the BASE of the lantern. Some kids will be tempted to tape the handle to the top of the lantern, but that makes it too tippy.

taped handleUse color masking tape to create decorative bands at the top and bottom of the cup. Hot glue a drink lid / bottle cap to the top of the lantern. Finish by wrapping one sparkle stem around the base of the lantern, and the other sparkle stem around the beverage cap.

lantern capWith the lantern complete, we embarked on a map making project. I gave the kids a spooky old tree template, and asked them to draw what they thought the inside of the tree looked like. For inspiration, I taped color copies of pages from the book (featuring the hall, the bridge, the moving wall, etc.) on the surrounding walls. When the maps were finished, my assistant hid them around the gallery and invited the kids to go on a “map hunt.” While this was going on, we got the tree ready for action.

And now (duh duh DUH)…THE TREE!

spooky tree door closedI’ll start by saying that you do NOT, of course, have to create a tree like mine. A large box with a hole cut in it, a darkened room, a table draped with a dark tablecloth – all of these thing will do just as well. Kids will have fun no matter what. You also don’t have to have a hidden key game. Crawling through the tree with your glowing lantern is a fine adventure.

However, if you DO want to make a tree like mine, fire up the hot glue gun and let’s get started!

You’ll need:

  • 2 large boxes (mine were 32″ x 26.5″ x 22″ and 25″ x 25.5″ x 24.5″
  • 1 roll of brown craft paper (or brown wrapping/packing paper)
  • 1 box cutter
  • Packing tape
  • Hot glue
  • 4 small clear plastic cups
  • 4 LED votive candles
  • White, brown, black, and yellow poster board
  • Black marker
  • 1 large piece of tagboard for key reinforcement & key sleeves
  • 1 key template, printed on 8.5″ x 11″ card stock
  • 1 set of metallic Sharpie markers (optional)

I used the smaller box for the “entry tunnel” and the larger box for the “key chamber.”

boxesUsing the box cutter, cut matching rectangular holes in one side of each box. Push the two boxes together so the holes are connected, then tape and hot glue the boxes together securely. Now the boxes are connected by an interior “doorway.”

Wielding your box cutter once more, cut doors at each end of the joined boxes. One door is the entrance, the other door is the exit. I decorated the entrance door with a black poster board and added yellow eyes.

spooky tree entrywayThe exit door isn’t decorated on the outside, but I did cut a small rectangular “keyhole” in it. Here’s an interior shot:

spooky tree keyholeNow it’s time for the “bark” on the tree. Cut a big piece of craft paper:

branch sheetRoll and twist it into a tall cone-like shape (i.e. so the base is wider than the tip).

rolled branchThen hot glue the wider part of the “branch” to the box.

glued tree branchRepeat until the tree is covered! I must admit, I pooped out after the first box, and simply wrapped the sides of the second box with paper. But as you can see, it still looked great!

spooky tree side viewIf you want to see this tree building technique used on a smaller scale, check out this post.

Now, on to the interior of the tree! In the interest of time, I only decorated the key chamber. I left the entry tunnel undecorated. I used the white and brown poster board to create two spooky bear portraits with frames. Then I hot glued them to the walls. As you can see, I didn’t make them too spooky. Because it’s easy to get a little hysterical in a dark, tight room with flickering candles. So you don’t need super-scary bears glaring at you too, eh?

bear portraitsNext I hot glued plastic drink cups to the upper corners of the room and plunked an LED votive candles in each cup. Instant wall sconces! Finally, I used a black marker to add some details to the exit door. Here’s a birds eye view of the key chamber.

interior room bird's eye viewHere’s the entrance view again.

spooky tree interiorAnd here I am hot gluing everything (only burned myself once)!

dr dana gluesThe final step is the keys! To give the keys more texture, I colored them with metallic sharpie markers. Then I hot glued them to tagboard for extra reinforcement.

During story time, I knew was going to be repeatedly hiding the keys in a dark, very cramped place. I also knew I was going to drop a key someplace irretrievable. So I made “key sleeves” out of tagboard, slipped the keys inside, and hot glued the sleeve in the hiding places.

key sleevesHere’s one key sleeve glued in a crack in the ceiling:

hidden key 3And another key sleeve glued behind a bear portrait:

hidden key 2I placed the third key (with no sleeve) in a wall sconce:

hidden key 1Now we were ready! My assistant staffed the entry door, and I staffed the exit door. One by one, kids crawled inside the spooky old tree to find the hidden keys and stick them through the “keyhole” I had created. The key in the keyhole was my signal to open the door and let them “escape.”

Originally, I was going to have kids find all three keys. But we were so crowded that day we only had time for one key. One girl was a little scared, so we opened both doors wide and let her crawl through without stopping. She did it, and then circled back in line to do it again! I was very proud of her!