 Old tales get a modern twist when we asked artist Aliisa Lee to re-image twelve folk tale (and fairy tale) creatures as manga characters! Aliisa’s drawings, of course, were stunning. Singing turtles, badger tea kettles, and feisty dragons? Absolutely. Below are each of the characters, along with a very quick synopsis of their stories.
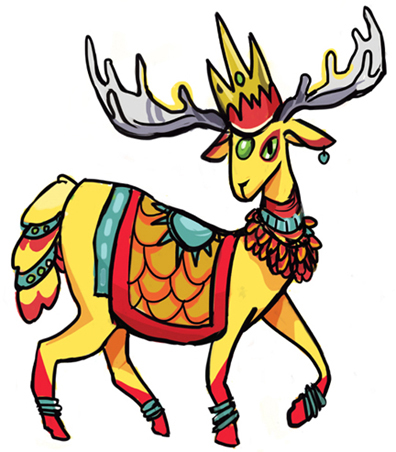
THE BANYAN DEER (India)
Once there was a golden deer who was King of the Banyan Deer. His herd lived peacefully in the forest alongside the King of the Monkey Deer and his herd. The Ruler of the country, however, was a man who loved to hunt and eat deer meat. He surrounded the forest with a fence and told the Kings that every day, a deer from their herds must sacrifice his/herself to his table. One day, a mother deer was due to be sacrificed. She begged to wait until her baby was older. The Monkey Deer King would not consent to this, but the brave Banyan Deer King offered to go in her place. The Ruler was touched by the noble sacrifice of the Banyan Deer, and vowed never to hunt or eat deer meat again.
From Told in India, retold by Virginia Haviland, illustrated by Blair Lent (Little, Brown, 1973).
 YOUNG DRAGON (Taiwan)
Long ago, China was a great sleeping Father Dragon. Only the tip of his tail stuck into the sea. Nearby, three young dragons wrestled and played with each other. Eventually, they started nipping at Father Dragon’s tail, biting harder and harder until he awoke with a mighty ROAR. He lashed his tail so hard, the tip broke off and fell into the sea, trapping one of the naughty dragons underneath. Today, the tail tip is the Island of Taiwan, and the mountain range in the middle of the island is the trapped dragon. Father Dragon, now called the Himalaya Mountains, has gone back to sleep. The two remaining dragons continue to play in the Taiwan Straits and China Sea, causing storms and typhoons.
From Tales from a Taiwan Kitchen, written by Cora Cheney, illustrated by Teng Kung Yun-chang and others (Dodd, Mead & Company, 1976).
 MOON RABBIT (China)
An old hermit lived in a cave with a rabbit. Every day, the rabbit brought berries, herbs, and mushrooms for the hermit to eat. But then came a terrible drought. The rabbit traveled far, looking for food. When he returned to the cave, he couldn’t bear to tell his friend that he had failed to find anything. So he leaped into the fire, hoping the hermit would cook him and avoid starvation. But before the flames touched the rabbit, the Celestial Emperor lifted him to the calm surface of the moon. He praised the rabbit’s bravery and compassion, and sacrifice. The Moon Goddess was delighted to have such a noble companion. The next full moon, see if you can spot the outline of the Moon Rabbit!
From Cloud Weavers: Ancient Chinese Legends by Rena Krasno and Yeng-Fong Chiang (Pacific View Press, 2003).
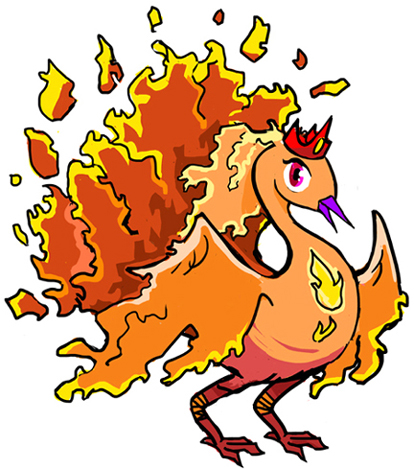 THE FIREBIRD (Russia)
Tsar Vyslav Andronovich had a magnificent garden and a special tree that bore golden apples. But every night, a Firebird would fly into the garden and steal apples from the tree. Tsar Vyslav ordered his three sons to capture the bird, but only Ivan, the youngest, succeeded in plucking a feather from her tail as she flew away. A massive quest ensued, one that involved a gray wolf, a horse with a golden mane, a beautiful maiden, ravens, the water of death, the water of life, and two treacherous, back-stabbing brothers. Needless to say, it all ends well, with Ivan and Elena living happily ever after.
From The Firebird and Other Russian Fairy Tales, edited and with an introduction by Jacqueline Onassis, illustrated by Boris Zvorykin (Viking Press, 1978).
 BABE THE BLUE OX (United States of America)
Winter can be hard, but this particular winter was so cold, the snow turned blue! One day, a giant lumberjack named Paul Bunyan went on a walk. He heard a little cry. Following the sound, he found a blue baby ox in the snow. Paul took the baby ox home and named him Babe. In time, Babe the Blue Ox grew to humongous proportions. But he was always a good and faithful companion to Paul Bunyan. By the way, do you know the Mississippi River was formed when a big ‘ol water tank wagon Babe was hauling sprung a leak? It’s true! I swear!
From American Folklore: Minnesota Tall Tales retold by S. E. Schlosser. Original source here.
 ANANSI (Africa)
Nyame, the sky god, held all the world’s stories. Anansi the spider wanted those stories. So Nyame challenged Anansi to capture Hornet, Python, Leopard, and Fairy in exchange for the tales. Clever Anansi trapped Hornet in a gourd by pretending it was raining. He tricked vain Python into stretching out on a branch and then tied him to it. He bound Leopard in a web net, and stuck curious Fairy to a doll made of sticky gum. Nyame was overjoyed at Anasai’s success. He gave him the world’s stories, which Anansai shared with everyone.
From Children’s Book of Mythical Beasts & Magical Monsters (DK Publishing, 2011).
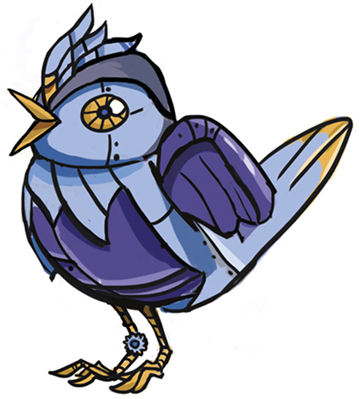 THE MECHANICAL NIGHTINGALE (Denmark)
A nightingale lived in a forest. Her song was so beautiful, the Emperor demanded she perform in his court. When she sang for him, the Emperor wept. He commanded her to stay in the palace, but the bird soon grew unhappy. Then one day, a gift arrived. It was a mechanical nightingale, one that sang when you wound it up. It quickly replaced the real nightingale. Time passed, and the Emperor grew very ill. When death came to claim him, the Emperor turned to the mechanical bird for comfort. But it remained silent, for there was no one to wind it. Suddenly, there was a glorious burst of song! The real nightingale sang away death, and the Emperor and the nightingale became good friends.
From Ardizzone’s Hans Andersen: Fourteen Classic Stories, selected and illustrated by Edward Ardizzone, translated by Stephen Corrin (Atheneum, 1979).
 BAYAMEY (Australia)
When Ocean disobeys Bayamey, the Maker of the World, Bayamey transforms into a giant frog and swallows all the Earth’s water. Earth’s creatures, fearing for their lives, try to make Bayamey laugh and release the water. Kookooburra Bird, Turtle, and Bumble Bee all do funny things, but nothing works. Finally, the Eel Sisters try an amusing dance. In doing so, they accidently tie themselves together and start arguing. The creatures laugh at their antics, and Bayamey just can’t help himself. He laughs and laughs! The water bursts forth and returns to Earth.
From Eleven Nature Tales: A Multicultural Journey, written by Pleasant DeSpain, illustrated by Joe Shlichta (August House, 1996).
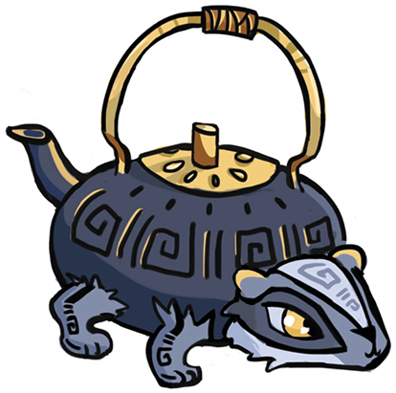
THE GOOD FORTUNE KETTLE (Japan)
A poor junkman frees a badger from a trap. The grateful badger transforms himself into a fine teakettle and crawls into the junkman’s basket. The junkman, hardly believing his good fortune, sells the kettle to a temple priest. The priest is shocked, however, when the kettle grows legs and a head and starts dashing around the room! He returns the kettle to the junkman. Next, the badger teakettle suggests that he and the junkman put together a show and become rich. After many performances, the now-affluent junkman returns to the temple, explains his story, and offers the kettle to the priest as a gift. Rumor has it the kettle still resides at the Monrinji Temple!
From Told in Japan, retold by Virginia Haviland, illustrated by George Suyeoka (Little, Brown, 1967).
 THE TROLL (Norway)
Once there were three billy goats named Gruff. There was a hillside full of rich grass they wanted to eat. But first, they had to cross a bridge, and underneath that bridge lived a big, ugly, nasty troll. The youngest brother had just started across the bridge when the troll lunged up, roaring “WHO’S THAT TRIP TRAPPING OVER MY BRIDGE? I’LL EAT YOU UP!” The first brother assured the troll that the second brother would make a better meal. The second brother insisted the oldest brother was even bigger and meatier. The oldest brother got right down to business. He charged the troll and tossed him into the stream. And the troll was never seen again!
From Favorite Fairy Tales Told Around the World, retold by Virginia Haviland, illustrated by S.D. Schindler (Little, Brown, 1985).
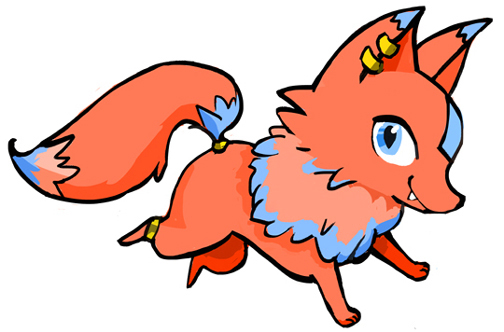 THE FOX (Greece)
One morning, a fox was looking for a bite to eat. She spotted a crow perched high in a tree, holding a piece of cheese in her beak. Calling up, the fox began to praise the crow for her shiny feathers, bright eyes, and strong beak. The fox lamented, however, that she couldn’t hear the crow’s beautiful voice. The crow was feeling quite flattered at this point (and, it must be said, growing quite vain). She opened her mouth and croaked “Caw! Caw! Caw!” The cheese fell out of her beak. Quick as a flash, the fox gulped it down. The lesson to be learned? Never trust a flatterer.
From Aesop’s Fables by Jerry Pinkney (SeaStar Books, 2000).
THE SINGING TURTLE (Haiti)
Everyone in the village is starving except Kanzo. His garden is bursting with peas! Some hungry birds decide to sneak in and have a feast. They loan their good friend Turtle feathers so he can fly with them. The secret snacking continues for days until suspicious Kanzo surprises them and captures turtle. But Turtle amazes Kanzo by bursting into song! Soon, people are paying money to hear Kanzo’s singing turtle, and Kanzo becomes rich. The King demands to hear the Turtle (and secretly plans to steal it for himself). But someone has switched the singing turtle for an ordinary one. The King is enraged at being made a fool of, and Kanzo and his family flee. And the Turtle? He’s probably still singing!
From When Night Falls, Kric! Krac!: Haitian Folktales, by Liliane Nérette Louis, edited by Fred Hay, Ph.D. (Libraries Unlimited, 1999).
Original artwork by Aliisa Lee

 A no mess, no carve, no flame, gorgeously glowing pumpkin? You got it! Bounce these LED pumpkin balloons around at your next story time, sneak a few on the shelves on the 31st, or take a spirited evening stroll.
 The illooms LED balloon has a round, hard tip at the top, and a tab sticking out of its neck. Pinch the tip while simultaneously pulling the tap to activate the LED. Then inflate the balloon (the directions suggest a pump, but I went with my lungs).
 The round tip acts as a balloon weight that pulls the inflated balloon upside down, creating the the perfect pumpkin shape. Use a black Sharpie permanent marker to draw a pumpkin face on the balloon, and you’re good to glow!
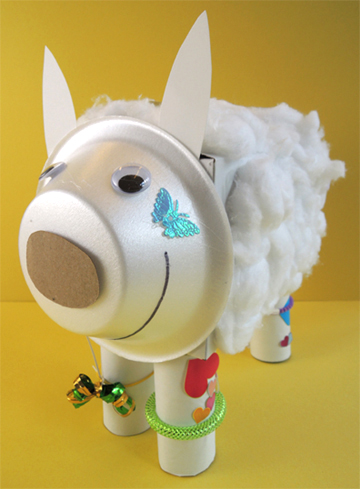
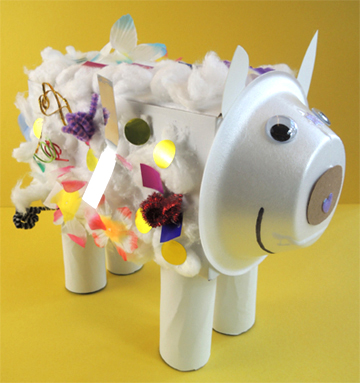
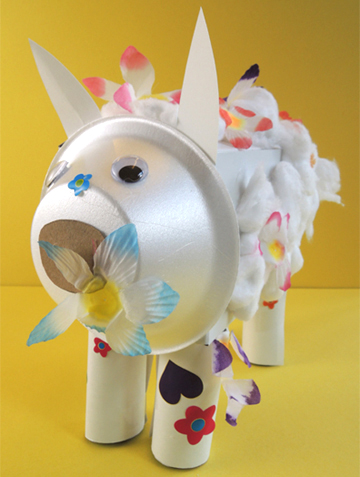
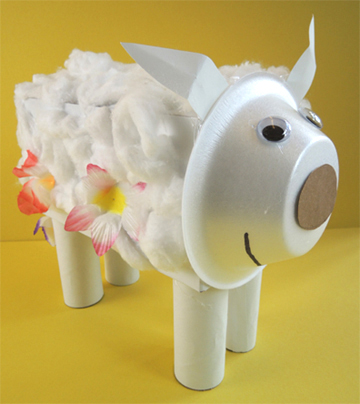
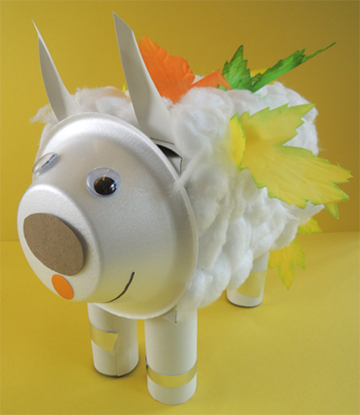
 One of these sheep is not like the other! Revel in your creative individualism by designing a fluffy cotton ball sheep that is utterly unique.
 Begin with the basic sheep. Wrap 4 toilet paper tubes in white construction paper, then hot glue the tubes to the bottom of a box. Hot glue a brown oval nose and 2 wiggle eyes to a paper (or styrofoam) bowl, then hot glue the bowl to the box. Attach a pair of construction paper ears with tape (or hot glue). Finish by gluing white cotton balls to the box.
 The results were fantastic. There were anklets, headdresses, bows, decorative wooly coats, and some very interesting tail modifications. Here’s our happy herd!