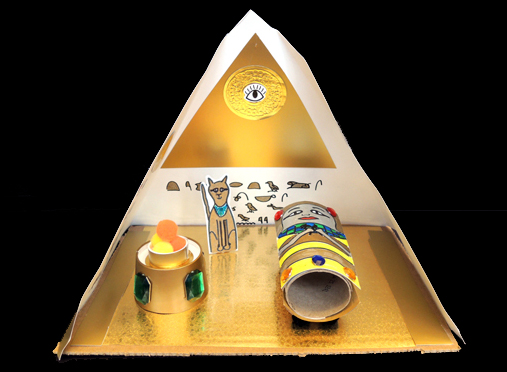
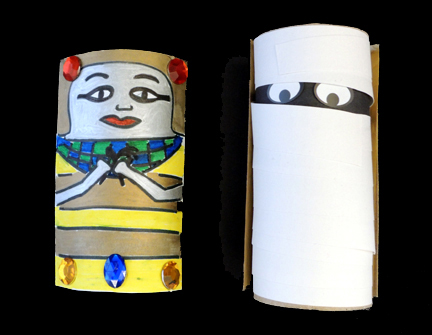
 Deep inside this golden pyramid is a lavish tomb complete with jeweled table, companion cat, mysterious hieroglyphics, decadent sarcophagus, and of course, a mummy!
 We read Ten Little Mummies: An Egyptian Counting Book, written by Philip Yates and illustrated by G. Brian Karas (Viking Juvenile, 2003). Ten little mummies, dead bored, decide to emerge from the tomb for a day of play and mischief. As the countdown progresses, each adventurous mummy encounters something different – heat stoke, adoption by baboons, a chariot race, being unwound on a pyramid slide, vanishing into the night on a hippo, etc. Finally, one sad, lonely little mummy returns to the tomb to discover that – surprise! – the other nine waiting for her, all safe and sound.
You’ll need:
- 1 corrugated cardboard pyramid base (approximately 7.25″ x 11″)
- A selection of embossed foil paper
- 1 rectangle of golden metallic poster board (approximately 9.5″ x 21″)
- 1 heiroglyphics sheet printed on 8.5″ x 11″ white paper
- 2 toilet paper tubes
- 1 rectangle of black construction paper (approximately 2″ x 6″)
- A selection of eye stickers
- 3 – 4 strips of white construction paper (approximately 0.75″ x 18″ per strip)
- 7 – 8 mini pom-poms (mine were 0.5″ in diameter)
- 1 paper cup (I used a metallic-colored one)
- 1 small beverage cap
- A selection of large gemstones (and small ones as well)
- 1 cat and lid template printed on 8.5″ x 11″ white card stock
- 1 small wooden spool (mine was 1″ tall)
- Extra scraps of gold poster board and embossed foil paper
- Tape, scissors, and glue stick for construction
- Metallic markers for decorating
- Hot glue
We begin with a corrugated cardboard pyramid base (I cut mine out of a copy paper box). Glue or tape a sheet of embossed foil paper on one side, right on the middle. This is the floor of your tomb. The foil paper won’t go to all of the edges of the base, but we’ll fix that later!
Next comes the pyramid. I used gold metallic poster board (ordered online from Blick Art Supplies. It’s gold on one side, white on the other). It looked fantastic, but yellow poster board would look good too. Unfortunately, my pyramid template didn’t fit on an 11″ x 17″ piece of paper, so I wasn’t able to make a printable template for you. Here are the dimensions:
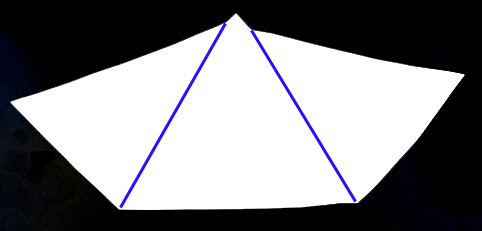
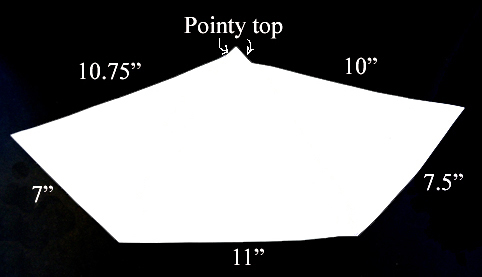 One important thing to note is that the pointy top of the pyramid is NOT part of the 10.75″ and 10″ sides. I left some extra room during the original cut and then cut the pointy top out of the excess. This template is not perfect, but the kids didn’t seem to care if their pyramids were a bit lopsided.
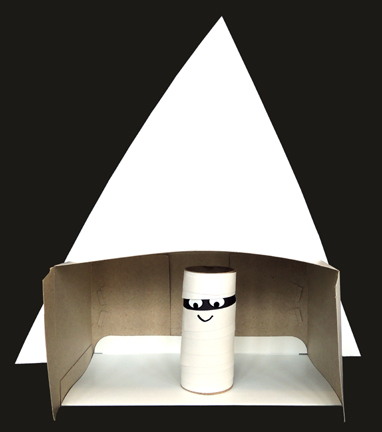
If you don’t want to tackle this pyramid, here is an alternative. Simply cut a triangle out of poster board, then hot glue it to a box “tomb.” See? This mummy is just as happy in this type of pyramid as the other one…
 With the pyramid cut, use the hieroglyphics sheet to write messages on the interior walls. The talented Miss Joani did these with metallic markers (the bottom one says “Tiger Tales Rocks”). She also did the drawings for the templates! Awesome.
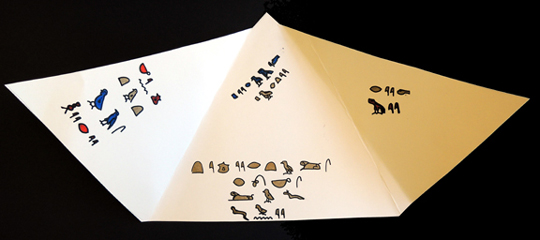 When you’re done with your hieroglyphics, fold the pyramid template along the blue lines and tape it the top of the cardboard base. You might have to do a little shaping with the scissors to get it just right.
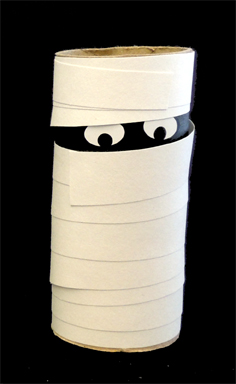
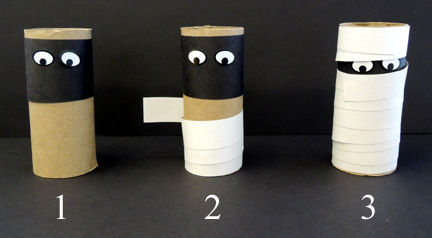
 Ready for the mummy? First, wrap the black construction paper rectangle around the top of the toilet paper tube and affix eye stickers. Run a glue stick down one side of a white construction paper strip and, starting at the bottom of the tube, wrap it around your mummy. When the strip runs out, start another until the mummy is complexly wrapped (but make sure to leave its eyes peeking out).
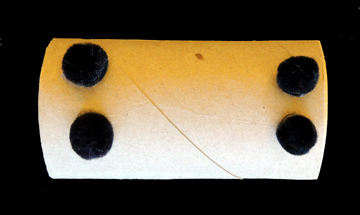
 Now for the sarcophagus. Cut a toilet paper tube in half, lengthwise. Glue a small piece of embossed foil paper on the interior of one of the tube halves (like a metallic mattress for your mummy to rest on). Then flip it over and hot glue 4 mini pom-poms on the bottom for legs.
 Next, use metallic markers to color the sarcophagus lid template and hot glue (or tape) it to the top of the remaining tube half. I added some small plastic gems as well. Lay your mummy on the bottom half of the sarcophagus, then gently place the lid on top.
 Just a few more touches remain! Cut the paper cup down to 1.5″ then hot glue large gemstones on it. This is your table, to which you can add a beverage lid filled with mini pom-pom fruits.
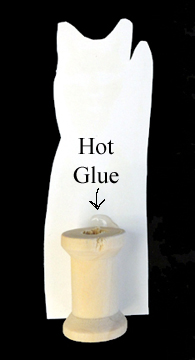
Color the cat template, then flip it over and hot glue a wooden spool to the back.
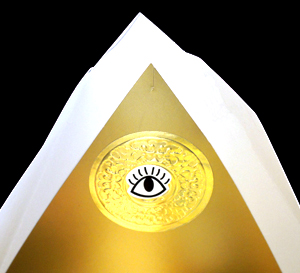
 All that’s left now is general decorating fun. Use extra pieces of gold poster board and embossed foil paper to fill the gaps in the floor and add flourishes to the walls. I also had some some gold embossed foil seals handy (purchased from Nashville Wraps).
One clever story time artist added an eye sticker to the center of the seal and I just had to do the same on mine. Behold the Eye of Horus!

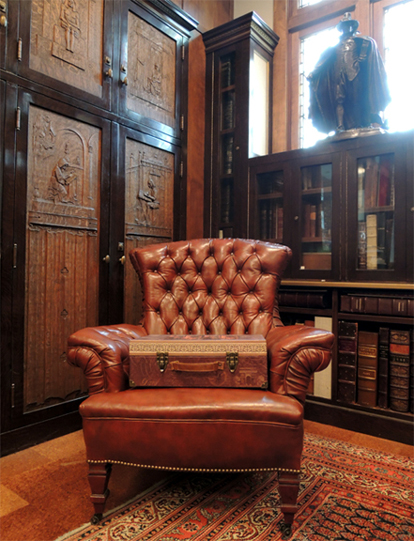 Need a boggart in a suitcase to transport to your next Defense Against the Dark Arts class? We can make that happen! Imagine a suitcase innocently resting on a tabletop (or handsome leather chair). But then, just when you least expect it, it jumps and bumps as the boggart inside tries to escape!
 Meet the “Weazel Ball.” It’s a pet toy with a rotating motor inside it that causes the ball to scoot around randomly, pulling and twitching the furry weasel on top. It’s meant to drive cats and small dogs crazy, but I knew it would be the perfect boggart. I purchased this one on Amazon for $6.
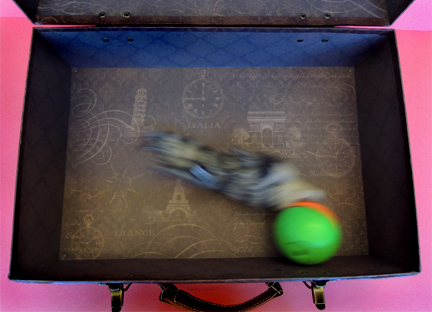 The most important thing when selecting your suitcase (or trunk) is the ability to latch or padlock it shut. This will prevent young skeptics from pulling up the lid and shouting “Daaaaad! I told you there’s no boggart in here!”
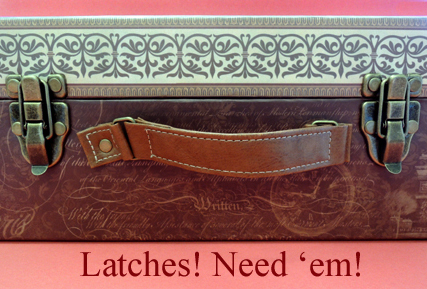 The other thing you’ll need are spare batteries. If you haven’t heard from your boggart in a while, the battery may have run out (the Weazel Ball uses a single AA). Depending on how long the event is, you’ll want several on hand.