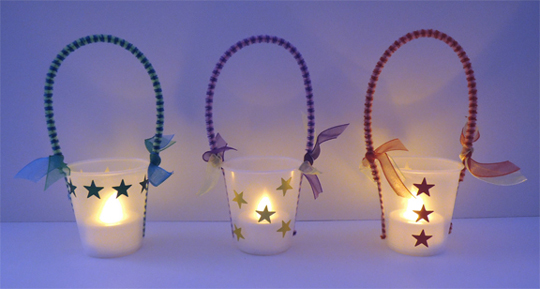
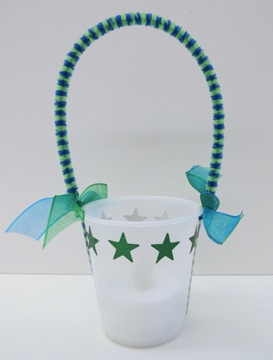
Hip Hat

hip hatsThe task…to make a hat that you NEVER want to take off. The resulting hats? Totally hip!

We read What a Hat! by Holly Keller (Greenwillow Books, 2003). Cousin Newton is visiting Henry and Wizzie. Newton doesn’t talk much, and when he does, he just says “No hat.” Newton simply refuses to take off his fuzzy knitted hat. He wears it at the dinner table, in the bathtub, and when he goes to bed! Henry tries to make Newton remove his hat, but it’s not happening. But when Wizzie falls prey to a local bully, Newton gives her his precious hat in order to make her feel better. And, like magic, it works!

You’ll need:

This is an incredibly simple story time project. Basically, give each kid a hat…

top hatThen decorate!

side of decorated top hatIf you want a big, floppy hat brim (and lots of kids did), begin by rounding the ends of a 14″ x 22″ piece of poster board.

hat steps 1 and 2Flip the hat upside down and place it in the center of the poster board. Use a pencil to trace the top of the hat onto the poster board.

hat step 3 Cut the traced circle out. Turn the hat right side up, and slide the poster board brim onto the hat. You might have to enlarge the circle a little to get it to slide all the way down to the base of the hat.

hat step 5Use a little hot glue to secure the poster board brim to the plastic hat, then decorate!

hat with wide brimQuick tip – if the hat is too big for your head, stuff the interior with extra tissue paper.

Come On Get Snappy

get snappySnapdragon anyone? I’ve offered this simple project at a number of programs in the past, and it’s always well-received. “Snappy” has decorated the edges of a swamp at a Halloween party, hid in an Alice in Wonderland garden, and grown out of pots at a “Primordial Plants” event table!

event tableYou’ll need:

  • 1 paper cup
  • 1 small rectangle of green construction paper for head (approximately 1.5″ x 3″)
  • A sliver of red construction paper for tongue
  • 1 green pipe cleaner
  • Hole punch
  • Tape
  • Markers
  • Extra green construction paper for leaves

First, fold the green construction paper rectangle in half to form Snappy’s mouth. Tab the ends of the mouth, then cut out teeth.

mouth stepsMake sure to leave a gap in the lower teeth (this is where the tongue will rest later).

gapNext, punch a hole in the back of Snappy’s head…

punched holeThen thread a green pipe cleaner through the hole. Twist the pipe cleaner around and thread it through the hole once again. Pull gently to tighten, then curl the end.

stem steps Cut the sliver of red construction paper to look like a forked tongue and tape (or glue) it into the mouth.

tongueUse markers to draw eyes. I added my eyes at the very end, but younger kids might have an easier time drawing the eyes earlier, such as before they attach the head to the pipe cleaner stem.

close up of faceTape the pipe cleaner stem inside the paper cup. Use extra green construction paper to add foliage. Done! Perhaps you can test out your new Snappy skills with this garden story time?

Let it Shine

dream friendsTwinkle twinkle little light! Are your ready for your journey to dreamland? This beautiful lantern and dream friend will help guide you on your way!

little lanternWe read Dream Friends by You Byun (Nancy Paulsen Books, 2013). Melody has a very special friend…a dream friend. They fly, play hide-and-seek, have marvelous adventures, and watch fireworks. But only in her dreams. In reality, Melody is a shy girl in a new neighborhood. Since her dream friend can’t leave her dreams, Melody decides to close her eyes and imagine her friend is with her. While dancing on the playground, Melody draws the attention of another little girl who asks to join her. Soon, the whole playground is dancing with Melody. Magical!

You’ll need:

  • A 5″ plastic bucket container (more on this below)
  • A 3.5″ x 5″ rectangle of mirror board
  • A selection of foil star stickers
  • Regular markers
  • Hole punch
  • 1 LED votive candle
  • A set of window markers
  • Lullaby CD
  • A selection of shimmer ribbon
  • Gold curling ribbon

A bucket container (also sometimes called a craft container) is constructed of plastic and metal. It’s meant to hold party favors, candy, etc. I purchased mine from Oriental Trading Company. You can purchase them individually at Michael’s Craft store.

bucket containerTo begin this project, use regular markers to draw a “dream friend” on the back of the mirror board (i.e. the white, non-reflective side). You could use white card stock instead of mirror board, but the mirror board is fantastic at reflecting the light of the lantern in the dark.

When cutting out your dream friend, make sure to leave a little tab at the top. Punch a hole through this tab (and round the edges if you’d like). This is where your ribbon will go later.

dream friend stepsOpen the bucket container and stick the foil stars on the “floor” of the container and the underside of lid. Some kids stuck stars on the plastic sides of the container. This is fine – just make sure they keep the stickers on the interior of the container so they won’t interfere with the markers later.

Now for the fun part. I dropped a twinkling LED votive in each container, darkened the room, put on a lullaby CD ( I highly recommend Sweet Dreams: Lullabies for Guitar by Nina Gerber), and the kids used window markers to decorate the exterior of their containers. The room was full of excited yet peaceful kids, decorating away amidst mellow, glowing lanterns.

dream workshopA tip about window markers. I purchased this brand from Discount School Supply (alas, there is no purple marker in this set). I know from experience that this particular brand works on glass AND plastic.

window markersYou have to draw slowly with window markers and allow them a little time to dry (about 30-45 second). Once they completely dry, then you can go back over them with another color. Otherwise, they get smudgy. So if you want to draw little stars with smiley faces like mine, just wait 30-45 seconds before you use the blue marker to draw the face on the yellow star.

decorated containerTo complete the project, thread some shimmer ribbon and gold curling ribbon through the punched hole in the dream friend, then tie to one side of the lantern. Sweet dreams!

lit up