Screenshot from Ghostbusters; 1984, Columbia Pictures
Katie and I work in a library (allbeit a unique library), visit libraries (like here, here, here, here, and here), and even craft libraries (here, here, or with flying books!). So when a library shows up in a movie, we of course get all giddy. Recently, we put together a list of our Top 10 famous movie libraries. Number two was a bit of a surprise, and number one? TOTAL CLASSIC.
#10 NATIONAL TREASURE
National Treasure is a campy hoot, packed with forefather name drops and American-ish history. Eventually, our adventurers find themselves in Washington DC in the Library of Congress. They discover a secret hatch in the shelving with a journal inside it, but…total pet peeve here…Nicolas Cage doesn’t shut the hatch after he removes the book. If you’re trying to be all secretive and cover your tracks, SHUT THE SECRET HATCH SO NO ONE ELSE CAN FIND IT! Geez!
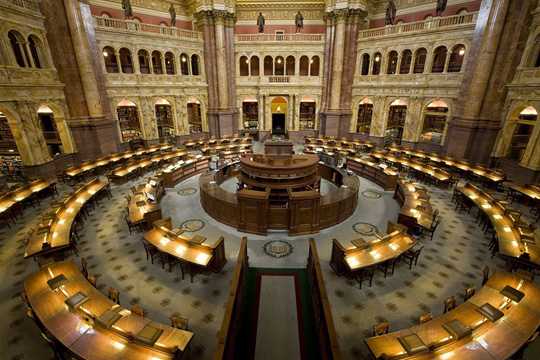
Image courtesy of the Library of Congress
#9 AMERICAN ANIMALS
Based on the true story of a botched rare books heist, American Animals centers around the Transylvania University Library in Lexington, Kentucky. The movie is fascinating, featuring both actor portrayals and interviews with the real life culprits (who all did jail time for the crime). The library featured in the movie, however, was not in Kentucky. It was the E.H. Little Library at Davidson College, Davidson, North Carolina.
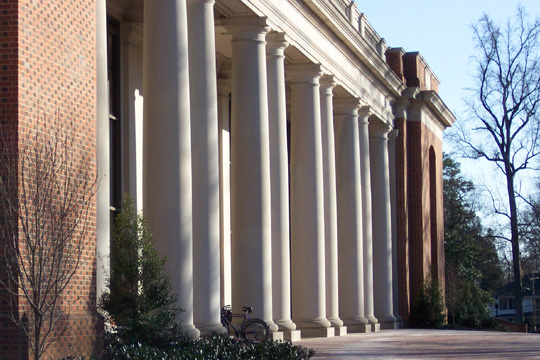
Image courtesy of Wikimedia Commons
#8 PHILADELPHIA
The multiple Academy Award-winning movie Philadelphia stars Tom Hanks and Denzel Washington as two lawyers fighting AIDS discrimination. A major turning point takes place in the gorgeous Fisher Fine Arts Library at the University of Pennsylvania. Awwww. We love you Philly!
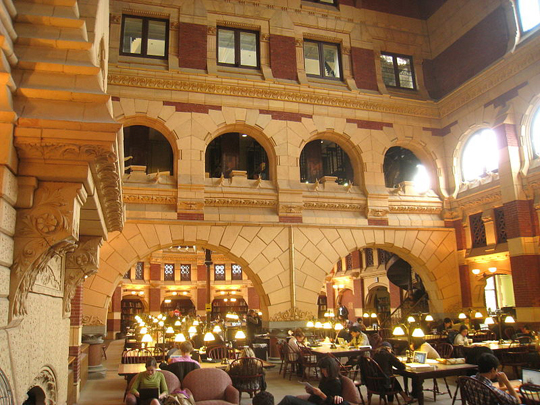
Image courtesy of Wikimedia Commons
#7 LEGALLY BLONDE
What better way to win back an ex-boyfriend then attending Harvard Law School. And what better place to studying for those LSATs then the Pasadena Central Library in Pasadena, California. It’s got palm trees in front, ya’ll!
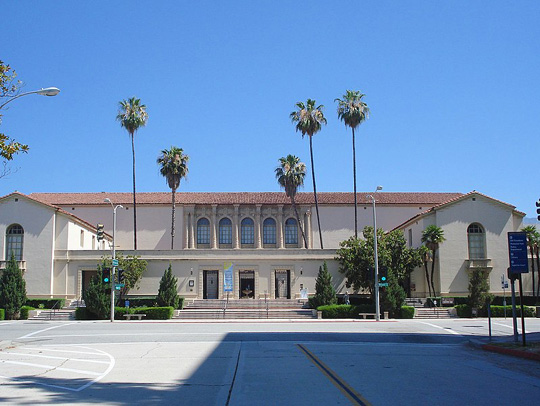
Image courtesy of Wikimedia Commons
#6 STRANGER THINGS
While technically not a movie, we had to include Stranger Things on this list. Interestingly, the exterior of the library is the Butts County Courthouse in Jackson, Georgia. The interior scenes were shot in a library in East Point, Georgia. Why did a NOT movie make this movie list? This awesome quote from Dustin: ““I am on a curiosity voyage. And I need my paddles to travel. These books… these books are my paddles.”
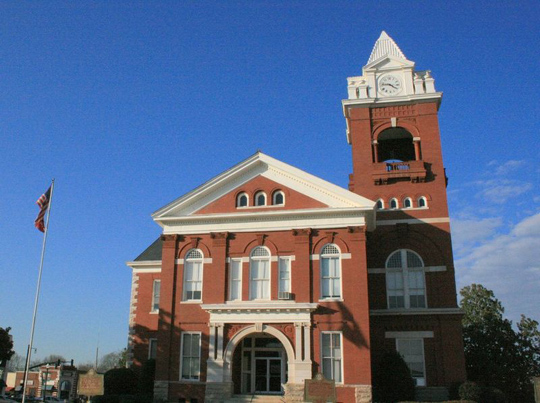
Image courtesy of Wikipedia
#5 BEAUTY AND THE BEAST
Since we’re stretching the movie list a bit with Stranger Things, we’ll stretch just a BIT further with a library that inspired a movie library. Yes, we’re talking about Disney’s animated Beauty and the Beast, Katie’s favorite, favorite FAVORITE. Belle’s literary wonderland was modeled after the Admont Abbey Library in Admont, Austria.

Image courtesy of the Admont Abbey Library, Austria
#4 INDIANA JONES AND THE LAST CRUSADE
The exterior of the Chiesa di San Barnaba Library in Venice, Italy was used during filming of Indiana Jones and the Last Crusade. But no, the library does not have stained glass window maps, secret in-floor compartments, or catacombs underneath it. Darn it.

Image courtesy of Wikimedia Commons
#3 HARRY POTTER AND THE CHAMBER OF SECRETS
Of course a Harry Potter movie is on this list! Where else would Hermoine go to find all the answers (or overstudy)? Hogwart’s adopted the Duke Humfrey’s Library, Bodleian Library, University of Oxford, England as its sanctum of knowledge.

Image courtesy of Wikimedia Commons
#2 THE BREAKFAST CLUB
The 1980s classic The Breakfast Club basically takes place in a library, so it’s close to the top of our list. They movie was filmed in the Maine North High School in Des Plaines, Illinois. But they didn’t use the school library OR shoot scenes in an alternate library. Surprisingly, they built an entire library set inside the high school’s gymnasium! So no, the library was not real. And no, you can’t go and recreate the famed “Detention Dance” scene. Bogus.
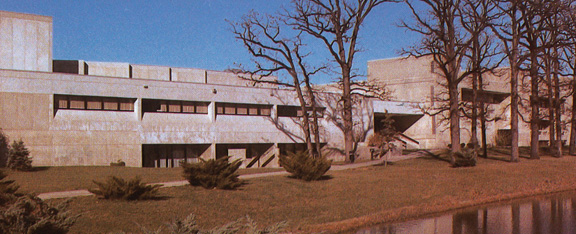
Image courtesy of Wikimedia Commons
#1 GHOSTBUSTERS
And the number one spot goes to the New York Public Library in New York City! Woooo!
While this iconic library has appeared in several films (Breakfast at Tiffany’s,13 Going on 30, Spiderman) we would argue that Ghostbusters leads the pack in sheer supernatural awesomeness. And while the NYPL was used for exterior and early scene shots (including the beautiful NYPL reading room photo that started this post), it must be said that the encounter with the fabled “Library Ghost” was actually filmed in the stacks of the Los Angeles Central Library. Life lesson learned: don’t mess with library ghosts. Just don’t.
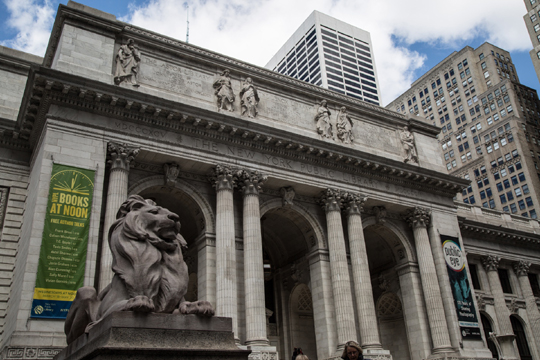
Image courtesy of Public Domain Pictures.net