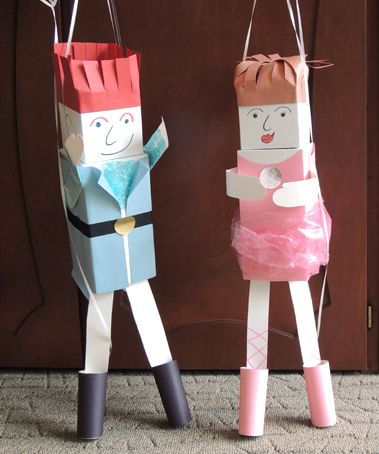
 Twirl and whirl with this beautiful ballerina marionette! Not so into pink tutus? No problem. We also have a pirouetting prince!
 We read Miss Lina’s Ballerinas and the Prince, written by Grace Maccarone, illustrated by Christine Davenier (Feiwel & Friends, 2011). Miss Lina’s ballerinas are delighted to learn that a boy will be joining their ballet class. A boy! Each girl imagines that she will be the one to dance a pas de deux with him at the end-of-year show. But the boy arrives and he’s not having it. With a leap and a bounce, he’s out the classroom door and dashing towards the zoo with the girls in pursuit. It becomes abundantly clear that the boy can dance, but not quite the way anyone expected. Eventually, the dancers learn to work together and all ten of them (Christina, Edwina, Sabrina, Justina, Katrina, Bettina, Marina, Regina, Nina and Tony Farina) perform brilliantly together at the end-of-year-show.
We’ll mainly use the ballerina for the instructional images below, but I’ll jump in every once in a while with something “prince specific.” And just in case you’re wondering, we did have some boys who choose to make pink ballerinas, and some girls who decided to make princes!
You’ll need:
- 1 large rectangular box (mine was 4 ½” X 4 ½” x 9”) a large tissue box works too
- A box cutter
- 2 small craft sticks (mine were 2.5″ long)
- 2 pieces of curling ribbon (approximately 36″ each)
- A selection of color masking tape
- Pink construction paper (or blue for the prince)
- 1 small square box (mine was 4” x 4” x 4”) a small tissue box works too
- Brown, yellow, red, or black construction paper for hair
- 2 white poster board rectangles for arms (approximately 1.75″ x 7.5″)
- 2 toilet paper tubes
- Construction paper for ballet shoes (pink for ballerina, black for prince)
- 2 white poster board rectangles for legs (approximately 1.5″ x 11.5″)
- Plastic cellophane lace (pink for ballerina, blue for prince) Tissue paper works too!
- A small gold or silver embossed foil seal (optional)
- An 8.5″ piece of PVC pipe
- 1/2 of a pipe cleaner
- Scissors, tape, and stapler for construction
- Markers for decorating
- Hot glue
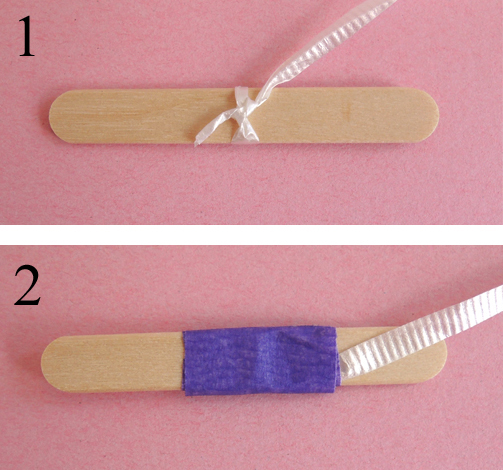
First, you’ll need to attach the string to your puppet. These puppets are going to do some bouncing and twirling, so I made sure to really anchor the string inside the box. To make the anchor, knot one end of a 36″ piece of curling ribbon around a small craft stick. Then reinforce the knot with masking tape.
 Then use a box cutter to cut a small slit on each side of the large box (aim for the the top, middle part of the box).
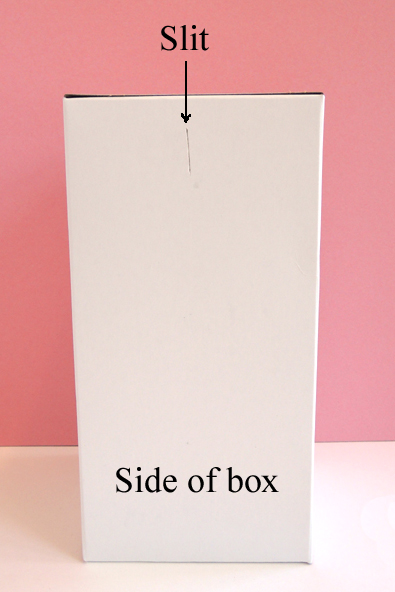 Use scissors (or the craft stick) to enlarge the slits a little. From inside the box, push the curling ribbon outwards through the slit. Pull the ribbon until the anchor is flush against the inside of the box. Now thread the ribbon through the slit on the other side. But this time, you’ll start outside the box and push the ribbon in. Knot the unattached end of the ribbon around a small craft stick and reinforce the knot with tape. You now have a loop of curling ribbon that is anchored inside the box by two reinforced craft sticks.
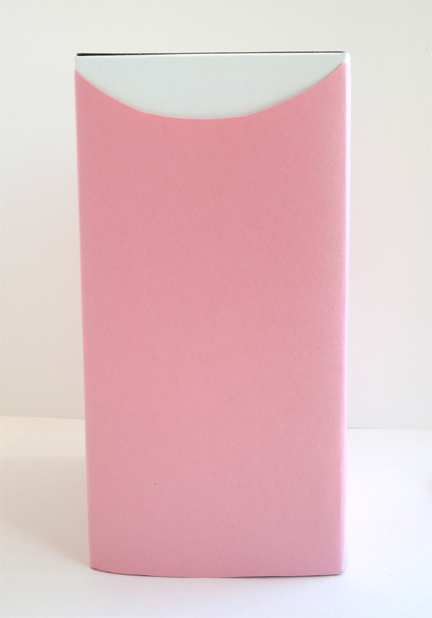
 Now for the ballerina’s leotard (and the prince’s jacket). For the ballerina, wrap a piece of pink construction paper around the large box and tape it in the back. If you’d like, you can cut a little scoop in the top of the pink paper to create a neckline.
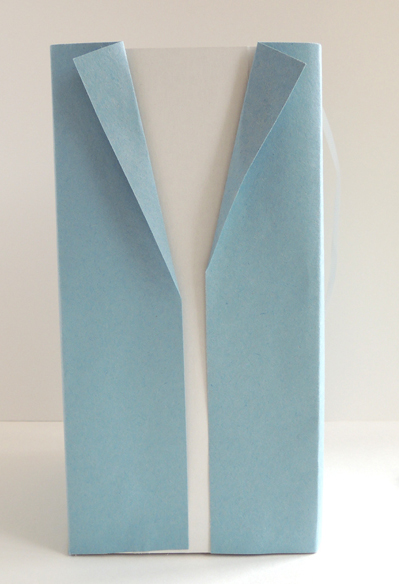
 For the prince’s jacket, wrap a blue piece of construction paper around the box and tape it in the front. If you’d like, fold the tops back to form the “lapels” of the prince’s jacket. If you have extra construction paper hanging down the back of the box, consider cutting them into a jaunty pair of coat tails!
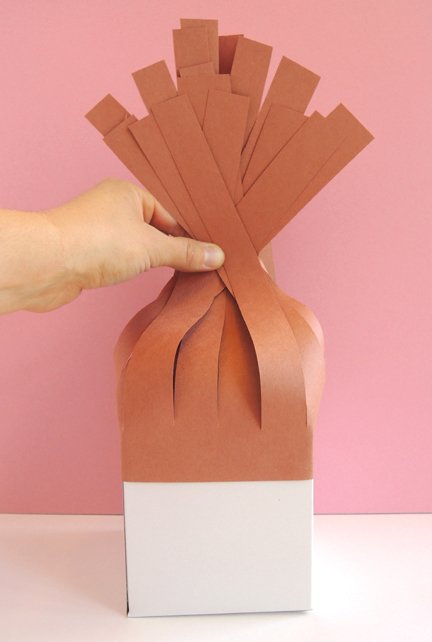
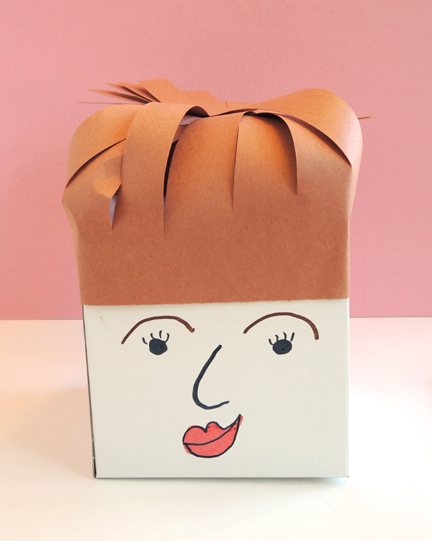
 The head is next! Fringe a piece of construction paper (we offered brown, yellow, black, and red) and hot glue (or tape) it around the top of a small square box. If you’d like to make a ballerina ponytail, gather the fringes together towards the back of the head
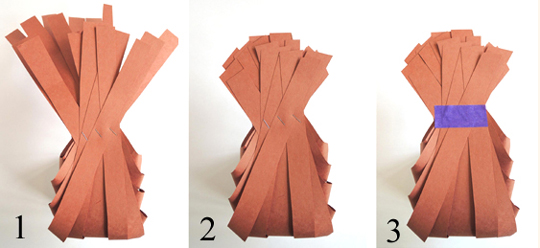
 Staple the fringes together, trim off any excess, then cover the staples with a masking tape “barrette.”
 Draw a face on the front of the box (and ears on the sides) and attach the head to the body with hot glue.
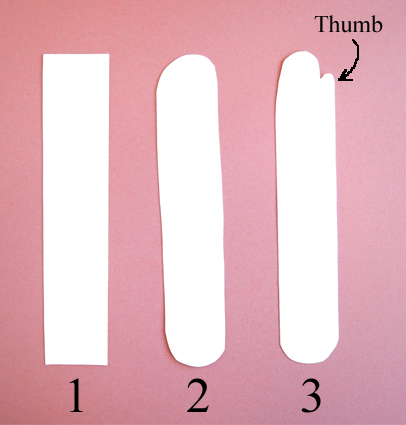
 Now for the arms. Round the rectangles of poster board at both ends. If you’d like, you can use scissors to shape a little thumb as well.
 For the prince’s arms, wrap most of the arm with blue plastic cellophane lace (or blue construction paper) to create jacket sleeves, and then hot glue (or tape) to the box.
 For the ballerina, simply hot glue (or tape) the unadorned arms to the sides of the box. Curl or fold them into whatever position you like.
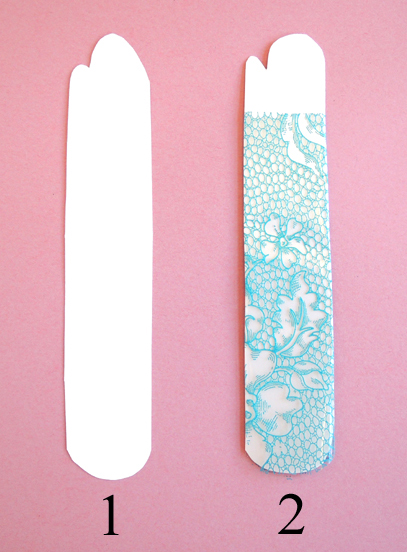
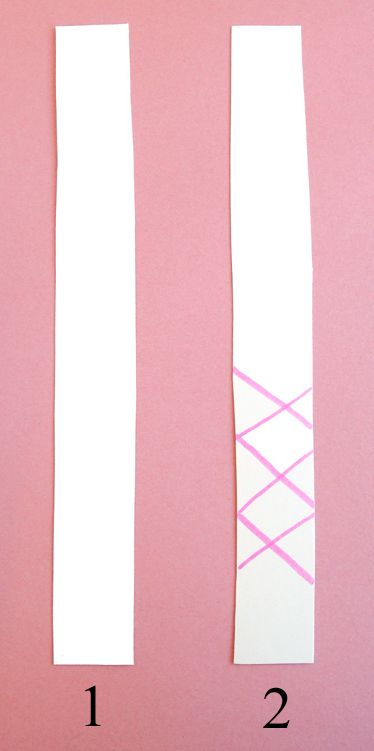
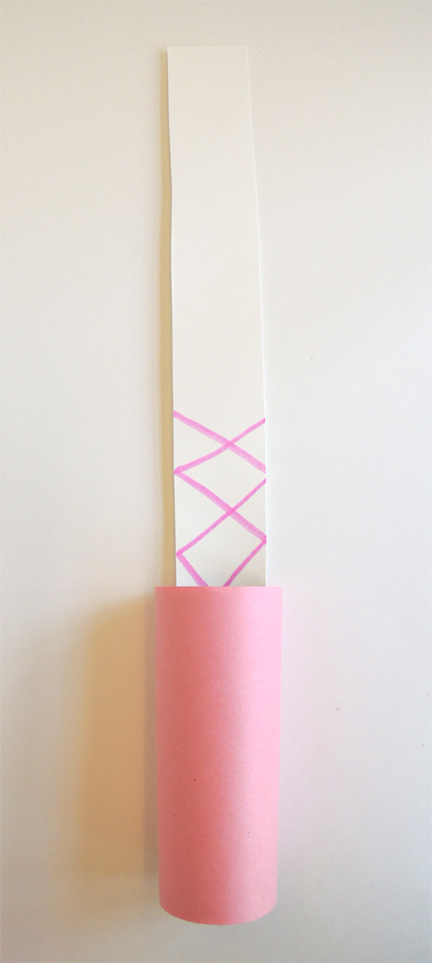
To make the legs, wrap 2 toilet paper tubes with construction paper (pink for ballerina, black for prince). These will become your puppet’s dancing shoes. If you’re making a ballerina, draw some toe shoe ribbon on the white poster board legs strips (I started drawing mine about 0.5″ from the bottom of the strip).
 Hot glue (or staple, or tape) the poster board legs to the inside of the toilet paper tubes. I had about 9″ of poster board leg extending above the top of the tube shoe.
 If you’re making a prince, skip the ribbon and hot glue (or staple, or tape) the poster board legs to the inside of the tubes.
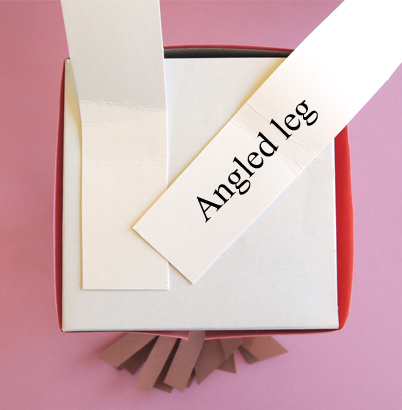
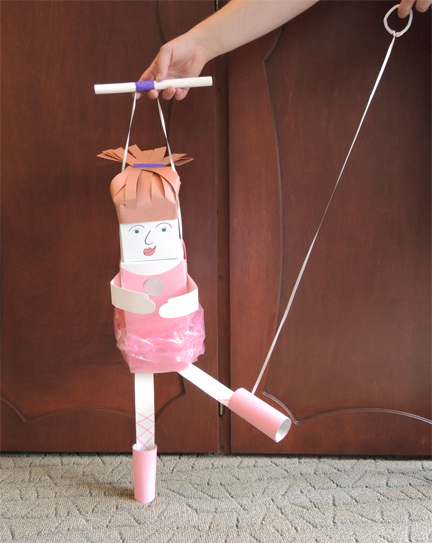
To attach your dancer’s legs, tab the top of the poster board strip and hot glue to them bottom of the box. You can see my leg placement in the image below (you can see the ballerina’s ponytail at the very bottom of the image). Make sure that one leg is attached at an angle. This is the leg that raise and lower later on a puppet string.
 Now for some finishing touches! If you’re making a ballerina, wrap and tape a long piece of pink cellophane lace around the bottom of the box to make a tutu (I had a spare roll of it left over from this princess dress program). My piece of cellophane lace was approximately 8″ x 39.5″. You can also make a tutu with tissue paper. We tested a 20″ x 26″ piece of tissue paper. We folded it in half (until it was 10″ high) and then wrapped it around the box. It looked great!
Stick a small foil seal to the front of the ballerina’s leotard for decoration (or decorate the leotard with markers). For the prince, use color masking tape to make a belt around the jacket, and stick a small foil seal on the front as a belt buckle. If you have any extra blue cellophane lace (or even a Kleenex), make an ascot!
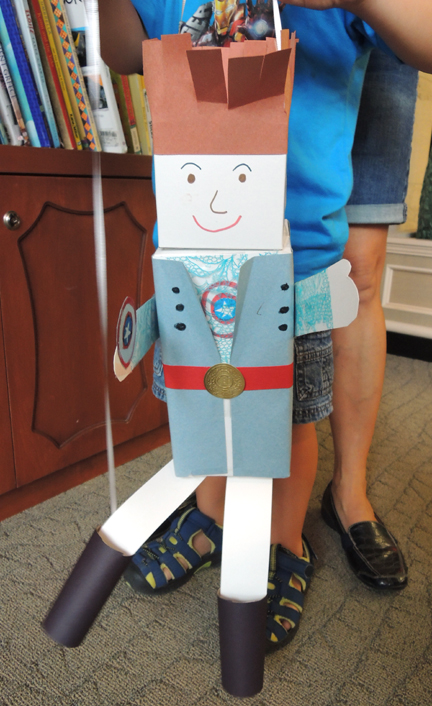
 I have to share this fantastic prince puppet. This is a “Captain America dancer.” Love the shield, but I especially love the buttons down the front of the jacket! Why didn’t I think of buttons? They look awesome!
 To attach the puppet to its stick, hold the curling ribbon loop up to the bottom of a piece of PVC pipe and secure it with masking tape.
If you’d like your puppet to raise and lower a leg, follow these steps. First, twist 1/2 of a pipe cleaner into a loop, then knot a 36″ piece of curling ribbon onto it. Slide the pipe cleaner loop onto the PVC stick and tape the unattached end of the ribbon to the heel of your dancer’s shoe. Remember to attach the ribbon on the angled leg! When you’re ready to operate your puppet, slide the loop off the stick and move the leg up and down.
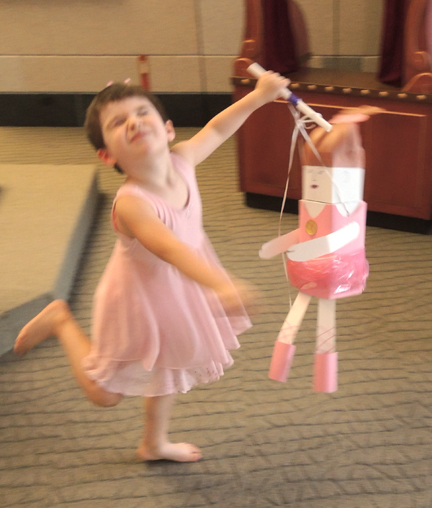
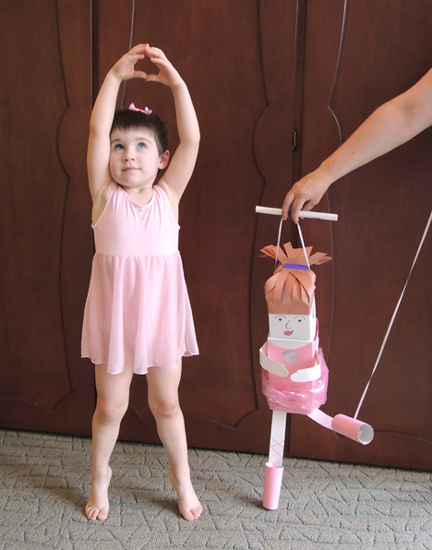
 At the end of story time, I played some music from the Nutcracker, and kids danced a pas de deux with their puppets. There was plenty of creative and enthusiastic twirling, whirling, and leaping going on, lemme tell you!