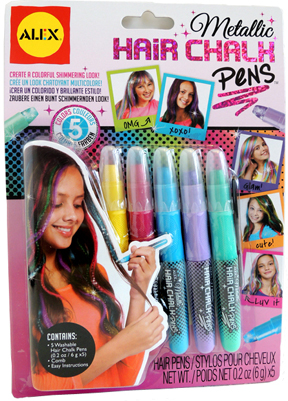
Our kid tester Hope is back once again! In this exciting installment, she’ll be reviewing and comparing two types of hair chalk: Alex metallic hair chalk pens (for ages 8+, a five color package retails for approximately $10 ) and Kiss Naturals hair chalk (for ages 6+, a two color box retails for approximately $13). Take it away Hope!
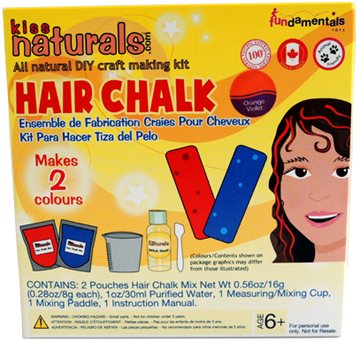
Hi everyone! The Kiss Naturals hair chalk is described on the box as an “All natural DIY craft making kit.” I would have to agree with this statement! You mix together the ingredients and let it set inside molds to make a chalky material. The Alex version took a different twist – glittery chalky “pens” (the pens were really just chalk holders). Definitely less DIY than the Kiss Naturals. Just pop off the little plastic covering.
The box for the Kiss Naturals chalk was a little misleading. The front of the box showed two sticks of chalk in a bold red and blue. However, the package had a small sticker that said the box contained supplies for orange and purple chalk, and the actual molds for the hair chalk were heart shaped, not rectangular.
 The Alex chalk pens were in a clear package, so you could see each product. This clear packaging is helpful, especially on a cosmetic product [Dr. Dana notes: the larger boxes of Kiss Naturals hair chalk, which contain 6 colors, do have a clear window on the front that displays the contents].
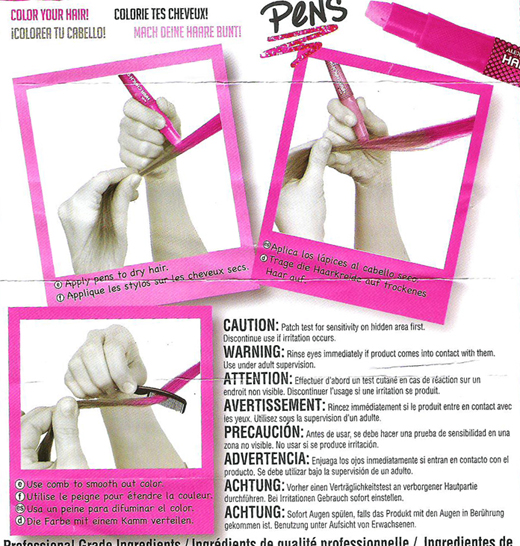
 The Alex pens had some directions inside the package, and the directions only had two steps in English! There were three total pictures with directional captions. Each one had a foreign language caption, but only two had English captions. Two of the pictures were almost (but not quite!) identical, but only one of those pictures had an English caption! Talk about confusing!
 The Alex pens also included a tiny comb to use in your hair. The comb was so small, it seemed more suitable to use on an American Girl Mini Doll’s hair than human hair, but as we didn’t want to ruin a hairbrush, we decided to try our luck with the tiny comb.
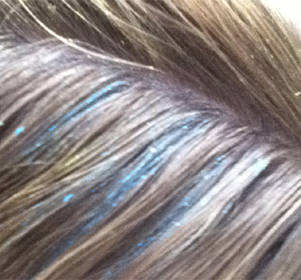
The instructions said to separate a section of hair and rub the chalk on it. As my helper assistant, Em, held out a section of my hair and ground some yellow Alex hair chalk into it, I tried not to yelp! The hair chalk, despite Em’s heroic effort, barely left a trace of color, and to make matters worse, it smelled like vinegar! We tried several different colors of the Alex pens, but they ALL smelled like vinegar! The only solution was to keep it away from my face while grinding it in my hair so I couldn’t smell it!
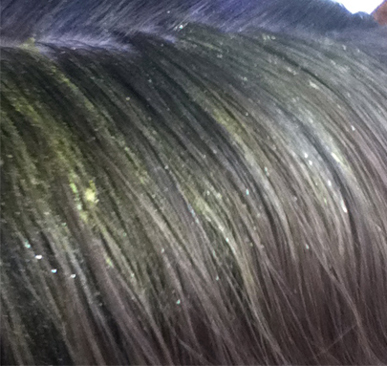
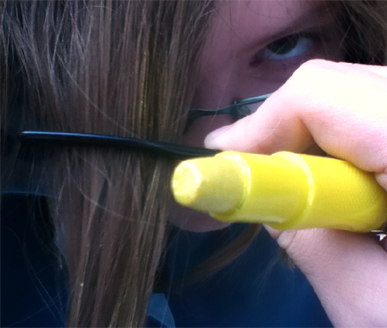 Em then ran the little comb through my hair. It got caught in the slightest knots in my hair. SUPER UNCOMBFORTABLE!!! In the end, the Alex pens left an okay amount of color, but it most noticeably left what looked like colorful dandruff in my hair!
 The Kiss Naturals chalk was not much improved. As I mentioned above, it’s a DIY project. When you open the package, it comes with two little baggies of pigment, a tiny spoon, a little measuring cup/beaker, a bottle of purified water and what appear to be rubber ice cube molds (those are the hair chalk molds).
Okay everybody! It’s time for the most interesting part of the review: the witch hazel CONFUSION!
The front of the Kiss Naturals box has a cartoon picture of the items in the box. Nice feature! I noticed that the little bottle on the front of the box was labeled “Witch Hazel.” I got excited! I’d read about witch hazel in books, and was interested to see how it would work in a cosmetic product. Interestingly enough, however, the little bottle inside the box was labeled “Purified Water,” and the directions also said to use water. Why did the directions say water, and the box say witch hazel?
 After opening the bottle and smelling it, the Pop Goes the Page team determined that it was not witch hazel. Why wasn’t it? Was there a typo on the box? Or did the company send the wrong bottle and directions? Definitely something a consumer should know!
In the end it didn’t matter, because as Em and I whipped up the lavender chalk, I completely missed the bottle of water and used tap water. By the time I saw the bottle of purified water in the bottom of the package it was too late! After mixing the pigment with the (tap) water, we poured it in the mold. Taking a glance at the directions, we realized that the chalk had to sit for FOUR hours!! FOUR!! Two hours in the mold, and two out of the mold. After two hours inside the mold it was completely hardened, and we decided to use it. Whether or not it set quickly because of the tap water I am not completely sure.
 However, much the same events followed with the Kiss Naturals chalk as with the Alex pens. Em ground the chalk into my scalp. OW!!!!! After going through this cosmetic torture, Dr. Dana pointed out that Kiss Naturals suggests applying the chalk to wet hair (Dr. Dana also noticed that the Alex pens definitely say dry hair). I don’t know if this would have made a difference but, in the end, despite Em’s efforts, the chalk left my hair a pale white-lavender color. NOT PLEASANT! Especially not after Em had ground it into my hair! I wonder if the chalk would have been more easily applied to wet hair?
Then it was the moment of truth: The washing of the hair!
That night, I turned on the warm water and started scrubbing my hair. And scrubbing. And…well you get the picture. The Alex product definitely took more scrubbing to get out. Without a doubt! That’s when Kiss Naturals came through for me. Their product washed out easily, without any trouble at all!
Now it’s time for the SCORES!
All in all, the Alex pens score was…
Comfort : 3/10
Style/Color: 5/10
Smell: 1/10
Pros: Colorful. I loved how there were more color choices!
Cons: TERRIBLE smell, not easily applied, took a bit of scrubbing to get out of my hair.
All in all, the Kiss Naturals chalk score was…
Comfort: 3/10
Style/Color: 4/10
Smell: 10/10 (no odor)
Pros: NO SMELL!!!!!!!! DIY project. I really enjoyed being able to mix up a purple concoction! It was like being in Macbeth, but no gory stuff! WASHED OUT QUICKLY AND PAINLESSLY!
Cons: Not easily applied, faded color
So as far as style goes, the Alex pens took the cake. But it was a very stale cake. Neither of the two hair chalks tested are hair chalks I would recommend, because of the discomfort they caused. It didn’t help that the Alex pens had pictures of supermodel-gorgeous kids on the front! Talk about saying you’ll get glam hair, and getting glitter dandruff!
 So out of the two hair chalk products tested, neither was a completely satisfactory product! If I had to pick one of these products to recommend, I would actually recommend the Kiss Naturals chalk over the Alex pens, only because the Kiss Naturals chalk was dry and odorless, whereas the Alex pens left me with a soggy, sore, dandruffy-appearing head.
Though a little uncomfortable, this hair chalk might be a fun rainy day project for someone, even if hair chalk isn’t really my thing. Just look out…you may see me whistling this song down the road someday…
“I’m gonna wash that chalk right outta my hair, I’m gonna wash that chalk right outta my hair, and send it on its way!”
Many thanks to Hope for providing photos, and to Em for her invaluable assistance!