
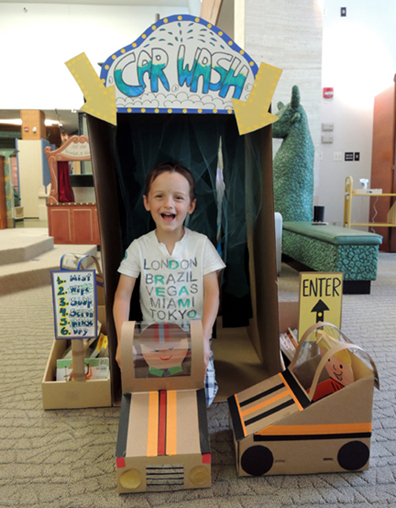
 Drive your customized vehicle through our super-duper story time car wash! You will be misted, wiped, soaped, scrubbed, rinsed, and dried. We had some totally awesome tunes playing too…check out the video at the end of this post!
We read The Scrubbly Bubbly Car Wash, written by Irene O’Garden and illustrated by Cynthia Jabar (HarperCollins, 2003). The family car is dirty – it’s time to get it clean at the scrubbly-bubbly car wash! Fun illustrations and fantastic rhymes make this a great read-aloud. Here’s my favorite rhyme: “Steamy spray beyond the brushes / Rinse us down in luscious rushes.” YES!
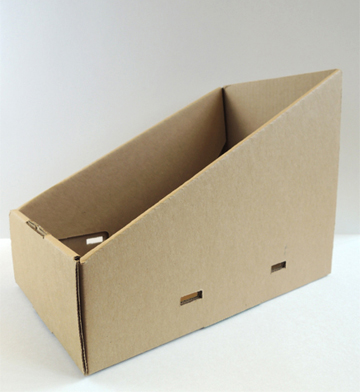
I used extra-wide magazine file boxes for my cars. But you can make a car out of anything really. Slap a couple of poster board wheels on a tissue box. Roll out your favorite toy car. Or pretend you’re a car and drive yourself through! The supplies and directions below are for a basic car, driver, and a bubble windshield.
You’ll need:
- 1 box
- 4 black poster board wheels
- A section of color masking tape
- White poster board
- Construction paper
- A rectangle of tagboard or poster board
- A rectangle of archival mylar (or transparency paper or clear cellophane)
- 1 car wash (more on this later!)
- Scissors and tape for construction
- Markers for decorating
- Hot glue
The boxes I used were left over from a major Rare Books vault move. I grabbed a couple dozen and transformed them into cars!
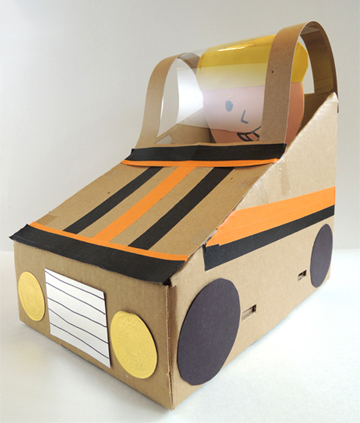 As you can see in the above image, I attached 4 black poster board wheels, taped a tagboard “hood,” across the front, and added a bubble windshield (more on the windshield in a moment). I used 2 large embossed foil seals for headlights, and a piece of mirror board for the front grill. Katie used color masking tape to add some awesome orange and black racing stripes. There were red sticker taillights on the back, and a mirror board bumper as well.
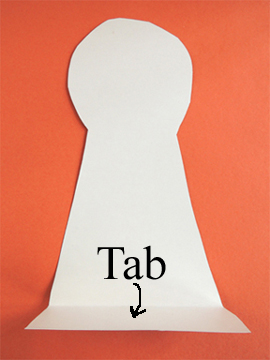
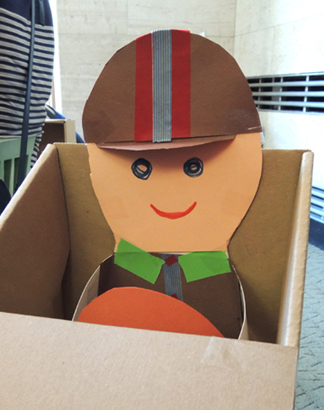
To make the car’s driver, cut an upper body outline out of white poster board. You can see the shape I used below. It’s tabbed at the bottom, so you can attach the driver to the floor of the car later.
 Decorate your driver using markers and/or construction paper (I love using multicultural construction paper). Two strips of white poster board were added for arms, and the “hands” gripped a construction paper steering wheel. Hot glue (or tape) the driver’s tab to the floor of the car.
 To make a bubble windshield, cut a frame out of tag board. There’s a simple trick for cutting frames out of heavy paper like tagboard or card stock (I learned it from a 2nd grade teacher). Soft-fold the paper in half, then cut a rectangle out of it.
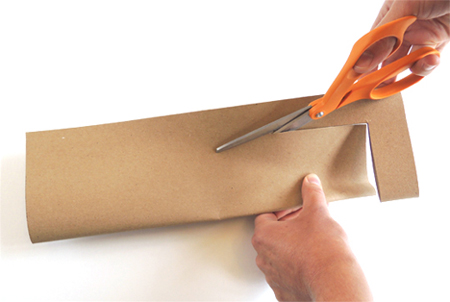 When you unfold the paper, you have a frame! This is much better than the jab-a-pair-of-scissors-through-it-and-pray-you-don’t-stab-yourself method I used to employ.
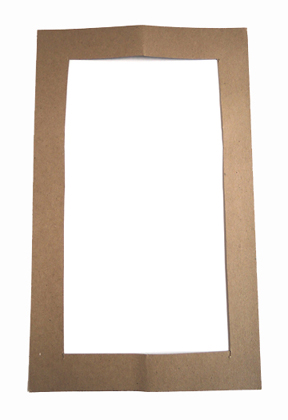 Tape a piece of clear plastic inside the frame. I used mylar, but you can also use transparency film from an overhead projector (OfficeMax sells it) or clear cellophane. Next, use tape to attach the frame to the car. As you can see in the image below, I attached the bottom of the frame to the hood. The top of the frame curved over the driver’s head and attached to the back of the car.
We had a grand time decorating our cars and drivers. Just look at this fellow’s handsome driving cap! The stripes! The tape buttons down the front of the jacket! The green collar!
 Finally, it was time to bust out our story time CAR WASH!
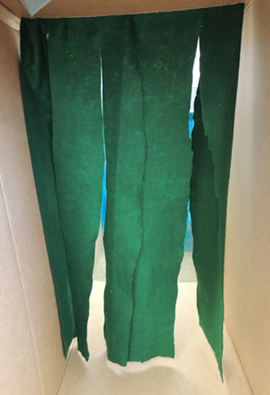
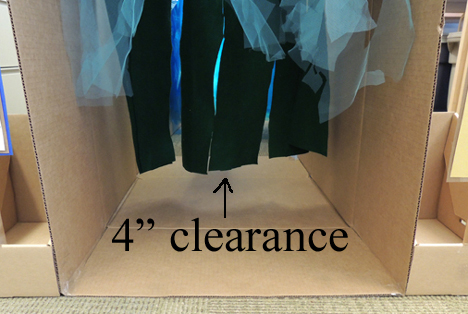
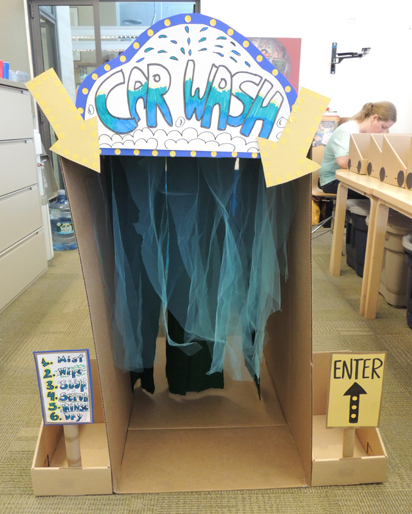 There were 6 different “stages” of the car wash. First came “Mist,” which consisted of strands of blue tulle hanging from the ceiling of the car was (you can see them in the above photo). Next came “Wipe.” These were big pieces of green felt dangling from the ceiling:
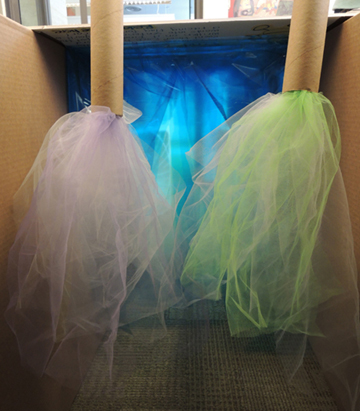
 After the wipers came the “Soap” nozzles, which were 2 wrapping paper tubes with purple, green, and white tulle dangling from them.
 Soap was followed by “Scrub.” The scrub brush heads were 2 tag board rectangles wrapped with pink felt. I stuffed them with polyester fill to make them cushy, and used masking tape to attach the heads to 2 long pieces of PVC pipe.
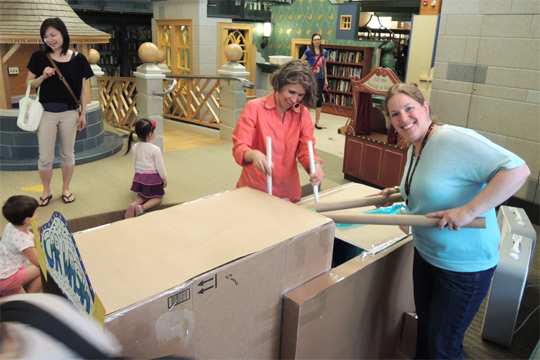
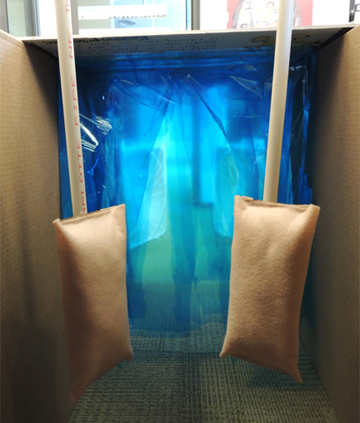 It should be noted that the Soap and Scrub portions of the car wash were operated by Katie and myself. As you can see in the below photo, that section of the car wash didn’t have a roof over it. That allowed us to reach in and soap and scrub the kids as they drove through.
 After being scrubbed, cars went through a final “Rinse” (i.e. multiple strips of blue cellophane dangling from the ceiling) and emerged to “Dry” (2 box fans blowing on them). I recommend placing the box fans off to the side of the car wash, so little drivers don’t ram into them and knock them over.
If box fans make you nervous, have a story time helper stand with a big piece of poster board and fan the kids as they emerge from the wash. Also, make sure that all the car wash items dangling from the ceiling are at least 4″ off the ground. Otherwise, kids might get tangled in them and inadvertently yank them from the ceiling!
 We used 4 big boxes and lots of packing tape and hot glue to make the car wash. But you can also do a simplified version using 1 box, or the underside of a table. If you don’t want to go big, make a tabletop car wash for Matchbox cars.
As you can imagine, the car wash was a massive hit! We stayed open for business a good 30 minutes past story time, letting the kids drive through again and again. And, of course, we put “Car Wash” by Rose Royce on repeat play. Roll video!
Postscript: Irene O’Garden sent us a signed copy of her book! She has, quite possibly, the most beautiful handwriting I’ve ever seen. My fingers aspire to create such exquisite lettering. Thank you Irene!
