Just posted! A BiblioFiles interview with graphic novelist Victoria Ying, creator of City of Secrets and its sequel, City of Illusion.
In City of Secrets we meet two children, Ever Barnes and Hannah Morgan. Ever is an orphan, hiding in a massive, intricate jigsaw puzzle of a complex known as the Switchboard Operating Facility. He is befriended by Hannah, the daughter of the wealthy businessman who owns the facility. Soon, the two children discover the facility houses a secret that people are willing to kill for. With war escalating between the cities of Oskars and Edmonda, the race to uncover the secret becomes all the more urgent. And dangerous.
In City of Illusion, Ever and Hannah travel to a third city, Alexios, which specializes in illusions and magic. Unfortunately, villains are still on their trail, attempting to unlock the mystery that ties all three cities together. The stakes are huge, and the winner can gain enough power to conquer and control everything and everyone.
Ying’s graphic novels are incredibly stylish, with sweeping action and interesting visuals. Part espionage and part science fiction, her characters enliven the page, creating an experience that feels like you are turning the pages on a fast-paced film. Imaginative and intriguing, they absolutely deliver on adventure and heart.
In addition to her two full-length graphic novels, Ying has produced short stories, illustrated numerous picture books, and has been a developmental artist for Disney Studios and Sony, working on major films such as Frozen, Tangled, Big Hero 6, Moana, and Wreck-It Ralph.
Since childhood, there have been a few craft projects that have proved elusive to fabrication…umbrellas that stay open, a conveyer belt that moves, and life-sized fake cotton candy that still looks yummy. The cotton candy is ESPECIALLY difficult. Tulle fabric looks weird, and cotton balls just clump! They. Just. Clump.
Cameras used to be one of those elusive craft projects, but I’m happy to report that we’ve managed to create several fun versions complete with lenses, shutter clicks, and Polaroids! So today, in honor of National Camera Day, we will be sharing our favorite camera projects. Starting with the one pictured above. A handheld camera with color changing lenses!
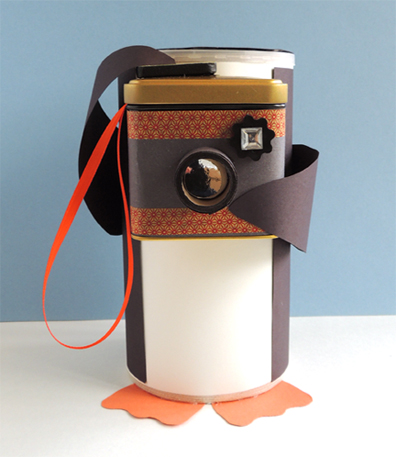
Shutter clicks go hand in hand with camera, be they physical or digital. I never was able to quite nail the sound until I stumbled upon these bug clickers. They really add dimension to this snazzy tea tin camera, modeled here by a penguin…
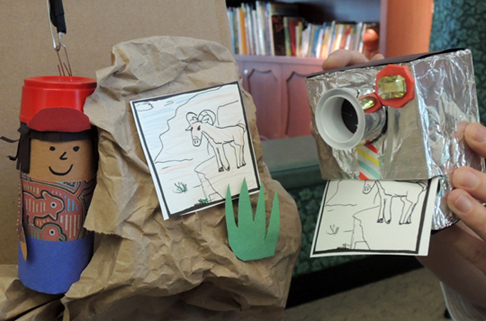
Polaroid cameras were a thing of my youth, and attempts to recreate them were met with various degrees of success. I felt I reached my zenith, however, with this OCuSOFT box turned Polaroid camera. We also turned the photos into a nifty little story time matching game!
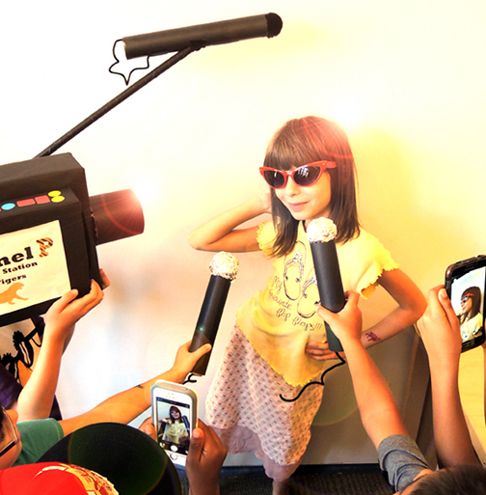
Finally, go BIG with an entire film crew, complete with handheld mic, camera, and a boom mic! We’veve used this set up a number of times (from science interviews to cooking shows), and it’s always fab-u-lous!
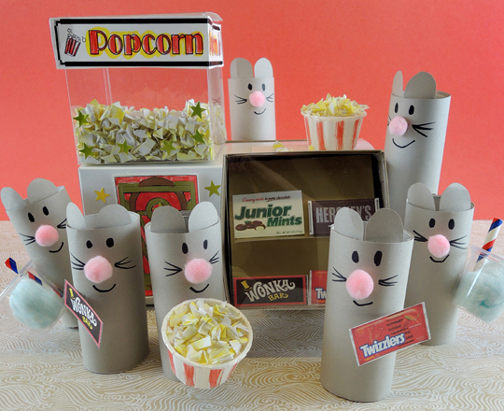
Enjoy a fabulous film with your furry friends! First, stop by our mouse-sized concession stand for popcorn, candy, and drinks. Then head to the “story time theater” for a special screening of a Mickey Mouse animation short!
We read Martha the Movie Mouse by Arnold Lobel (Harper & Row, 1966). Martha is a mouse with no home. One night, however, she wanders into a movie theater. The beautiful chandelier, the candy counter, the soft-drink machine – it’s a wonderland! Martha soon meets Dan, the projectionist, and they become friends. But one day, entranced by a musical number, Martha dances her way on stage and there’s a huge fuss. Once again, Martha is out in the cold. But when the projector slips a gear the audience is demanding a diversion or their money back, Martha comes to the rescue. She takes the stage and sings and dances her heart out. Wow! Overnight, Martha the Movie Mouse becomes a star! Martha is happy with her new life, but most of all, she loves quiet evenings watching movies with her good friend, Dan.
You’ll need:
1 large box (ours was 4.5” X 4.5” x 9” – a large tissue box works too)
1 small box (ours was 2” x 4” x 4” – a small tissue box works too)
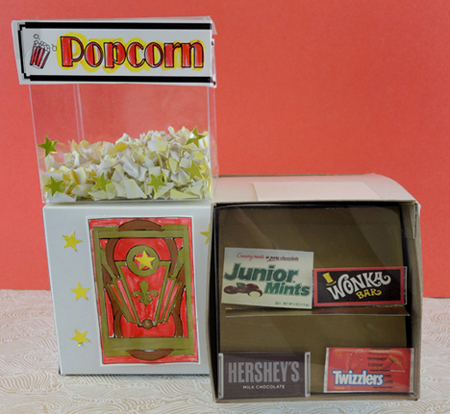
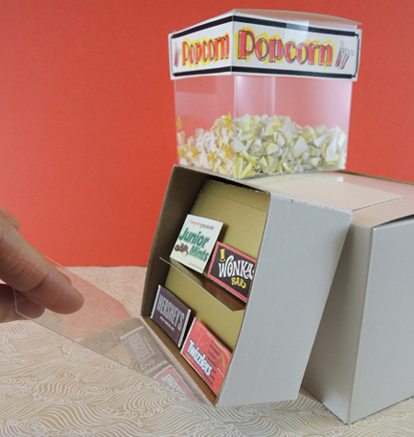
First the concession stand, starting with that awesome popcorn machine! Our popcorn machine is a 4″ x 4″ x 4″ plastic favor box from Oriental Trading Company (item #13705345, 24 boxes for $9.50). Cut the clear lid off the top of the favor box and set it aside. Later, the this lid will be the “glass” front of the candy display case. You can leave the top of the popcorn machine open, or use a piece of poster board to create a new lid.
Cut and color the popcorn sign from the template and tape it to the top of the favor box. Then hot glue the popcorn machine to the top of a large box. To make the popcorn, scribble on 1-2 pieces of white printer paper with yellow marker. Cut the paper into tiny squares and crinkle them tightly. Serve your popcorn in 2 small paper sample cups. Use a marker or crayon to draw red stripes on the cup if you’d like!
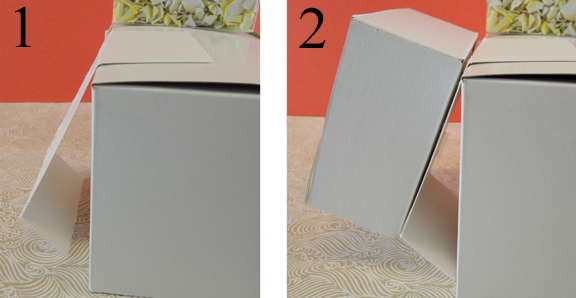
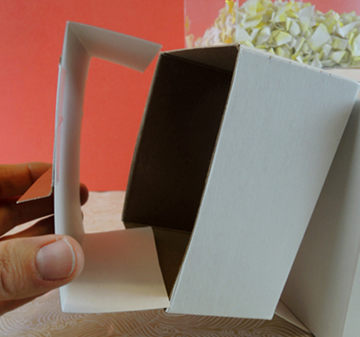
Next up…the candy display case! As you can see in the photo below, both the display box, and the shelf inside it, are tilted backwards. You can also see how the cardboard lid of the box has been replaced with the clear plastic favor box lid. We hinged our lid at the bottom of the display case, but some kids opted for a top hinge.
To make the display case, tri-fold a piece of poster board and: 1) Hot glue (or tape) the top fold to the top of the box; then 2) Hot glue (or tape) the display box to the middle fold. As you can see below, the lower fold tilts the display case backwards very nicely.
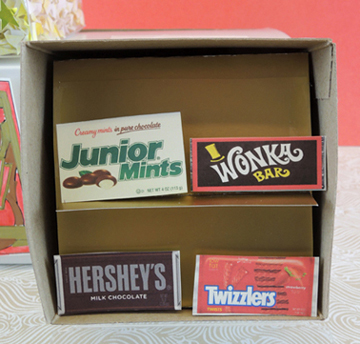
The shelves inside the display box are very similar. Tri-fold a piece of poster board, then tuck it into the box.
We wanted 2 shelves of candy, so we taped a folded snippet of poster board in the center of shelves. Then we stocked the shelves with candy labels printed on white card stock (thank you, Google image search!).
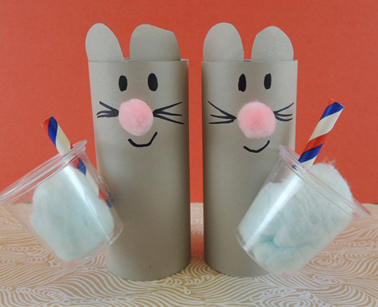
Finally, beverages. Stick some cotton balls in plastic 1oz. cups, add a couple snippets of drinking straw and you’re done! In the below photo, you can also see how we constructed our toilet paper tube mice. Each kids made 2 mice to go with the 2 drinks and 2 popcorn buckets at the concession stand.
For a little extra flash, cut and color the art deco panel from the template and add a couple foil star stickers to the stand.
When the concession stands were complete, mice lined up for goodies and then headed to the movie theater to watch the film. Our “movie screen” was Katie holding up a Microsoft tablet (we didn’t want to prop it up and risk having it take a tumble).
What was playing that day? A mouse movie of course! It was Mickey’s Garden, a charming 9 minute Disney cartoon from 1935.

 Just posted! A BiblioFiles interview with graphic novelist Victoria Ying, creator of City of Secrets and its sequel, City of Illusion.
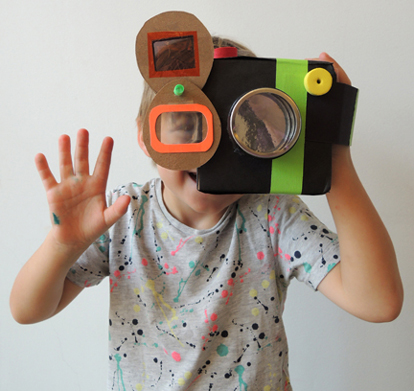

 First the concession stand, starting with that awesome popcorn machine! Our popcorn machine is a 4″ x 4″ x 4″ plastic favor box from Oriental Trading Company (item #13705345, 24 boxes for $9.50). Cut the clear lid off the top of the favor box and set it aside. Later, the this lid will be the “glass” front of the candy display case. You can leave the top of the popcorn machine open, or use a piece of poster board to create a new lid.
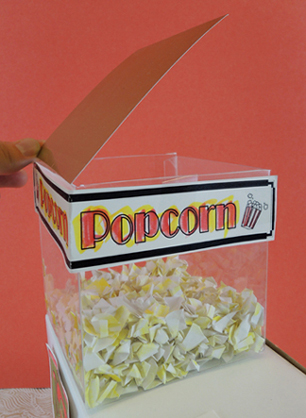 Cut and color the popcorn sign from the template and tape it to the top of the favor box. Then hot glue the popcorn machine to the top of a large box. To make the popcorn, scribble on 1-2 pieces of white printer paper with yellow marker. Cut the paper into tiny squares and crinkle them tightly. Serve your popcorn in 2 small paper sample cups. Use a marker or crayon to draw red stripes on the cup if you’d like!
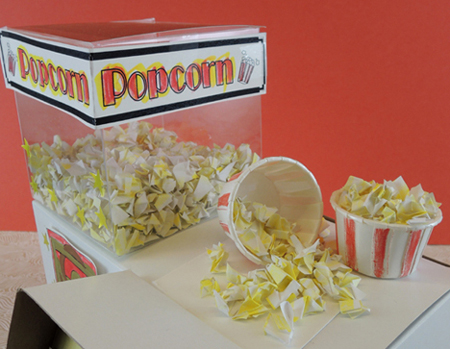
 What was playing that day? A mouse movie of course! It was