Bird, House, Hat

bird house hat
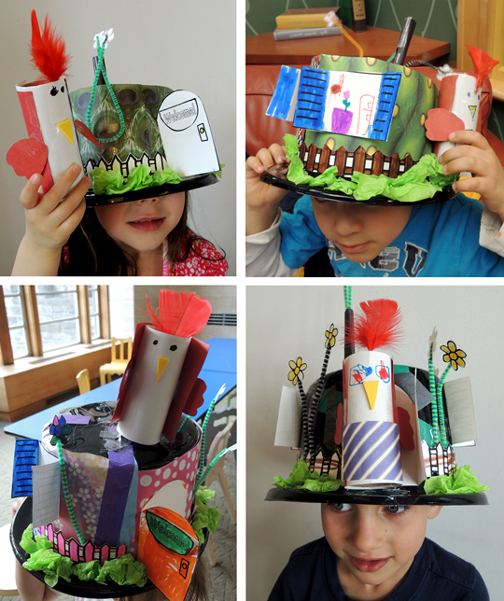
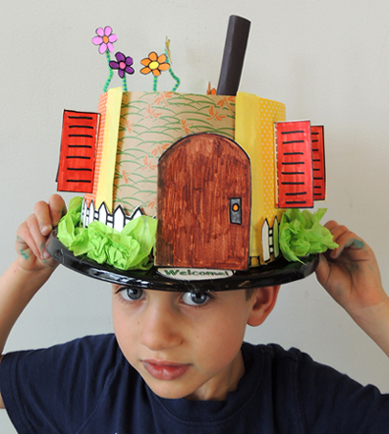
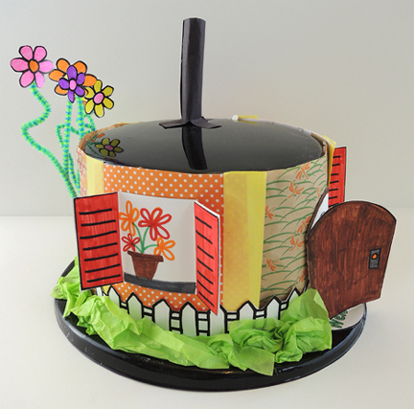
Every bird needs a home, and this deluxe house has everything one needs – doors, windows, a chimney, flowers, and a white picket fence. Best of all, it’s a HAT!

We read Brimsby’s Hats by Andrew Prahin (Simon & Schuster, 2014). Brimsby the hatmaker lives in a quiet cottage. His life is full of making hats and chatting with his best friend over tea. But one morning, his friend announces that he’s off to pursue adventures on the high seas, and Brimsby becomes very lonely. Trudging through the snow on a solitary walk, he finds some birds who might make good friends. Unfortunately, they’re too busy shoveling snow out of their nests to chat. That gives Brimsby a tremendous idea. He eagerly sets to work, making hat houses for all the birds. Once the hat houses are in place, there’s no more snow shoveling, no more freezing nights, and the birds are free to visit their new friend!

You’ll need:

This is an incredibly easy project that only involves a few steps:

  1. Circle the crown of the hat with construction paper and/or patterned paper
  2. Create a hatband using the white picket fences from the template
  3. Cut, color, and attach the windows, door, and welcome mat from the template
  4. Add tissue paper shrubs (hot glue is best when attaching these to the hat)
  5. Attach flowers from the template to pipe cleaner stems, then tape them to the hat

If you’d like a chimney, roll a piece of construction paper into a 4″ tube, cut three, 1″ tabs in the bottom, spread the tabs, and attach them to the top of hat using tape or hot glue.

finished house hat
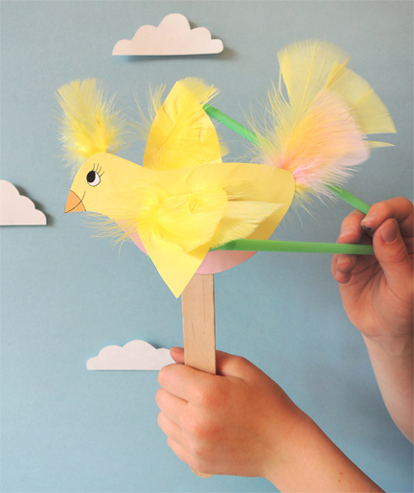
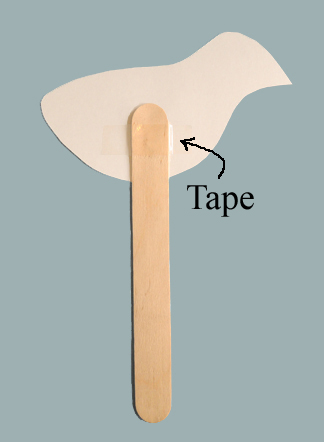
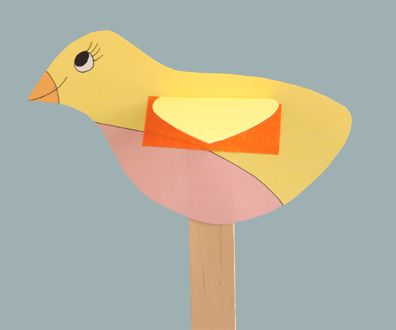
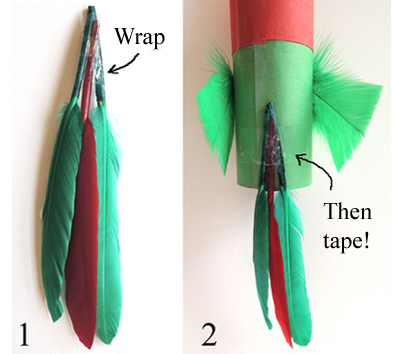
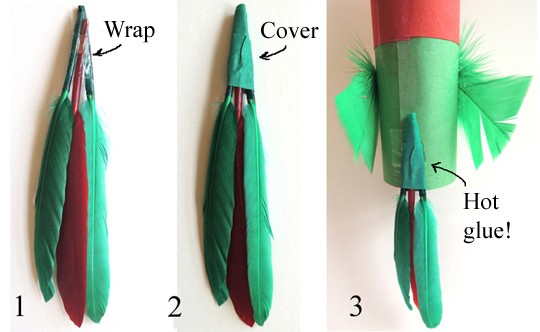
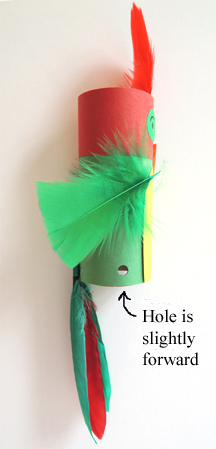
Now for the bird! Wrap a toilet paper tube in white construction paper. Then, wrap another color of construction paper three-quarters of the way around the bird, thus creating a white tummy. Add wings, eyes, and a beak (our beak was a snippet of self-adhesive foam). Tape a small feather to the top of the tube.

bird for house
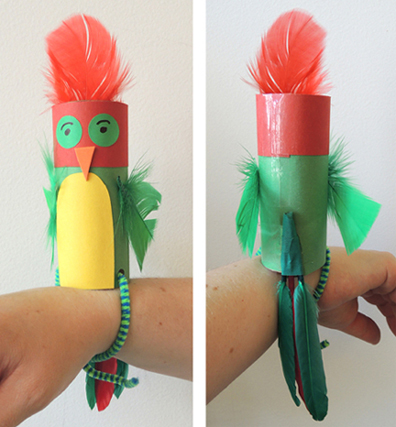
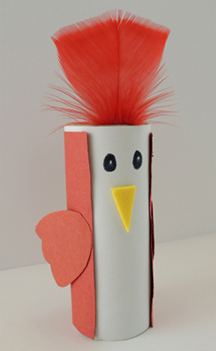
Introduce the bird to its new home (if the hats are a little big, stuff them with tissue paper)!

bird meets house

Spring Chicken

spring chickenNo spring chicken? We got your spring chicken! The drinking straw “sticks” on this little bird puppet allow it to flap its wings and soar across the big blue sky! I designed the project for a weekend story time event for 50 kids. It needed to be inexpensive, appealing to ages 2 – 6, constructed without white glue or hot glue, and easy to put together with minimal adult assistance. For the full effect of the bird’s flight, check out the video clip at the end of the post!

You’ll need:

First, cut the bird’s body and wings from the template and color them with markers. Tape a jumbo craft stick to the back of the bird’s body (an 8″ craft stick work best). Make sure to leave approximately 1.5″ of space above the craft stick. Later, you’ll need that space to attach the bird’s wing.

bird on craft stick with typeYou could also wait until the end of the project to tape the craft stick in place, but I found that the early placement of the stick helped kids attach their wings in the right place (i.e. close to the top of the bird’s body instead of the middle).

Next, fold each wing downwards along the dotted line, then attach the wings to the body with long pieces of tape. It’s important that the entire fold of the wing is covered with tape. I used orange masking tape to demonstrate this in the image below, but I used clear tape on the actual project.

taped wingNow stick an additional piece of tape over the bird’s back and wings like a “tape saddle.” Again, I used orange masking tape to demonstrate it below…

tape saddleUse tape to add feathers to the head, tops of the wings, and tail. Finally, tape the short end of a flexible straw to the underside of each wing, close to the wingtips (if the straws are too close to the body, the wings won’t flap properly). Use scissors to trim the ends of the straws so they don’t extend past the wings.

taped drinking straw with typeTo operate your bird, hold the craft stick in one hand, then gather the two drinking straws in your other hand. Holding the straws straight behind the bird, use them to flap the wings of the bird up and down!


Since my audience was primarily preschoolers, I read Birds, written by Kevin Henkes and illustrated by Laura Dronzek (Greenwillow Books, 2009). It’s a lovely book with simple text and plenty of opportunities for audience participation (such as naming the colors of birds, naming the types of birds, and yelling “Surprise!” on one of my favorite pages). The illustrations are colorful, pretty, and, in some places, extremely imaginative and delightful.

Perfect Parakeets

perfect parakeetsThese wrist parakeets are super simple to make, require very few art supplies, and…are amazingly adorable, yes? They’re also tough. Thanks to their sturdy pipe cleaner tethers, these parakeets really stay attached, even on the most active ornithologist. This project can also be modified to be an owl!

You’ll need:

  • 1 toilet paper tube
  • Construction paper
  • dot sticker for eyes
  • 3 small feathers
  • 3 goose quills
  • 1 pipe cleaner
  • Scissors, tape for construction
  • Markers for decorating
  • Hole punch

If you want to get a little fancier, you’ll need:

We’ll make the parakeet’s body first, and then proceed to perching it on your wrist. Here’s what a completed bird body looks like:

parakeet bodyWrap construction paper around the entire toilet paper tube. Then wrap a smaller strip of construction paper around the top – this will become your bird’s head. Yet another piece of construction paper becomes your bird’s colorful chest (it looks best if you round the top of the chest).

Draw eyes and eyebrows on the dot stickers, then stick them on the bird’s head. Tape (or glue) a small triangle of construction paper to the head for a beak. You can also use a triangle of self-adhesive foam for the beak (it gives the beak some really nice texture). Tape (or hot glue) 2 small feathers on the side for wing, and 1 small feather on top for the crest. The body is done!

To make the tail, gather 3 duck quills together, fan them out slightly, and wrap scotch tape around the points of the quills (if you don’t want to purchase duck quills for the tail, just use more small feathers). Tape the tail to the back of the bird.

easy tail stepsIf you want to get a little fancier, you can wrap scotch tape around the points of the quills, then cover the scotch tape with color masking tape and hot glue it to the bird’s body.

fancier tail stepsThe final step is to tether the bird to your wrist! Punch holes in both sides of the toilet paper tube. Don’t punch the holes in the center of the tube. Punch them slightly more toward the front of the bird. The reason is this – with the tail in place, the bird actually sits slightly askew on your wrist. It needs to be tethered slightly towards the front in order to sit correctly on your wrist. When in doubt, just plunk the tube on your wrist and you’ll see where the holes need to go.

punched holeThread a pipe cleaner through the holes, sit the bird on your wrist, and twist the pipe cleaner under your wrist to secure the bird in place! Finito!

finished parakeetI mentioned this in the intro, but this project can also be modified to be an owl. You can go with the version below, or you can see our slightly-more-simplified version here.

owl