
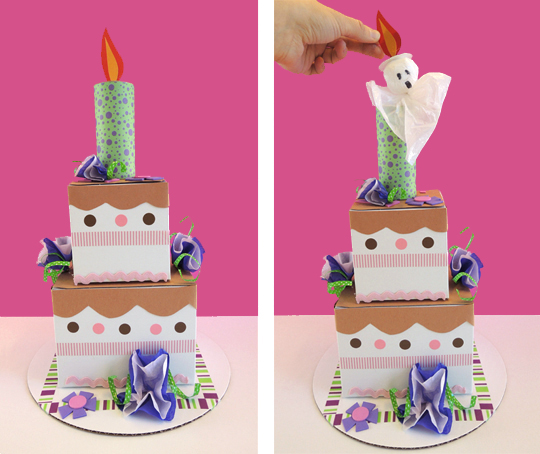
 It’s a scrumptious birthday cake, but be warned…this cake is haunted. Pull the flame on the candle and out pops a ghost!
We read The Bake Shop Ghost, written by Jacqueline Ogburn and illustrated by Marjorie A. Priceman (Houghton Mifflin, 2005). Miss Cora Lee Merriweather’s cakes and pies might be sweet, but her personality is downright dour. After she dies, she haunts her bake shop, chasing off potential successors one by one. But she finally meets her match when Annie Washington moves in. Annie’s determined to not be scared by loud noises, poltergeist activity, or ghostly heads rising up through her baking table. She confronts Cora Lee and they make a wager. If Annie can make a cake that brings tears to Cora Lee’s eye, a cake “like one I might have baked, but that no one ever made for me,” Cora Lee will stop haunting the bake shop.
Annie tries everything. Moon cake, white cake, tiramisu, fruit cake, cheesecake, carrot cake. Nothing works. Finally, after some research at the local library, Annie makes a… birthday cake. The ghost is so touched that Annie remembered her birthday, she sheds a tear and loses the wager. But Annie, knowing a world-class baker when she sees one, invites the ghost to become her business partner. The two bakers make fabulous baked goods together. And every year, they make birthday cakes for one another.
You’ll need:
- 2 small boxes (mine were 4.5″ x 4.5″ x 6″ and 4″ x 4″ x 4″)
- Construction paper (we offered pink, brown, white, and yellow)
- 1 corrugated cardboard base (or paper plate)
- 1 toilet paper tube
- A square of white poster board (approximately 2″ x 2″)
- A box cutter
- A selection of patterned paper
- Cake decorating supplies (more on this below!)
- 3 squares of a white plastic garbage bag (approximately 13″ x 13″)
- 1 piece of white pipe cleaner (approximately 5″ long)
- A black permanent marker
- Scraps of colored mirror board for candle flames (or use construction paper)
- Scissors, tape, and glue stick for construction
- Hot glue
You can use 1 box and create a single layer cake, or you can use 2 boxes and go for a double layer cake. I used white craft boxes, but tissue boxes work too. You might, however, want to cover the tissue boxes with white, brown, or yellow, construction paper before you begin.
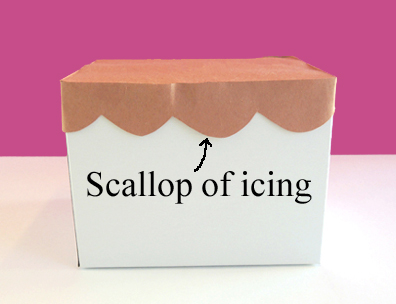
Cover the tops of the boxes with construction paper “icing.” Cut bumps into a strip of construction paper, and wrap the strip around the box to create a scallop of icing along the cake’s edge.
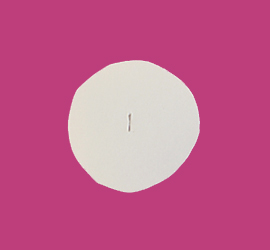
 Next, use a toilet paper tube to trace a circle onto a square of white poster board. Cut the circle from the poster board and use a box cutter to cut a small slit in the circle’s center:
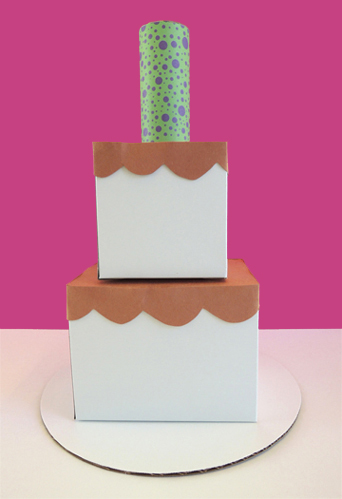
 Set the circle aside for a moment. Wrap the toilet paper tube with patterned paper and hot glue it to the top of the small box. Then hot glue the small box on top of the large box. Finally, hot glue the large box to a corrugated cardboard base. If your box is small enough, you can use a paper plate for the base. If your cake is too big, try flipping the paper plate upside down to gain a tad more room. For our bases, we used 10″ cake circles:
 It’s time to decorate! We used construction paper, patterned tape, tissue paper squares, craft ties, self-adhesive foam shapes, dot stickers, and rickrack ribbon. I take no credit for the masterpiece you see below. This is the work of Miriam Jankiewicz, a rare books staffer who was helping me out that day. I love the tissue flowers with the delicate little craft tie curls!
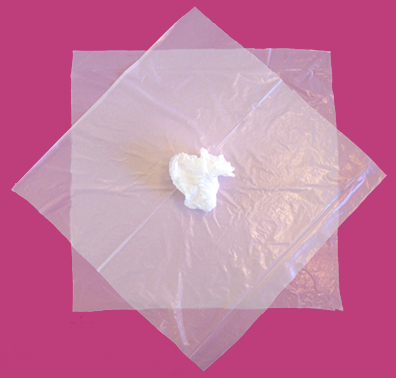
 The cake is complete, now for the ghost! Place 2 squares of white plastic trash bag flat on top of one another. Crumble a third square and place it in the center of the flat squares.
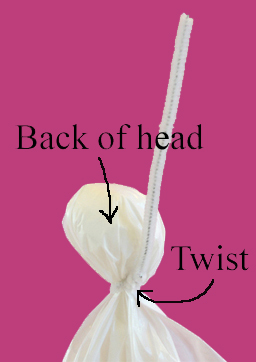
 Bunch the flat squares around the crumble and twist to create the ghost’s head and neck. Wrap one end of a short pipe cleaner around the ghost’s neck and twist tightly. Bend the rest of the pipe cleaner straight up. The twist and the straight part of the pipe cleaner should both be located behind your ghost’s head.
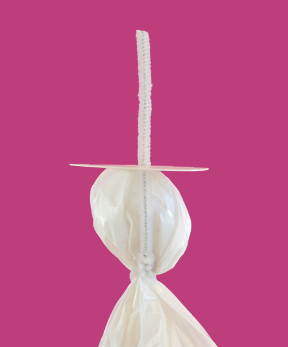
 Thread the free end of the pipe cleaner through the slit in the poster board circle. The circle will rest on top of your ghost’s head like a hat.
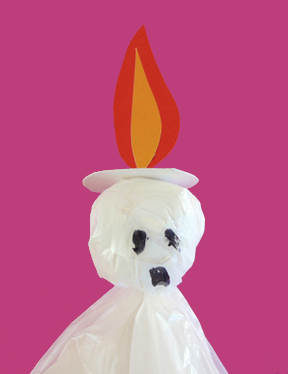
 Use a permanent black marker to draw eyes and a mouth on your ghost. Tape scraps of red and orange mirror board (or construction paper) to the front of the pipe cleaner. These are the flames of your candle. The front of your ghost should now look like this:
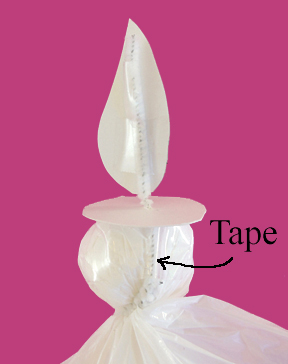
 The final step is to tape the back of the ghost’s head to the pipe cleaner. This will keep it nice and steady when you yank it from the cake.
 To operate your ghost cake, stuff the ghost into the toilet paper tube candle. Wedge the poster board circle into the top of the tube (you might have to trim it a little to get it just right). Present your cake to an unsuspecting individual, then grab the candle flame and pull the ghost out. Shouting “Boo!” is optional, but entirely appropriate.
 Looking for a few more spooky ideas? Take a look at our haunted dollhouse, glowing skeleton marionette, creepy carrots, shadow puppets, bat mini-exhibit, mummy in a pyramid, and Spooky Old Tree. And don’t miss this plump and perfectly simple toilet paper jack-o’-lantern!